Marantz AV9000 AV9000 USER'S MANUAL - Page 16
Osd Main Menu, System Setup - noise
 |
View all Marantz AV9000 manuals
Add to My Manuals
Save this manual to your list of manuals |
Page 16 highlights
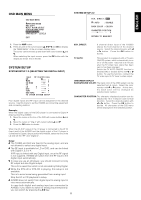
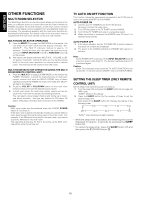
ENGLISH OSD MAIN MENU OSD MAIN MENU SURROUND MODE REC COPY MULTI ROOM SELECT STATION NAME INPUT SYSTEM SETUP SPKR SETUP / LEVELS EXIT SYSTEM SETUP 2/2 6CH. DIRECT : OFF TV AUTO : DISABLE BACK COLOR : COLOR-1 CHARACTER POSITION : 0 RETURN TO MAIN/EXIT 1. Press the AMP button. 2. Press any one of the cursor buttons ( , , , and OK) to display the "MAIN MENU" of the on-screen display menu. The cursor can be moved up and down with cursor buttons and . When selecting the input source, press the OK button with the display as shown the on the left. SYSTEM SETUP SYSTEM SETUP 1/2 (SELECTING THE DIGITAL INPUT) Input RF D i g 1 2 3 4 Ana CD TAPE CD-R/MD TV LD DVD VCR1 DSS/VCR2 TO OTHER SYSTEM SETUP Four digital inputs and RF input can be assigned for the desired source. Use this menu to set the AV9000 as connecting equipment and connecting method. Example; When the digital output of the DVD player is connected to Digital 4 (input jack) of the AV9000; 1. Move the cursor on the line of the DVD with cursor buttons and . 2. Move the cursor on "Dig 4" with cursor buttons and . 3. Press the OK button to decide. When the AC-3 RF output of the LD player is connected to the RF IN (input jack) of the AV9000 and the digital output of the LD player is connected to Digital 2 (input jack) of the AV9000, select the line of the LD and set the "RF" and "Digital 2". 6CH. DIRECT: 6 channel direct input of the AV9000 shares the front channel of the desired source. Select the desired source with or button. Press the OK button to decide. TV AUTO: This product is equipped with a TV-auto ON/OFF system, which automatically turns on or off the power 1 seconds to 5 minutes after the TV video input signal has been sent or has been stopped. Switch the TV AUTO ON/OFF function to enable (ON) or disable (OFF) with or button. To use this function, connect the TV video input to TV tuner's video output. ONSCREEN DISPLAY BACKGROUND COLOR: The back color of the OSD system can be selected from 6 colors. Select the color number with or button. At this time, the back color will be changed as selected color number. CHARACTER POSITION: The character displayed position can be adjusted by +5 or -5 steps in each vertical direction. Select the desired position with or button. Press the OK button to decide. All characters of the OSD menu will be displayed in the selected position. Notes: The TUNER and AUX are fixed to the analog input, and are not allowed to select any digital input. The RF input is available for LD or DVD, and can be linked with Digital 1,2,3 or 4. If RF input is linked with any Digital input, once the RF signal is not supplied, AV9000 will switch from the RF input to the digital input automatically. In case you use an LD player, you should connect not only RF output but also Digital output. This is for a Laser Disc which is not encoded by Dolby Digital. While the DTS-LD or DTS-CD is playing, this setup is not available. This is to avoid noise being generated from analog input. Stop the LD or CD playback to setup. AV9000 does not switch from digital input to analog input or vice versa automatically. In case both digital and analog input are connected to AV9000, if you desire to switch to analog input temporarily, you can switch by pressing the A/D key. 11
-
 1
1 -
2
-
3
-
4
-
5
-
6
-
7
-
8
-
9
-
10
-
 11
11 -
 12
12 -
 13
13 -
 14
14 -
 15
15 -
 16
16 -
 17
17 -
 18
18 -
 19
19 -
 20
20 -
 21
21 -
22
-
23
-
24
-
25
-
26
-
27
-
28
-
29
-
30
-
31
-
32
-
33
-
34
-
35
-
36
-
37
-
38
-
39
-
40
-
41
 |
 |
