Marantz AV9000 AV9000 USER'S MANUAL - Page 28
would not normally be included in a macro sequence, and are
 |
View all Marantz AV9000 manuals
Add to My Manuals
Save this manual to your list of manuals |
Page 28 highlights
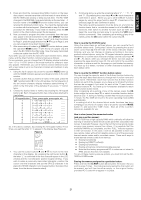
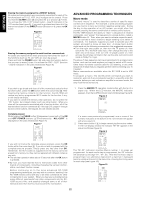
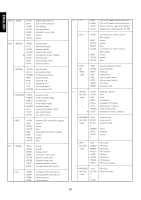
ENGLISH 3. Press the command buttons in the desired sequence. When you press a command button to be learned into the macro sequence, its name will appear within the LCD window. Every time you press another remote command, the macro step number increases one by one. 4. It is possible during macro programming to adjust the timing of the interval between several macro steps. Using the cursor keys ⁄,6 the interval between macro playback steps can be increased or decreased in 1/2 second steps, over the range beginning at 1/2 second up to 10 seconds. For example, when the indicator shows "0.5 SEC", if you press the direction key, the interval time would change to 10 seconds, then with another press of the direction key, it would change to 9.5 seconds, etc. Use the direction key to increase the interval time, and use the direction key to decrease the interval time. Some equipment may not be able to receive infrared commands in one-half second steps. If after programming a macro you find that the sequence was not properly carried out, you may wish to experiment with different sequence timings to obtain the correct operation results by using the adjustment method described above. Within each macro button, up to 20 steps can be memorized. In the event that you wish to memorize more than 20 steps per macro, then press another MACRO button n , and follow the above operations. A maximum of 80 steps can be programmed this way. However, you will probably find that 20 steps is more than enough to carry out even the most complex macro instructions to achieve a specific home theater operating result. Note: To memorize the cursor button ⁄6 except OK button, press and hold the LIGHTING button ¤0 before pressing the cursor button. When programming macro steps, note that the following buttons would not normally be included in a macro sequence, and are therefore not available for inclusion in a macro: MODE z, MACRO x, CLONE c, PAGE ,, VOLUME ⁄,1 MEMO ⁄,3 CLEAR ⁄4 and LIGHTING ¤0. To check to see which MACRO buttons n have been programmed with macros, at the beginning of the macro learning sequence the four numerical (1 through 4) indicators at the bottom of the LCD window will show a box around the number for each MACRO button that already has a macro assigned to it (see Figure 11, which shows that only MACRO button number 1 has a macro assigned to it). Figure 11 LOW LEARN NAME 1234 In the event that you wish to revise a programmed macro sequence, search the step number you wish to change by using the cursor button and ⁄6, and then re-enter the new command. If you memorized different commands than have already been programmed, then the previous macro sequence will be erased and re-written over with the new sequence. To add the new command, press the MEMO button at your desired point. To delete the sequence, press the CLEAR button at your desired point. During macro programming, if a button is not pressed within 1 minute, the mode will automatically revert to the original mode (USE). When you have completed the macro programming sequence, press the MACRO x operation button with the the tip of a paper clip. The "END" indication appears in the LCD display window. When you release the MACRO button, all indications will revert to the initial status. There is one more important point to note about programming a macro sequence. During a macro sequence, you may include more than one function selection button to access some transport and/or other commands. Depending on the macro sequence, this might result in the amplifier or receiver's function selection to be inadvertently changed as well when the macro is played back. The RC-18SR has a special feature to prevent this from occurring, allowing you to access the special commands available under each RC-18SR function button during a macro playback sequence, while at the same time preventing the amplifier or receiver from constantly switching its input source back and forth at the same time. During the programming sequence, just remember that if you wish to activate a specific input selector on your amplifier or receiver, make sure that you press the desired input selection button FIRST. Subsequent function button selections can be incorporated in the macro sequence, but on playback, the RC-18SR will only send out a function selection infrared command to the amplifier or receiver based upon the first function command used in the macro sequence. For example, you may wish to have a macro sequence which activates the laser disc player input on your amplifier or receiver, and then have additional commands in the sequence to instruct your TV set to switch to an external video source to receive the laser disc video signal. During the macro programming, make sure that you press the LD function selector button BEFORE you press any of the other function selector buttons in the sequence. You can then include any of the TV commands by pressing the TV function selector button, later in the sequence. When this macro is next used (played back), the RC-18SR will send out the command to change the amplifier or receiver's input selector to laser disc input (since its function selector button was the first one programmed into that macro sequence), and will not subsequently change the amplifier or receiver's input to TV (but will send out any special TV commands that you included in the macro sequence). Programming a macro under a function selector key: If you wish, you can also program a macro that can be activated by pressing one of the function selector . keys. The programming steps are similar to the steps outlined for programming a macro number button n. The following example shows how to program a macro under the LD (laser disc) function selector .: (activate the main amplifier's power on, switch the source to laser disc, switch the amplifier's surround mode to PRO LOGIC, switch on the television, switch to the television's AUX video input, power up the laser disc player, and begin laser disc playback) 1. Press the MACRO x operation mode button with the tip of a paper clip. 2. Press the LD function button .. 3. Press the following buttons: POWER ON, LD, AMP, direct function D-2 (Dolby mode selector) in page 1, TV*, SOURCE ON, direct function D-3 (VIDEO input selector) in page 1, LD*, SOURCE ON, and PLAY. 4. Press the MACRO x button with the tip of a paper clip. The RC18SR will revert to the normal mode and save the macro under the LD function button. 5. To execute the new macro sequence, press and hold the LD function selector button for 3 seconds. 23
-
 1
1 -
2
-
3
-
4
-
5
-
6
-
7
-
8
-
9
-
10
-
11
-
12
-
13
-
14
-
15
-
16
-
17
-
18
-
19
-
20
-
21
-
22
-
 23
23 -
 24
24 -
 25
25 -
 26
26 -
 27
27 -
 28
28 -
 29
29 -
 30
30 -
 31
31 -
 32
32 -
 33
33 -
34
-
35
-
36
-
37
-
38
-
39
-
40
-
41
 |
 |
