Marantz AV9000 AV9000 USER'S MANUAL - Page 20
Playback Operation
 |
View all Marantz AV9000 manuals
Add to My Manuals
Save this manual to your list of manuals |
Page 20 highlights
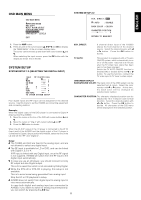
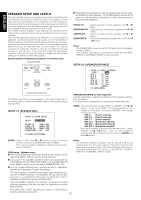
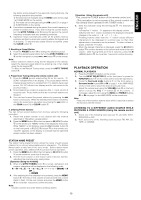
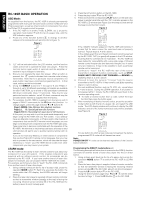
ENGLISH the station will be played for five seconds. During this time, the following operations are possible: 1) The band can be changed using the BAND button D4 on page 1 at TUNER MODE on the remote 2) The mode can be changed using the FM button D1 on page 1 at TUNER MODE on the remote 6. If no button is pressed during this period, the current frequency is preset in location CH-2. If you wish to skip the current station, turn the GYRO TUNING knob !6 during this period, the current frequency is skipped and auto presetting continues. 7. Operation stops automatically when all 50 preset memory positions are filled or when auto scanning attains the highest end of all bands. To stop the auto preset function at anytime, press the CLEAR button !.7 3. Recalling a Preset Station 1. Press the PRESET button !5 to change the display to preset. 2. Select the desired preset station by turning GYRO TUNING knob !6 on the front panel or press or button ⁄5 on the remote. Note; Direct selection method using the ten keypad on the remote, select the desired preset station by entering one or two digits using the ten keypad ⁄2. To return to the Manual Tuning mode, press the AUTO TUNING button !4. 4. Preset Scan Tuning (Using the remote control unit) 1. Press the SCAN (preset scan) button D8 on the remote. "P- SCAN" indicator blinks in the display. (The preset station with the smallest preset number is recalled first. If no stations have been preset, CH "00" blinks in the display and the unit returns to the previous mode.) 2. Preset stations are recalled in sequence (CH-1 › CH-2, etc.) for 5 seconds each. Preset numbers that do not contain stations are skipped. 3. You can fast forward the preset stations by pressing the button continuously. When the desired preset station is received, cancel the preset scan operation by pressing the the SCAN button D8 or CLEAR button !7. button or 5. Clearing Preset Stations You can remove preset stations from memory using the following procedure. 1. Recall the preset number to be cleared with the method described in "Recalling" a preset station . 2. Press the MEMO button !8 on the front panel or M (MEMO) button ⁄3 on the remote unit, "MEMO" blinks in the display for 5 seconds. While "MEMO" is still blinking, press the CL (CLEAR) button o on the front panel or C (CLEAR) button ⁄4 on the remote unit. "CLEAR" appears on the display to indicate that the specified preset number has been cleared. [Operation (Using the remote unit)] First, press the TUNER button on the remote control unit. (This operation is not necessary if the remote control unit has already been operated in the TUNER mode.) 3. Enter the character using the ten keypad ⁄2. For example, to enter "A": 1) Press the "1" button. "A" appears on the display column. 2) Every time the 1 button is pressed, the displayed character changes in the order: A → B → C → 1 → A... Pressing buttons other than the "1" button cause different characters to be displayed in a similar way, so that other alphanumeric characters can be entered. To enter a blank or space, press the "9" button. 4. When the desired character is displayed, press the M (MEMO) button ⁄3 to confirm the entry in this column and move to the next column. After having filled all of the 8 columns, press the M (MEMO) button ⁄3, for more than 1 second to confirm the entry. PLAYBACK OPERATION NORMAL PLAYBACK 1. Press the POWER ON button on the remote. 2. Turn the INPUT SELECTOR !9 on the front panel or press the FUNCTION button . on the remote unit to select an input source. 3. Press the Surround mode buttons u on the front panel or Surround mode buttons D1 to D8 on page 1 in the AMP MODE on the remote unit to select the desired surround mode. 4. Adjust the volume level using the VOLUME knob !3 on the front panel or press the VOL + / - button ⁄1 on the remote. If necessary, adjust the tone using the BASS and TREBLE buttons D1 to D4 on page 3 in the AMP MODE on the remote unit. Note: Press one of the function buttons twice within 2 seconds to select the function with the remote. LISTENING TO A DIFFERENT AUDIO SOURCE WHILE WATCHING A VIDEO SOURCE (Using the remote control unit) 1. Select one of the following video sources TV, LD, DVD, VCR1, DSS/VCR2 or AUX. 2. Next, select one of the following audio sources FM, AM, CD, TAPE, or CDR/MD. STATION NAME PRESET The station name preset function allows the name of each preset channel to be entered using alphanumeric characters. The Station Name button is valid only in the tuner mode. Before station name preset operation, store stations with the preset memory operation. 1. Press the MEMO button !8 on the front panel or M (MEMO) button ⁄3 on the remote for more than 3 seconds. 2. The left most column of the station name indicator flashes, indicating the character entry ready status. [Operation (Using the AV9000)] 3. When the GYRO TUNING knob !6 is turned, alphabetic and numeric characters will be displayed in the following order: A → B → C ...Z → 1 → 2 → 3..... 0 Blank) → A UP → ← DOWN 4. After selecting the first character to be entered, press the MEMO button !8. The entry in this column is fixed and the next column starts to flash. Fill the next column and press the MEMO button !8 for more than 1 second to confirm the entry. Note: Unused columns should be filled by entering blanks. 15
-
 1
1 -
2
-
3
-
4
-
5
-
6
-
7
-
8
-
9
-
10
-
11
-
12
-
13
-
14
-
 15
15 -
 16
16 -
 17
17 -
 18
18 -
 19
19 -
 20
20 -
 21
21 -
 22
22 -
 23
23 -
 24
24 -
 25
25 -
26
-
27
-
28
-
29
-
30
-
31
-
32
-
33
-
34
-
35
-
36
-
37
-
38
-
39
-
40
-
41
 |
 |
