Maytag MDB8959SK Owners Manual - Page 26
Option D: No waste disposer, with air gap, COMPLETE INSTALLATION, Reconnect float switch, Replace
 |
View all Maytag MDB8959SK manuals
Add to My Manuals
Save this manual to your list of manuals |
Page 26 highlights
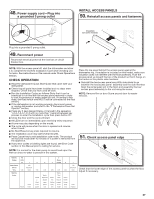
4. Attach drain hose to air gap with large COMPLETE INSTALLATION 4 drain hose clamp (provided). Use pliers to squeeze clamp open and move into position. If the drain hose was cut, use a 46. Reconnect float switch 11/2" to 2" (3.8 cm to 5.0 cm) screw-type clamp (not provided). 5. Use a rubber hose (not provided) with 5 screw-type clamps to connect from air gap to disposer inlet. Option D: No waste disposer - with air gap Screw-type clamps Waste tee Drain trap Air gap Large drain hose clamp Rubber hose connector Drain hose 1 Rubber end 1. Connect rubber end of drain hose to air gap. NOTE: Do not cut ribbed section. Check that the power supply wire or cord does not touch dishwasher motor or the lower part of the dishwasher tub. Reconnect float switch by aligning connector removed in Step 10 with the connector housing and pushing in until the locking tab is visible over the back of the connector. 47. Replace drip tray 2 2. Attach drain hose to air gap with large drain hose clamp (provided). Use pliers to squeeze clamp open and move into position. If the drain hose was cut, use a 11/2" to 2" (3.8 cm to 5.0 cm) screw-type clamp (not provided).. NOTE: Before replacing the dip tray, ensure that there is no water present in the tray. 3 3. Use a rubber hose (not provided) with screw-type clamps (not provided) to connect from waste tee to air gap. To replace drip tray, align with snaps in side members and push in toward unit. It is important that the black hoses are above the drip tray on both ends once it is pushed all of the way in. 26
-
 1
1 -
2
-
3
-
4
-
5
-
6
-
7
-
8
-
9
-
10
-
11
-
12
-
13
-
14
-
15
-
16
-
17
-
18
-
19
-
20
-
 21
21 -
 22
22 -
 23
23 -
 24
24 -
 25
25 -
 26
26 -
 27
27 -
 28
28 -
 29
29 -
 30
30 -
 31
31 -
32
-
33
-
34
-
35
-
36
-
37
-
38
-
39
-
40
-
41
-
42
-
43
-
44
-
45
-
46
-
47
-
48
-
49
-
50
-
51
-
52
-
53
-
54
-
55
-
56
-
57
-
58
-
59
-
60
-
61
-
62
-
63
-
64
-
65
-
66
-
67
-
68
-
69
-
70
-
71
-
72
-
73
-
74
-
75
-
76
-
77
-
78
-
79
-
80
-
81
-
82
-
83
-
84
 |
 |
