Maytag MFI2266AES Service Manual - Page 47
Pullout Freezer Drawer, Door Reinstallation
 |
View all Maytag MFI2266AES manuals
Add to My Manuals
Save this manual to your list of manuals |
Page 47 highlights
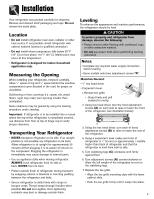
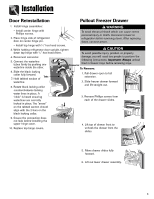
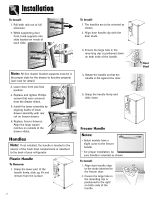
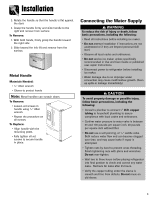
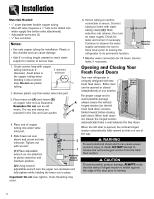
Installation Door Reinstallation Pullout Freezer Drawer 1. Install hinge assemblies: WARNING • Install center hinge with Phillips screws. 2. Place hinge side of refrigerator door on center hinge pin. To avoid electrical shock which can cause severe personal injury or death, disconnect power to refrigerator before removing doors. After replacing doors, connect power. • Install top hinge with 5⁄16" hex head screws. 3. While holding refrigerator door upright, tighten down top hinge with 5⁄16" hex head driver. CAUTION To avoid possible injury, product, or property 4. Reconnect connector. 5. Connect the waterline tubes firmly by pushing one waterline inside the other. damage, you will need two people to perform the following instructions. Important: Always unload food in freezer trays before removing trays. Connector To Remove: 6. Slide the black locking collar fully forward. Tabs 7. Hold tabbed section of waterline. 8. Rotate black locking collar 1. Pull drawer open to full extension. 2. Slide freezer drawer forward and lift straight out. counterclockwise locking water lines in place. A "click" is heard ensuring waterlines are correctly 3. Remove Phillips screws from each of the drawer slides. locked in place. The "arrow" on the tabbed section should align with the 2 bars on the black locking collar. 9. Ensure the connection does not leak before installing the upper hinge cover. 10. Replace top hinge covers. 4. Lift top of drawer front to unhook the drawer from the slides. 5. Move drawer slides fully forward. 6. Lift out lower drawer assembly. 6
-
 1
1 -
2
-
3
-
4
-
5
-
6
-
7
-
8
-
9
-
10
-
11
-
12
-
13
-
14
-
15
-
16
-
17
-
18
-
19
-
20
-
21
-
22
-
23
-
24
-
25
-
26
-
27
-
28
-
29
-
30
-
31
-
32
-
33
-
34
-
35
-
36
-
37
-
38
-
39
-
40
-
41
-
 42
42 -
 43
43 -
 44
44 -
 45
45 -
 46
46 -
 47
47 -
 48
48 -
 49
49 -
 50
50 -
 51
51 -
 52
52 -
53
-
54
-
55
-
56
-
57
-
58
-
59
-
60
-
61
-
62
-
63
-
64
-
65
-
66
-
67
-
68
-
69
-
70
-
71
 |
 |
