Maytag MFI2266AES Service Manual - Page 50
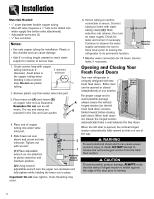
Opening and Closing Your, Fresh Food Doors
 |
View all Maytag MFI2266AES manuals
Add to My Manuals
Save this manual to your list of manuals |
Page 50 highlights
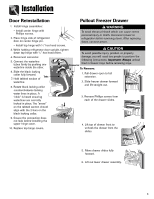
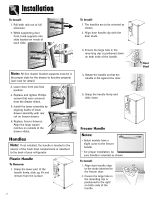
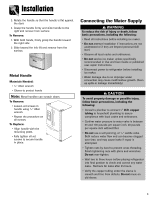
Installation Materials Needed: • 1⁄4" outer diameter flexible copper tubing • Shut-off valve (requires a 1⁄4" hole to be drilled into water supply line before valve attachment) • Adjustable wrenches (2) • 1⁄4" hex nut driver Notes: • Use only copper tubing for installation. Plastic is less durable and can cause damage. • Add 8' to tubing length needed to reach water supply for creation of service loop. 6. Pull on tubing to confirm connection is secure. Connect tubing to frame with water tubing clamp (C). Slide waterline into retainer, then turn on water supply. Check for leaks and correct if necessary. Continue to observe the water supply connection for two to three hours prior to moving the refrigerator to its permanent location. C Waterline Retainer 7. Monitor water connection for 24 hours. Correct leaks, if necessary. 1. Create service loop with copper tubing (minimum 2' diameter). Avoid kinks in the copper tubing when bending it into a service loop. Do not use plastic tubing. 2' diameter minimum 2' 2. Remove plastic cap from water valve inlet port. 3. Place brass nut (A) and sleeve (B) on copper tube end as illustrated. A Reminder: Do not use an old sleeve. The nut and sleeve are B provided in the Use and Care packet. 4. Place end of copper tubing into water valve inlet port. 5. Slide brass nut over sleeve and screw nut into inlet port. Tighten nut with wrench. (1) Place adjustable wrench on nut attached to plastic waterline and maintain position. 2 1 Waterline Supply Retainer (2) Using second adjustable wrench turn the upper nut clockwise and fully tighten while holding the lower nut in place. Opening and Closing Your Fresh Food Doors Your new refrigerator is uniquely designed with two fresh food doors. Either door can be opened or closed independently of one another. Vertical Hinged Section For proper usage and to avoid possible damage, always ensure the vertical hinged section (on the left fresh food door) remains folded inward before closing both doors. When both doors are closed, the hinged section automatically forms a seal between the two doors. When the left door is opened, the vertical hinged section automatically folds inward so that is is out of the way. WARNING To avoid electrical shock which can cause severe personal injury or death, DO NOT attempt to remove the vertical hinged section from the fresh food section. CAUTION To avoid possible product damage, ALWAYS verify that the vertical hinged section is folded against the edge of the door prior to closing. Important: Do not over-tighten. Cross threading may occur. 9
-
 1
1 -
2
-
3
-
4
-
5
-
6
-
7
-
8
-
9
-
10
-
11
-
12
-
13
-
14
-
15
-
16
-
17
-
18
-
19
-
20
-
21
-
22
-
23
-
24
-
25
-
26
-
27
-
28
-
29
-
30
-
31
-
32
-
33
-
34
-
35
-
36
-
37
-
38
-
39
-
40
-
41
-
42
-
43
-
44
-
 45
45 -
 46
46 -
 47
47 -
 48
48 -
 49
49 -
 50
50 -
 51
51 -
 52
52 -
 53
53 -
 54
54 -
 55
55 -
56
-
57
-
58
-
59
-
60
-
61
-
62
-
63
-
64
-
65
-
66
-
67
-
68
-
69
-
70
-
71
 |
 |
