NEC LCDMT810 User Manual - Page 2
background
 |
View all NEC LCDMT810 manuals
Add to My Manuals
Save this manual to your list of manuals |
Page 2 highlights
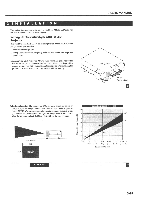
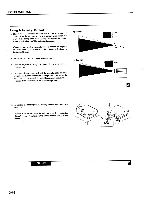
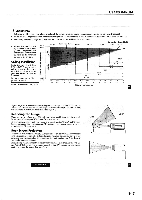
USERS MANUAL Using A Tabletop Or Cart 1. Place your LCD projector on a flat level surface at the optimal (A) Top view screen distance from the screen or wall so you realize the size image you want. (Avoid having bright room lighting or sun light directly on the screen or wall where you'll be projecting the image.) 2. Connect the power cable, remove the lens cap and turn the projector on. (If no input signal is available, the projector will display a background image.) 3. Ensure that the projector is square to the screen. (B) Side view screen 4. Move the projector left or right to center the image horizontally on the screen. (A) 5. To center the image vertically (B), lift the front edge of the projector and press the buttons on the front of the projector, just above the feet, to release the one-touch tilt feet. (There is approximately 10.5° of up and down adjustment for the front of the projector. ) 6. To fine tune the image's position vertically on the screen, rotate each front foot. 7. Increase or reduce the size of the projected image by pressing the "Zoom" (+) or (-) buttons on the remote control or top of the cabinet. INSTALLATION 3-16
-
 1
1 -
 2
2 -
 3
3 -
 4
4 -
 5
5 -
 6
6 -
 7
7 -
 8
8 -
9
-
10
-
11
-
12
-
13
-
14
-
15
-
16
-
17
-
18
-
19
-
20
 |
 |
