NEC NP-M311X Users Manual - Page 124
Maintenance, (1) Cleaning the Filters
 |
View all NEC NP-M311X manuals
Add to My Manuals
Save this manual to your list of manuals |
Page 124 highlights
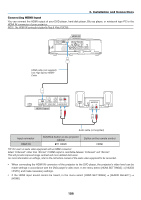
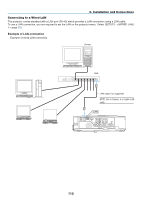
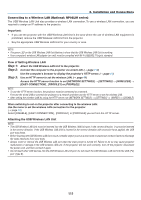
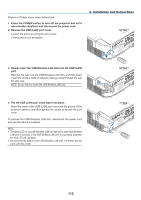
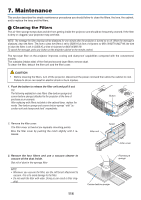
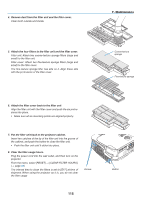
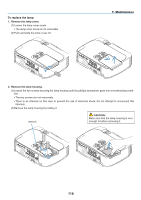
7. Maintenance This section describes the simple maintenance procedures you should follow to clean the filters, the lens, the cabinet, and to replace the lamp and the filters. Cleaning the Filters The air-filter sponge keeps dust and dirt from getting inside the projector and should be frequently cleaned. If the filter is dirty or clogged, your projector may overheat. NOTE: The message for filter cleaning will be displayed for one minute after the projector is turned on or off. When the message is displayed, clean the filters. The time to clean the filters is set to [6000 H] at time of shipment on M311X/M271X/M271W; the time to clean the filters is set to [5000 H] at time of shipment on M361X/M311W. To cancel the message, press any button on the projector cabinet or the remote control. The two-layer filter on the projector improves cooling and dust-proof capabilities compared with the conventional models. The outsides (intake side) of the first and second layer filters remove dust. To clean the filter, detach the filter unit and the filter cover. CAUTION • Before cleaning the filters, turn off the projector, disconnect the power cord and then allow the cabinet to cool. Failure to do so can result in electric shock or burn injuries. 1. Push the button to release the filter unit and pull it out. TIP: The following explanation uses filters (fine-texture sponge and coarse-texture sponge) attached to the projector at the time of purchase as an example. After replacing with filters included in the optional lamp, replace the words "fine-texture sponge and coarse-texture sponge" with "accordion soft and honeycomb hard" respectively. Button WIRELESS WIRELESS 2. Remove the filter cover. The filter cover is fixed at six separate mounting points. Bow the filter cover by pushing the notch slightly until it releases. Filter unit Notch Filter cover 3. Remove the four filters and use a vacuum cleaner to vacuum all the dust inside. Get rid of dust in the sponge filter NOTE: • Whenever you vacuum the filter, use the soft brush attachment to vacuum. This is to avoid damage to the filter. • Do not wash the filter with water. Doing so can result in filter clog- ging. 114 Coarse-texture sponge Fine-texture sponge
-
 1
1 -
2
-
3
-
4
-
5
-
6
-
7
-
8
-
9
-
10
-
11
-
12
-
13
-
14
-
15
-
16
-
17
-
18
-
19
-
20
-
21
-
22
-
23
-
24
-
25
-
26
-
27
-
28
-
29
-
30
-
31
-
32
-
33
-
34
-
35
-
36
-
37
-
38
-
39
-
40
-
41
-
42
-
43
-
44
-
45
-
46
-
47
-
48
-
49
-
50
-
51
-
52
-
53
-
54
-
55
-
56
-
57
-
58
-
59
-
60
-
61
-
62
-
63
-
64
-
65
-
66
-
67
-
68
-
69
-
70
-
71
-
72
-
73
-
74
-
75
-
76
-
77
-
78
-
79
-
80
-
81
-
82
-
83
-
84
-
85
-
86
-
87
-
88
-
89
-
90
-
91
-
92
-
93
-
94
-
95
-
96
-
97
-
98
-
99
-
100
-
101
-
102
-
103
-
104
-
105
-
106
-
107
-
108
-
109
-
110
-
111
-
112
-
113
-
114
-
115
-
116
-
117
-
118
-
 119
119 -
 120
120 -
 121
121 -
 122
122 -
 123
123 -
 124
124 -
 125
125 -
 126
126 -
 127
127 -
 128
128 -
 129
129 -
130
-
131
-
132
-
133
-
134
-
135
-
136
-
137
-
138
-
139
-
140
-
141
-
142
-
143
-
144
-
145
 |
 |
