NEC NP-M311X Users Manual - Page 93
(6) Menu Descriptions & Functions [SETUP], [GENERAL], Enabling Auto Keystone [AUTO KEYSTONE]
 |
View all NEC NP-M311X manuals
Add to My Manuals
Save this manual to your list of manuals |
Page 93 highlights
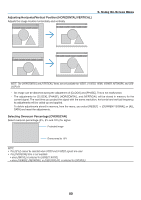
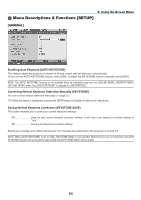
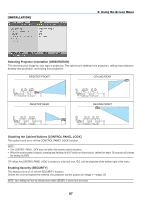
5. Using On-Screen Menu 6 Menu Descriptions & Functions [SETUP] [GENERAL] Enabling Auto Keystone [AUTO KEYSTONE] This feature allows the projector to detect its tilt and correct vertical distortion automatically. To turn on the AUTO KEYSTONE feature, select [ON]. To adjust the KEYSTONE feature manually, select [OFF]. NOTE: The [AUTO KEYSTONE] function is not available when an orientation type such as [CEILING REAR], [DESKTOP REAR], [CEILING FRONT] other than [DESKTOP/FRONT] is selected for [ORIENTATION]. Correcting Vertical Keystone Distortion Manually [KEYSTONE] You can correct vertical distortion manually. (→ page 21) TIP: When this option is highlighted, pressing the ENTER button will display its slide bar for adjustment. Saving Vertical Keystone Correction [KEYSTONE SAVE] This option enables you to save your current keystone settings. OFF Does not save current keystone correction settings. It will return your keystone correction settings to "zero". ON Saves current keystone correction settings Saving your change once affects all sources. The changes are saved when the projector is turned off. NOTE: When [AUTO KEYSTONE] is set to [ON], [KEYSTONE SAVE] is not available. Next time you turn on the power, the AUTO KEYSTONE function will work and the data stored with [KEYSTONE SAVE] will be invalid. 83
-
 1
1 -
2
-
3
-
4
-
5
-
6
-
7
-
8
-
9
-
10
-
11
-
12
-
13
-
14
-
15
-
16
-
17
-
18
-
19
-
20
-
21
-
22
-
23
-
24
-
25
-
26
-
27
-
28
-
29
-
30
-
31
-
32
-
33
-
34
-
35
-
36
-
37
-
38
-
39
-
40
-
41
-
42
-
43
-
44
-
45
-
46
-
47
-
48
-
49
-
50
-
51
-
52
-
53
-
54
-
55
-
56
-
57
-
58
-
59
-
60
-
61
-
62
-
63
-
64
-
65
-
66
-
67
-
68
-
69
-
70
-
71
-
72
-
73
-
74
-
75
-
76
-
77
-
78
-
79
-
80
-
81
-
82
-
83
-
84
-
85
-
86
-
87
-
 88
88 -
 89
89 -
 90
90 -
 91
91 -
 92
92 -
 93
93 -
 94
94 -
 95
95 -
 96
96 -
 97
97 -
 98
98 -
99
-
100
-
101
-
102
-
103
-
104
-
105
-
106
-
107
-
108
-
109
-
110
-
111
-
112
-
113
-
114
-
115
-
116
-
117
-
118
-
119
-
120
-
121
-
122
-
123
-
124
-
125
-
126
-
127
-
128
-
129
-
130
-
131
-
132
-
133
-
134
-
135
-
136
-
137
-
138
-
139
-
140
-
141
-
142
-
143
-
144
-
145
 |
 |
