NEC NP-M311X Users Manual - Page 66
Image Express Utility Lite Help while Image Express Utility is run
 |
View all NEC NP-M311X manuals
Add to My Manuals
Save this manual to your list of manuals |
Page 66 highlights
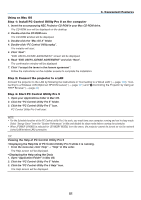
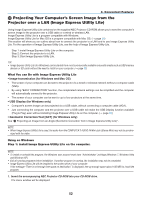
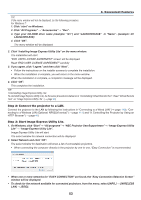
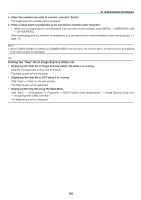
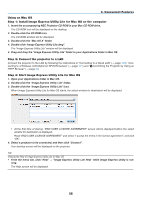
3. Convenient Features Using on Mac OS Step 1: Install Image Express Utility Lite for Mac OS on the computer 1. Insert the accompanying NEC Projector CD-ROM in your Mac CD-ROM drive. The CD-ROM icon will be displayed on the desktop. 2. Double-click the CD-ROM icon. The CD-ROM window will be displayed. 3. Double-click the "Mac OS X" folder. 4. Double-click "Image Express Utility Lite.dmg". The "Image Express Utility Lite" window will be displayed. 5. Drag and drop the "Image Express Utility Lite" folder to your Applications folder in Mac OS. Step 2: Connect the projector to a LAN Connect the projector to the LAN by following the instructions in "Connecting to a Wired LAN" (→ page 110), "Connecting to a Wireless LAN (Optional: NP02LM series)" (→ page 111) and "❾ Controlling the Projector by Using an HTTP Browser" (→ page 41) Step 3: Start Image Express Utility Lite for Mac OS 1. Open your Applications folder in Mac OS. 2. Double-click the "Image Express Utility Lite" folder. 3. Double-click the "Image Express Utility Lite" icon. When Image Express Utility Lite for Mac OS starts, the select window for destination will be displayed. • At the first time of startup, "END USER LICENSE AGREEMENT" screen will be displayed before the select window for destination is displayed. Read "END USER LICENSE AGREEMENT" and select "I accept the terms in the license agreement", and click "OK". 4. Select a projector to be connected, and then click "Connect". Your desktop screen will be displayed on the projector. TIP: Viewing the Help of Image Express Utility Lite for Mac OS • From the menu bar, click "Help" → "Image Express Utility Lite Help" while Image Express Utility is run- ning. The Help screen will be displayed 56
-
 1
1 -
2
-
3
-
4
-
5
-
6
-
7
-
8
-
9
-
10
-
11
-
12
-
13
-
14
-
15
-
16
-
17
-
18
-
19
-
20
-
21
-
22
-
23
-
24
-
25
-
26
-
27
-
28
-
29
-
30
-
31
-
32
-
33
-
34
-
35
-
36
-
37
-
38
-
39
-
40
-
41
-
42
-
43
-
44
-
45
-
46
-
47
-
48
-
49
-
50
-
51
-
52
-
53
-
54
-
55
-
56
-
57
-
58
-
59
-
60
-
 61
61 -
 62
62 -
 63
63 -
 64
64 -
 65
65 -
 66
66 -
 67
67 -
 68
68 -
 69
69 -
 70
70 -
 71
71 -
72
-
73
-
74
-
75
-
76
-
77
-
78
-
79
-
80
-
81
-
82
-
83
-
84
-
85
-
86
-
87
-
88
-
89
-
90
-
91
-
92
-
93
-
94
-
95
-
96
-
97
-
98
-
99
-
100
-
101
-
102
-
103
-
104
-
105
-
106
-
107
-
108
-
109
-
110
-
111
-
112
-
113
-
114
-
115
-
116
-
117
-
118
-
119
-
120
-
121
-
122
-
123
-
124
-
125
-
126
-
127
-
128
-
129
-
130
-
131
-
132
-
133
-
134
-
135
-
136
-
137
-
138
-
139
-
140
-
141
-
142
-
143
-
144
-
145
 |
 |
