Netgear WNR834Bv2 WNR834Bv2 Setup Manual - Page 31
Troubleshooting, Basic Setup Checklist - problems
 |
View all Netgear WNR834Bv2 manuals
Add to My Manuals
Save this manual to your list of manuals |
Page 31 highlights
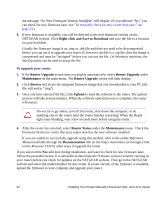
Troubleshooting If you have difficulties accessing the Internet, use the Basic Setup Checklist to make sure that you have connected and set up your router correctly. If your basic setup is correct, then look for your problem in one of the subsequent sections. Basic Setup Checklist The following items are the most common errors made when initially setting up a router. Carefully review the checklist to make sure that you have followed the recommended procedures. • Be sure you always start your network in this sequence: 1. Turn off and unplug the modem from the power outlet. Next, turn off the wireless router and computer. 2. Turn on the modem and wait 2 minutes. 3. Turn on the wireless router and wait 1 minute. 4. Turn on the computer. • Make sure the Ethernet cables are securely plugged in. - The Internet status light on the wireless router will be lit if the Ethernet cable to the wireless router from the modem is plugged in securely and the modem and wireless router are both turned on (see "Connecting Your Wireless Router" on page 15). - For each powered-on computer connected to the wireless router with a securely pluggedin Ethernet cable, the corresponding wireless router LAN port status light will be lit. The label on the back of the wireless router identifies the number of each LAN port (see "Router Label" on page 4). • Make sure the network settings of the computer are correct. - LAN connected computers must be configured to obtain an IP address automatically using DHCP. For more information, see the links in "Related Documents" on page 39. - Some cable modem services require you to use the MAC address of the computer registered on the account. If so, in the Router MAC Address section of the Basic Settings menu, select "Use this Computer's MAC Address." Click Apply to save your settings. Restart the network in the correct sequence. Troubleshooting 27
-
 1
1 -
2
-
3
-
4
-
5
-
6
-
7
-
8
-
9
-
10
-
11
-
12
-
13
-
14
-
15
-
16
-
17
-
18
-
19
-
20
-
21
-
22
-
23
-
24
-
25
-
 26
26 -
 27
27 -
 28
28 -
 29
29 -
 30
30 -
 31
31 -
 32
32 -
 33
33 -
 34
34 -
 35
35 -
 36
36 -
37
-
38
-
39
-
40
-
41
-
42
-
43
-
44
-
45
-
46
 |
 |
