Nikon 1666 Instruction Manual
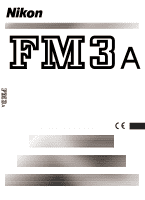
Nikon 1666 - FM 3A SLR Camera Manual
 |
UPC - 018208016679
View all Nikon 1666 manuals
Add to My Manuals
Save this manual to your list of manuals |
Nikon 1666 manual content summary:
- Nikon 1666 | Instruction Manual - Page 1
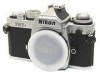
(E) INSTRUCTION MANUAL E - Nikon 1666 | Instruction Manual - Page 2
Getting Started Thank you for purchasing this Nikon FM3A camera. Please read this instruction manual carefully for complete details on getting the most from your Nikon FM3A. Your new Nikon FM3A features a Manual Exposure mode for total control of exposure, as well as a semi-automatic Aperture- - Nikon 1666 | Instruction Manual - Page 3
trial shots Take a few test shots before shooting important events like weddings or graduations. Have Nikon spot-check your camera regularly Nikon recommends that you have your camera serviced by an authorized dealer or service center at least once every two years. Using your camera correctly The - Nikon 1666 | Instruction Manual - Page 4
Contents 1 Prior to Use Getting Started 2 Symbols used in this manual 2 Notice 3 Camera Parts (Body, Viewfinder indications 6 2 Basic Operations for Shooting 9 Installing Batteries 10 Checking the Battery Power 11 Attaching/Detaching a Lens 12 Loading Film 13 - Nikon 1666 | Instruction Manual - Page 5
3 Controls in Detail 23 Shutter-Speed Dial 24 Film-Advance Lever 25 Manual Film-Speed Setting 26 Exposure-Compensation Indicator 27 Frame Counter 29 Depth of Field Preview Lever 29 Film-Plane Indicator 30 Accessory Shoe and Sync- - Nikon 1666 | Instruction Manual - Page 6
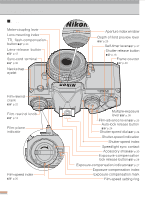
Camera Parts Body Meter-coupling lever Lens mounting index TTL flash-compensation button p.33 Nikon Lens-release button p.12 Sync-cord terminal p.30 R O K 45mm 1 NIK 1 m Nikon Neckstrap eyelet KO :2.8P Aperture index window Depth of field preview lever p.29 Self-timer lever p.37 Shutter - Nikon 1666 | Instruction Manual - Page 7
drive shutter coupling Film-rewind button p.22 Data Back contacts Film sprockets p.13 Socket for tripod/motor drive Battery chamber lid p.10 Film guide pin Motor-drive sync contacts DX contact Rewind fork About CE marking CE stands for Conformité Européenne. This marking guarantees that the product - Nikon 1666 | Instruction Manual - Page 8
as you turn the shutterspeed dial. For example, if you set the shutter-speed dial to "A," the shutter-speed indicator points to "A." In Manual mode, it points to the selected shutter speed. 3 Exposure-meter indicator With a light press of the shutter-release button, power is supplied to - Nikon 1666 | Instruction Manual - Page 9
aperture settings Narrow aperture settings For a distant view that For sharp focus of both requires precedence of foreground and definition background • In manual exposure shooting, you can freeze a moving subject by using a high shutter speed, or you can accentuate the flow of water by using - Nikon 1666 | Instruction Manual - Page 10
Installing Batteries Tips Three types of batteries can be used with this camera. 1) One 3V lithium battery (CR-1/3N type) 2) Two 1.55V silver-oxide batteries (SR44 type) 3) Two 1.5V alkaline batteries (LR44 type) ... Use new batteries of the same type when you use two batteries. 1 Remove the - Nikon 1666 | Instruction Manual - Page 11
Checking the Battery Power Check the battery power after installing a new battery (or new batteries) before starting shootings. Pull out the film-advance lever 1 1 and lightly press the shutterrelease button 2 . 2 Check that the exposure-meter needle moves in the viewfinder. ... Pressing the - Nikon 1666 | Instruction Manual - Page 12
Attaching/Detaching a Lens Attaching a lens Align the mounting index on the 1 lens with the mounting index of the camera body. 2 Insert and twist the lens counterclockwise (as shown by the arrow). 51 Detaching the lens 5 1.2 ... Twist the lens slowly until it clicks into place. ... Press and - Nikon 1666 | Instruction Manual - Page 13
Loading Film Tips When you use DX-coded film, the camera automatically detects the film speed and makes the appropriate setting. 1 Open the camera back. 2 Insert a roll of film 1 and push the rewind knob 2 back down. ... When you lift the film-rewind knob, the camera back will open. 3 Insert the - Nikon 1666 | Instruction Manual - Page 14
. ... Make sure that the film sprocket holes are per- fectly meshed with the film sprockets and that the film is correctly set between the film guide 7 Close the camera back and take up the film slack. rails. 8 Make a few blank exposures. ... 1 Slowly close the door of the camera back until it - Nikon 1666 | Instruction Manual - Page 15
Speed (DX-Coded Film) Tips When using DX-coded film, set the film-speed index to . When using non-DXcoded film, set the film speed manually. See page 26. ... When the film-speed index is set to , the film speed is automatically set (ISO 25 to 5000). 1 Pull up the film - Nikon 1666 | Instruction Manual - Page 16
Holding the Camera (How to press the shutter-release button) How to hold the camera Grip the camera in your right hand and look through the viewfinder. Keep your left elbow propped against your body to keep the camera steady. To hold horizontally To hold vertically How to press the shutter- - Nikon 1666 | Instruction Manual - Page 17
Focusing Focusing ring 4000 2000 1000 500 250 125 60 30 15 8 4 2 1 B Microprism collar Split-image rangefinder Matte field Look through the viewfinder and put the subject in focus by rotating the focusing ring of the lens. Tips • To focus using the split-image rangefinder, turn the focusing ring - Nikon 1666 | Instruction Manual - Page 18
Shooting: Aperture-Priority Auto Exposure Mode Tips • The aperture setting lets you adjust the exposure and control the depth of field. ... If the subject of your picture extends into the distance and/or you want the entire subject to be sharp, choose a narrow aperture setting. If you want an out- - Nikon 1666 | Instruction Manual - Page 19
Lightly press the shutter-release 5 6 button. Slowly depress the shutterrelease button all the way. ... Check the shutter speed, observing the exposure-meter indication in the viewfinder. ... If the exposure meter indication is between 1/60 and 1/4000 second, squeeze to press the shutter-release - Nikon 1666 | Instruction Manual - Page 20
Mode Tips • In this mode, you can manually select both the shutter speed and the aperture setting as desired. • By changing the combination of shutter speed and aperture setting, you can change the - Nikon 1666 | Instruction Manual - Page 21
Align the shutter-speed indicator 5 6 and the exposure-meter indicator. Slowly press the shutter-release button all the way. A 4000 2000 1000 A 4000 500 2000 1000 500 250 250 125 60 125 30 15 60 8 4 2 30 1 B 15 8 4 ... To align the two indicators, adjust the shutter -speed - Nikon 1666 | Instruction Manual - Page 22
Rewinding the Film When the end of the roll of film is reached, the film-advance lever will not advance further. Rewind the film. 1 Return the film-advance lever to its folded position. 2 Press the film-rewind button. 3 Rewind the film. ... Just press the button once. You don't have to hold it - Nikon 1666 | Instruction Manual - Page 23
in Detail To use the camera skillfully, you need to understand its functions and features. Shutter-Speed Dial p. 24 Film-Advance Lever p. 25 Manual Film-Speed Setting p. 26 Exposure-Compensation Indicator p. 27 Frame Counter p. 29 Depth of Field Preview Lever p. 29 Film-Plane Indicator p. 30 - Nikon 1666 | Instruction Manual - Page 24
the dial while holding down the auto-lock release button at the center of the dial. 1 to 1/4000 second (Manual mode) In Manual mode, you can set both the shutter speed and aperture manually to create various creative photographic effects. ( p.20) B (Bulb mode) In this mode, the shutter stays open as - Nikon 1666 | Instruction Manual - Page 25
(r3e0as˚negrvlee) Film-Advance Lever • The film-advance lever also provides a lock function for the shutter-release button. 135˚(awningdlein) g Standoff position Tips Power on/off: ... When you pull the film-advance lever to the standoff position and lightly press the shutter-release button, the - Nikon 1666 | Instruction Manual - Page 26
film. 2) To intentionally change the light sensitivity of DX-coded film in order to obtain special effects when developing. ... The film speed can be set manually in the range of ISO 12 to 6400. Setting the film speed • Pull and rotate the film-speed setting ring and set it to the - Nikon 1666 | Instruction Manual - Page 27
Exposure-Compensation Indicator If there is an extreme difference in brightness between the main subject and the background (e.g., a person surrounded by heavy shadows), it may be difficult to get the correct exposure. In this case, or when you want to achieve a certain effect, exposure - Nikon 1666 | Instruction Manual - Page 28
Exposure-Compensation Indicator (Continued) Exposure compensation using the exposure-compensation indicator It is possible to adjust ±2 EV in units of 1/3 EV. While holding down the expo- sure-compensation lock release 1 button 1, rotate the film-speed setting ring 2. 2 Set the compensation index - Nikon 1666 | Instruction Manual - Page 29
you wind the advance lever. ... The frame counter is automatically reset to "S" when the camera back is opened. Depth of Field Preview Lever 0.7 Nikon • When you press the depth of field preview lever toward the camera body, the lens is stopped down to the specified aperture setting, enabling you - Nikon 1666 | Instruction Manual - Page 30
it to the accessory shoe. • This accessory shoe is equipped with a safety lock mechanism (a lock hole) to prevent slippage. Sync-Cord Terminal Nikon • This camera has a sync-cord terminal (with a screw to prevent slippage). To use a sync-cord, connect it to this synccord terminal ("X" contact - Nikon 1666 | Instruction Manual - Page 31
with easy shooting. However, we hope you will also learn more advanced photographic techniques to take full advantage of the wonderful capabilities of your Nikon FM3A camera. Flash Photography p. 32 AE-Lock Photography p. 36 Self-Timer Photography p. 37 Multiple-Exposure Photography p. 38 - Nikon 1666 | Instruction Manual - Page 32
dark because of rear lighting or a bright background. Applicable speedlight and shooting situation Speedlight model Valid shooting modes TTL flash Non-TTL (external) auto flash Manual flash Connection method SB-80DX, SB-30, SB-28/28DX, yes SB-27, SB-26, SB-25, SB-24 SB-50DX, SB-29/29s, SB - Nikon 1666 | Instruction Manual - Page 33
can automatically reduce the level of flash illumination for more natural and better ex- posure results. When the TTL flash-compensation button Nikon is used, the illumination of the speedlight is automatically compensated (reduced) by 1 EV to the - side. • There is no indication regarding - Nikon 1666 | Instruction Manual - Page 34
second. ... When you use a Medical lens, set it to 1/125 second or lower. The following example shows the Nikon SB-27 Speedlight attached to the camera. For details, refer to the manual for your speedlight. 1 Set the exposure mode. 2 Set the mode switch of the speedlight to AUTO. (Example: with - Nikon 1666 | Instruction Manual - Page 35
the camera-to-subject distance: D (distance to subject)= GN (guide number)/f (aperture) • Equation to obtain the aperture: f (aperture) = GN (guide number)/D (distance to subject) If the ready light blinks for approx. 3 sec. immediately after firing the flash, check the camera-to-subject distance - Nikon 1666 | Instruction Manual - Page 36
AE-Lock Photography Tips • AE-lock photography is possible in Aperture-Priority Auto Exposure mode. You cannot use it in Manual Exposure mode. • Since the composition of a shot can be changed with the EV temporarily stored in memory, AE-lock photography of a subject of normal (intermediate) - Nikon 1666 | Instruction Manual - Page 37
. ... The maximum count-down time of the self-timer is approx. 10 seconds. 1 Pull the self-timer lever in the direction of the arrow. Nikon 2 Check the focus and exposure, then shoot. mm 1:2.8P NIKKO R 45 ... The shutter is released with a delay of approx. 10 seconds. ... The countdown time - Nikon 1666 | Instruction Manual - Page 38
Multiple-Exposure Photography Tips • Exposing a single frame more than once to overlap multiple images is called multiple-exposure photography. • If images are to be overlapped in the background, exposure compensation is required, depending on the number of exposures in multiple-exposure - Nikon 1666 | Instruction Manual - Page 39
Additional Information Keeping this information in mind may help you avoid problems. In particular, do not forget to read "Tips on Handling the Camera and Batteries" on page 48. - Nikon 1666 | Instruction Manual - Page 40
Shutter Speed and Aperture Setting The shutter-speed setting specifies the length of time the film will be exposed by opening and closing of the shutter curtains, while the aperture setting determines the amount of light that passes through the lens. The combined value of these settings is called EV - Nikon 1666 | Instruction Manual - Page 41
Depth of Field When you focus on your subject, you will find that not only is the subject itself in focus but objects in a certain distance range both in front of and behind the subject appear reasonably sharp. This in-focus zone is known as "depth of field." Control of depth of field enables - Nikon 1666 | Instruction Manual - Page 42
Attachment Remarks Stop-down metering Stop-down metering Stop-down metering IX lenses G-type lenses no no *1: When using the PC Micro 85mm f/2.8D, only manual exposure can be used. Note, however, that the exposure-meter indication will not be correct if you shift and/or tilt the camera or if - Nikon 1666 | Instruction Manual - Page 43
f/11 (No. 200111-200310) Tips How to distinguish Ai-type lenses from non-Ai-type lenses Ai-type lens Non-Ai-type lens Meter coupling guide An Ai-type lens has a meter-coupling guide, but a non-Ai-type lens does not. 43 - Nikon 1666 | Instruction Manual - Page 44
fast-moving subjects. SB-27 Speedlight • A compact, lightweight flash attachment that enables TTL light metering, external automatic light metering, and manual flash firing. • The mounting position of the light-emission block can be changed to horizontal at the right, and vertical, or horizontal at - Nikon 1666 | Instruction Manual - Page 45
Filters • Nikon filters are divided into three types: screw-on, drop-in and rear-interchange. With the FM3A, the filter factor need not be considered except with - Nikon 1666 | Instruction Manual - Page 46
Changing the Focusing Screen Tips • Different types of focusing screens can be used with this camera. The K3-type Clear Matte screen IIa comes with the camera as a standard accessory. • Two types of screen are available for replacement as options: B3 type and E3 type. Select the one that matches - Nikon 1666 | Instruction Manual - Page 47
Tips How to distinguish the applicable types. K3 type, B3 type, E3 type K2 type, B2 type, E2 type (for New FM2 and FE2) Type K3 Name/style Split-image rangefinder/ microprism system Features Suitable for general photography. It has a microprism collar around the central split-image rangefinder - Nikon 1666 | Instruction Manual - Page 48
Camera Care WARNING Do NOT use thinner, benzene or other organic solvents to clean the camera. They may damage the camera, cause it to catch fire, or harm your health. • Cleaning the camera First lightly blow off dirt and dust with a blower, then gently wipe the body with a clean soft cloth - Nikon 1666 | Instruction Manual - Page 49
that can be shot decreases in very cold temperatures. However, battery power may recover when the temperature returns to normal. • Do NOT throw batteries into a fire. Do NOT throw batteries into a fire, short-circuit, disassemble, heat or charge batteries. 49 - Nikon 1666 | Instruction Manual - Page 50
with a wide aperture opening, or to keep the overall picture in clear focus with a small aperture opening. B Blank exposure With a camera with manual film winding, initial film advancing is required by repeatedly releasing the shutter and winding the film until the film counter indicates the first - Nikon 1666 | Instruction Manual - Page 51
E EV EV stands for Exposure Value, which indicates the exposure settings, For example: using ISO 100 film with a shutter speed of one second and an aperture setting of f/1.0, the EV is defined as 0 (EV 0). This value increases by one each time the aperture is stopped down or the shutter speed is - Nikon 1666 | Instruction Manual - Page 52
exposure can be obtained by the following equation. Aperture value (f) = Guide number (GN) / Shooting distance (meters). I ISO film speed A light level measured by an external or built-in exposure meter. With manual exposure, shooting can be performed independent from changes in conditions. You - Nikon 1666 | Instruction Manual - Page 53
through the lens with the built-in exposure meter of the camera. TTL flash A function to obtain the correct exposure for the main subject by firing the flash regardless of the ambient light. By measuring the amount of the flash light reflected from the subject, the camera stops light emission when - Nikon 1666 | Instruction Manual - Page 54
film in a cartridge Frame size 24 × 36mm Lens mount Nikon F mount Shutter Vertical-travel, metal focal-plane shutter Shutter-speed (with a 50mm f/1.4 lens) Film-sensitivity settings DX system or manual. DX: ISO 25 to 5000 Manual: ISO 12 to 6400 Exposure compensation Exposure compensated to ±2 EV in - Nikon 1666 | Instruction Manual - Page 55
Ready light Lights when the flash is fully charged with SB-28, SB-27, etc.; blinks for full-output warning or shutter-speed settings from 1/500 to 1/4000 sec. Camera back Detachable hinged back; MF-16 Data Back can be attached in place. Camera-back opening Achieved with the film-rewind lever Power - Nikon 1666 | Instruction Manual - Page 56
No reproduction in any form of this manual, in whole or in part (except for brief quotation in critical articles or reviews), may be made without written authorization from NIKON CORPORATION. NIKON CORPORATION FUJI BLDG., 2-3, MARUNOUCHI 3-CHOME, CHIYODA-KU, TOKYO 100-8331, JAPAN Printed in Japan
-
 1
1 -
 2
2 -
 3
3 -
 4
4 -
 5
5 -
 6
6 -
 7
7 -
8
-
9
-
10
-
11
-
12
-
13
-
14
-
15
-
16
-
17
-
18
-
19
-
20
-
21
-
22
-
23
-
24
-
25
-
26
-
27
-
28
-
29
-
30
-
31
-
32
-
33
-
34
-
35
-
36
-
37
-
38
-
39
-
40
-
41
-
42
-
43
-
44
-
45
-
46
-
47
-
48
-
49
-
50
-
51
-
52
-
53
-
54
-
55
-
56
 |
 |
INSTRUCTION MANUAL
E
(E)