Nikon 25205 D1X User's Manual - Page 61
Step 6
 |
UPC - 018208252114
View all Nikon 25205 manuals
Add to My Manuals
Save this manual to your list of manuals |
Page 61 highlights
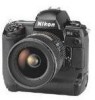
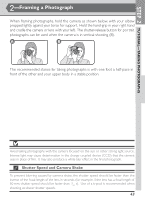
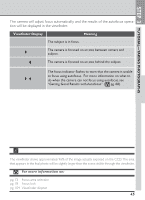
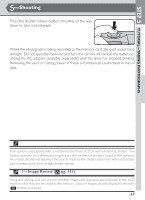
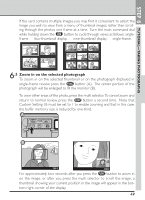
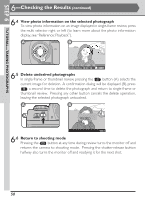
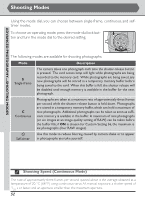
STEP 6 TUTORIAL-TAKING PHOTOGRAPHS 6-Checking the Results Photographs stored on the memory card can be displayed at the touch of a button, even when the camer a is not in playback mode . This allows the results of a photograph to be confirmed almost instantly. If you are not satisfied with the photograph, you can adjust settings and take another shot. Any shots you do not want to keep can be deleted immediately. 6.1 Turn the monitor on Press the button to turn the monitor on (A). The most recent photograph will be displayed in the monitor (B). A B If the memory card contains no photographs, the message, "No image in current folder" will be displayed. Press the button to turn the monitor off. 6.2 Select a photograph To view the other photographs in memor y, press the multi selector up or down. Press up to view photographs taken before the current photograph, down to view photographs taken after the cur rent photograph. Keep the multi selector pressed to scroll rapidly to the desired fr ame number. When the last photograph taken is selected, pressing the multi selector down will display the first photograph on the memory card. Pressing the selector up when the first image in memory is selected will display the most recent photograph. The Button If you press the button to turn the monitor on after taking a photograph, the most recent photograph will be displayed. If you turned the monitor off with the menus displayed, however, the menus will be displayed when you next turn the monitor on. 18-Monitor Off Delay ( pg. 170) By default, the monitor will turn off automatically to save power if no operations are performed for twenty seconds. Custom Setting 18 can be used to adjust the length of time before the monitor turns off automatically. 48
-
 1
1 -
2
-
3
-
4
-
5
-
6
-
7
-
8
-
9
-
10
-
11
-
12
-
13
-
14
-
15
-
16
-
17
-
18
-
19
-
20
-
21
-
22
-
23
-
24
-
25
-
26
-
27
-
28
-
29
-
30
-
31
-
32
-
33
-
34
-
35
-
36
-
37
-
38
-
39
-
40
-
41
-
42
-
43
-
44
-
45
-
46
-
47
-
48
-
49
-
50
-
51
-
52
-
53
-
54
-
55
-
 56
56 -
 57
57 -
 58
58 -
 59
59 -
 60
60 -
 61
61 -
 62
62 -
 63
63 -
 64
64 -
 65
65 -
 66
66 -
67
-
68
-
69
-
70
-
71
-
72
-
73
-
74
-
75
-
76
-
77
-
78
-
79
-
80
-
81
-
82
-
83
-
84
-
85
-
86
-
87
-
88
-
89
-
90
-
91
-
92
-
93
-
94
-
95
-
96
-
97
-
98
-
99
-
100
-
101
-
102
-
103
-
104
-
105
-
106
-
107
-
108
-
109
-
110
-
111
-
112
-
113
-
114
-
115
-
116
-
117
-
118
-
119
-
120
-
121
-
122
-
123
-
124
-
125
-
126
-
127
-
128
-
129
-
130
-
131
-
132
-
133
-
134
-
135
-
136
-
137
-
138
-
139
-
140
-
141
-
142
-
143
-
144
-
145
-
146
-
147
-
148
-
149
-
150
-
151
-
152
-
153
-
154
-
155
-
156
-
157
-
158
-
159
-
160
-
161
-
162
-
163
-
164
-
165
-
166
-
167
-
168
-
169
-
170
-
171
-
172
-
173
-
174
-
175
-
176
-
177
-
178
-
179
-
180
-
181
-
182
-
183
-
184
-
185
-
186
-
187
-
188
-
189
-
190
-
191
-
192
-
193
-
194
-
195
-
196
-
197
-
198
-
199
-
200
-
201
-
202
-
203
-
204
-
205
-
206
-
207
-
208
-
209
-
210
-
211
-
212
-
213
-
214
-
215
-
216
-
217
-
218
-
219
-
220
-
221
-
222
-
223
-
224
-
225
-
226
-
227
-
228
-
229
-
230
-
231
-
232
-
233
-
234
-
235
-
236
 |
 |