Nikon B000SDPMEI User Manual - Page 27
Tutorial, “Point-and-Shoot” Photography (AUTO Mode
 |
UPC - 018208094202
View all Nikon B000SDPMEI manuals
Add to My Manuals
Save this manual to your list of manuals |
Page 27 highlights
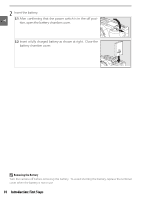
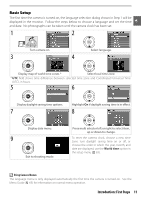
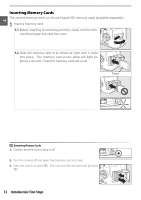
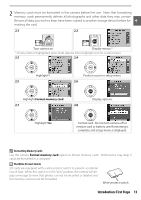
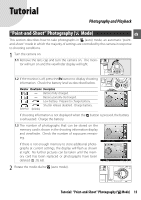
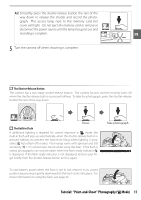
Tutorial Photography and Playback "Point-and-Shoot" Photography ( Mode) This section describes how to take photographs in (auto) mode, an automatic "pointand-shoot" mode in which the majority of settings are controlled by the camera in response to shooting conditions. 1 Turn the camera on. 1.1 Remove the lens cap and turn the camera on. The monitor will turn on and the viewfinder display will light. 1.2 If the monitor is off, press the button to display shooting information. Check the battery level as described below. Monitor Viewfinder Description - Battery fully charged. - Battery partially discharged. Low battery. Prepare to charge battery. Shutter release disabled. Charge battery. (blinks) (blinks) If shooting information is not displayed when the button is pressed, the battery is exhausted. Charge the battery. 1.3 The number of photographs that can be stored on the memory card is shown in the shooting information display and viewfinder. Check the number of exposures remaining. If there is not enough memory to store additional photographs at current settings, the display will flash as shown at right. No further pictures can be taken until the memory card has been replaced or photographs have been deleted ( 20, 65). 2 Rotate the mode dial to (auto mode). Tutorial: "Point-and-Shoot" Photography ( Mode) 15
-
 1
1 -
2
-
3
-
4
-
5
-
6
-
7
-
8
-
9
-
10
-
11
-
12
-
13
-
14
-
15
-
16
-
17
-
18
-
19
-
20
-
21
-
 22
22 -
 23
23 -
 24
24 -
 25
25 -
 26
26 -
 27
27 -
 28
28 -
 29
29 -
 30
30 -
 31
31 -
 32
32 -
33
-
34
-
35
-
36
-
37
-
38
-
39
-
40
-
41
-
42
-
43
-
44
-
45
-
46
-
47
-
48
-
49
-
50
-
51
-
52
-
53
-
54
-
55
-
56
-
57
-
58
-
59
-
60
-
61
-
62
-
63
-
64
-
65
-
66
-
67
-
68
-
69
-
70
-
71
-
72
-
73
-
74
-
75
-
76
-
77
-
78
-
79
-
80
-
81
-
82
-
83
-
84
-
85
-
86
-
87
-
88
-
89
-
90
-
91
-
92
-
93
-
94
-
95
-
96
-
97
-
98
-
99
-
100
-
101
-
102
-
103
-
104
-
105
-
106
-
107
-
108
-
109
-
110
-
111
-
112
-
113
-
114
-
115
-
116
-
117
-
118
-
119
-
120
-
121
-
122
-
123
-
124
-
125
-
126
-
127
-
128
-
129
-
130
-
131
-
132
-
133
-
134
-
135
-
136
-
137
-
138
-
139
 |
 |
