NordicTrack Cxt 970 User Manual - Page 6
Slide an M8 Split Washer 58 and an M8 Washer 33 - console
 |
View all NordicTrack Cxt 970 manuals
Add to My Manuals
Save this manual to your list of manuals |
Page 6 highlights
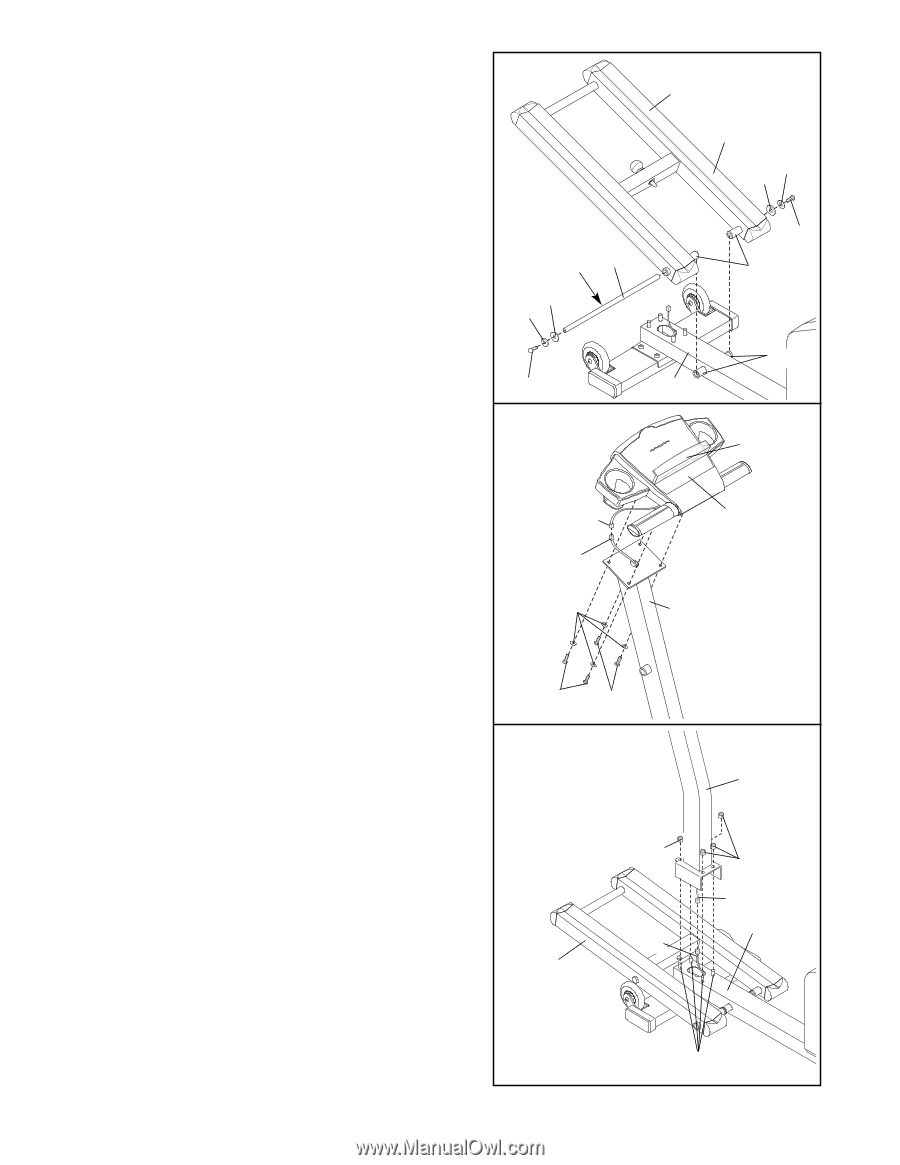
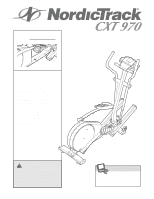
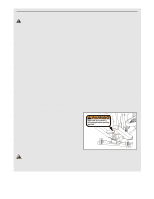
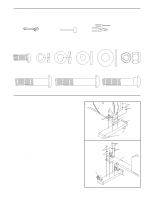
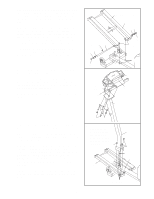
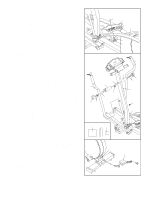
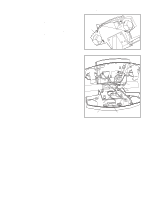
3. Slide an M8 Split Washer (58) and an M8 Washer (33) onto an M8 x 19mm Screw (30). Tighten the Screw into one end of the Incline Axle (29). Next, apply a small amount of the included grease to the Incline Axle. Align the indicated tubes on the Incline Frame (5) with the tubes on the Frame (1). Make sure that the Incline Frame is turned so the V-shaped grooves are on top. Insert the Incline Axle (29) through the Incline Frame and the Frame. Note: It may be helpful to tap the Incline Axle with a rubber mallet to insert it. Slide an M8 Split Washer (58) and an M8 Washer (33) onto the other M8 x 19mm Screw (30). Tighten the Screw into the open end of the Incline Axle (29). 3 Grease 29 33 58 4. Connect the wire harness on the Console (87) to the Extension Wire Harness (51). Attach the Console (87) to the Upright (2) with the four Console Screws (35) and the four Console Washers (93) packaged with the Console. Be careful to avoid pinching the wire harnesses. Snap the bookrack onto the Console (87) in the location shown. 30 4 Wire Harness 51 93 V-shaped Groove 5 33 58 30 Tubes Tubes 1 Bookrack 87 2 5. Remove the four M10 Nylon Locknuts (26) from the welded bolts on the front of the Frame (1). While a second person holds the Upright (2) near the Frame (1), connect the Extension Wire Harness (51) to the Wire Harness (85). Align the four holes in the bracket at the bottom of the Upright (2) with the welded bolts on the Frame (1). Lower the Upright, feeding all slack Extension Wire Harness (51) and Wire Harness (85) into the Upright, until the welded bolts are inserted into the bracket. Do not allow the Wire Harnesses to be pinched. Lift the front of the Incline Frame (5). Tighten the four M10 Nylon Locknuts (26) onto the welded bolts on the Frame (1). 35 35 5 Make sure the Wire Harnesses (51, 85) do not get pinched and damaged during this step. 26 85 5 2 26 51 1 Welded Bolts 6
-
 1
1 -
 2
2 -
 3
3 -
 4
4 -
 5
5 -
 6
6 -
 7
7 -
 8
8 -
 9
9 -
 10
10 -
 11
11 -
 12
12 -
13
-
14
-
15
-
16
-
17
-
18
-
19
-
20
-
21
-
22
-
23
-
24
 |
 |