NordicTrack Walkfit 3500 Treadmill English Manual - Page 8
Attach
 |
View all NordicTrack Walkfit 3500 Treadmill manuals
Add to My Manuals
Save this manual to your list of manuals |
Page 8 highlights
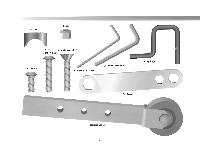
IMPORTANT To prevent permanent damage during assembly, do not completely tighten the top bolt and nut (a) before the bottom bolt (b) is secure. 2. Attach the Arm ears ■ Remove the right arm bar from the box. ■ Align the bar as shown, then push the top end of the bar all the way into the right side of the crossbar (a). DO NOT COMPLETELY TIGHTEN THE BOLT AND NUT AT THIS TIME. ■ Pass one of the 2-inch angled bolts through the arm spacer and bottom of the bar to secure the bar in place (b). Tighten the bolt securely. ■ Now, completely secure the 1 3/4-inch round bolt and nut at the top of the bar (a). ■ Repeat with the left arm bar. Items Needed... • Flat Wrench • 7/32-Inch Allen Wrench 2 -a • 2 2 -b • x2 5 DO NOT TIGHTEN THE TOP BOLT UNTIL THE BOTTOM BOLT (b) HA BEEN TIGHTENED. a.
-
 1
1 -
2
-
 3
3 -
 4
4 -
 5
5 -
 6
6 -
 7
7 -
 8
8 -
 9
9 -
 10
10 -
 11
11 -
 12
12 -
 13
13 -
14
-
15
-
16
-
17
-
18
-
19
 |
 |
