Oki C5400 Upgrade Kit Installation Instructions - Page 5
Step 2: Install the New DIMM
 |
View all Oki C5400 manuals
Add to My Manuals
Save this manual to your list of manuals |
Page 5 highlights
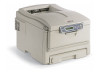
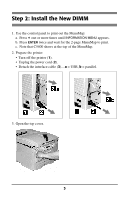
Step 2: Install the New DIMM 1. Use the control panel to print out the MenuMap: a. Press + one or more times until INFORMATION MENU appears. b. Press ENTER twice and wait for the 2-page MenuMap to print. c. Note that C5400 shows at the top of the MenuMap. 2. Prepare the printer: • Turn off the printer (1). • Unplug the power cord (2). • Detach the interface cable (3)-a = USB, b = parallel. 3. Open the top cover. 3
-
 1
1 -
 2
2 -
 3
3 -
 4
4 -
 5
5 -
 6
6 -
 7
7 -
 8
8 -
 9
9 -
 10
10 -
 11
11 -
12
-
13
-
14
-
15
-
16
 |
 |

3
Step 2: Install the New DIMM
1. Use the control panel to print out the MenuMap:
a. Press
+
one or more times until
INFORMATION MENU
appears.
b. Press
ENTER
twice and wait for the 2-page MenuMap to print.
c.
Note that C5400 shows at the top of the MenuMap.
2. Prepare the printer:
•
Turn off the printer (
1
).
•
Unplug the power cord (
2
).
•
Detach the interface cable (
3
)—
a
= USB,
b
= parallel.
3. Open the top cover.