Oki C5400 Upgrade Kit Installation Instructions - Page 8
Hold the DIMM with the narrower metallic contact edge, to the, right, and insert it, pushing
 |
View all Oki C5400 manuals
Add to My Manuals
Save this manual to your list of manuals |
Page 8 highlights
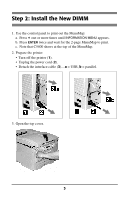
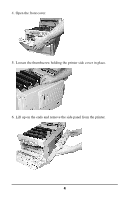
10. Hold the DIMM with the narrower metallic contact edge (1) to the right, and insert it straight into the socket, pushing in until you hear the lock tabs on either side snap into place. Caution! Keep the DIMM at a 90° angle to the printer: Push the DIMM in straight: 6
-
 1
1 -
2
-
 3
3 -
 4
4 -
 5
5 -
 6
6 -
 7
7 -
 8
8 -
 9
9 -
 10
10 -
 11
11 -
 12
12 -
 13
13 -
14
-
15
-
16
 |
 |

6
10.
Hold the DIMM with the narrower metallic contact edge (
1
) to the
right, and insert it
straight into the socket
, pushing in until you hear
the lock tabs on either side snap into place.
Caution!
Keep the DIMM at a 90° angle
to the printer:
Push the DIMM in straight
: