Olympus FE 170 FE-170 Advanced Manual (English) - Page 29
camera into the USB connector of the camera and the printer's, Disconnect the USB cable from
 |
UPC - 050332158689
View all Olympus FE 170 manuals
Add to My Manuals
Save this manual to your list of manuals |
Page 29 highlights
2 Turn the printer on and plug the USB cable provided with the camera into the USB connector of the camera and the printer's USB port. Connector cover USB connector USB cable (provided) • The [EASY PRINT START] screen is displayed. • For details of how to turn the printer on and the position of the USB port, refer to the printer's instruction manual. 3 Press O
-
 1
1 -
2
-
3
-
4
-
5
-
6
-
7
-
8
-
9
-
10
-
11
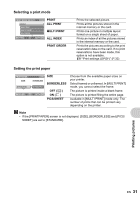
-
12
-
13
-
14
-
15
-
16
-
17
-
18
-
19
-
20
-
21
-
22
-
23
-
 24
24 -
 25
25 -
 26
26 -
 27
27 -
 28
28 -
 29
29 -
 30
30 -
 31
31 -
 32
32 -
 33
33 -
 34
34 -
35
-
36
-
37
-
38
-
39
-
40
-
41
-
42
-
43
-
44
-
45
-
46
-
47
-
48
-
49
-
50
-
51
-
52
-
53
-
54
-
55
-
56
-
57
-
58
-
59
-
60
-
61
-
62
-
63
-
64
-
65
-
66
-
67
-
68
-
69
-
70
-
71
-
72
-
73
-
74
-
75
-
76
 |
 |

Printing pictures
EN
29
2
Turn the printer on and plug the USB cable provided with the
camera into the USB connector of the camera and the printer’s
USB port.
•
The [EASY PRINT START] screen is displayed.
•
For details of how to turn the printer on and the position of the USB port, refer
to the printer’s instruction manual.
3
Press
O
<
.
•
Printing starts.
•
When printing is finished, the picture
selection screen is displayed. To print
another picture, press
XY
to select a picture,
and press
O
<
.
•
When you are finished, disconnect the USB
cable from the camera with the picture
selection screen displayed.
4
Disconnect the USB cable from the
camera.
USB connector
USB cable
(provided)
Connector cover
OK
<
EASY PRINT START
PC
/
CUSTOM PRINT
EXIT
PRINT