Olympus FE 170 FE-170 Advanced Manual (English) - Page 41
Connecting the camera to a computer, Click Restart.
 |
UPC - 050332158689
View all Olympus FE 170 manuals
Add to My Manuals
Save this manual to your list of manuals |
Page 41 highlights
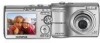
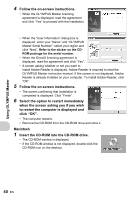
2 Double-click the "Installer" icon. • The OLYMPUS Master installer starts up. • Follow the on-screen instructions. • When the OLYMPUS Master licensing agreement is displayed, read the agreement and click "Continue" and then "Agree" to proceed with the installation. • The screen confirming that installation is completed is displayed. 3 Click "Finish". • The first screen is displayed. 4 Click "Restart". • The computer restarts. • Remove the CD-ROM from the CD-ROM drive and store it. Connecting the camera to a computer 1 Make sure the camera is turned off. • The monitor is off. • The lens is retracted. Using OLYMPUS Master 2 Connect the USB connector on the camera to the USB port on the computer using the provided USB cable. • Refer to your computer's instruction manual to locate the position of the USB port. • The camera turns on automatically. • The monitor turns on and the selection screen for the USB connection is displayed. 3 Select [PC], and press i. Monitor Connector cover USB connector USB PC EASY PRINT CUSTOM PRINT EXIT SET OK EN 41
-
 1
1 -
2
-
3
-
4
-
5
-
6
-
7
-
8
-
9
-
10
-
11
-
12
-
13
-
14
-
15
-
16
-
17
-
18
-
19
-
20
-
21
-
22
-
23
-
24
-
25
-
26
-
27
-
28
-
29
-
30
-
31
-
32
-
33
-
34
-
35
-
 36
36 -
 37
37 -
 38
38 -
 39
39 -
 40
40 -
 41
41 -
 42
42 -
 43
43 -
 44
44 -
 45
45 -
 46
46 -
47
-
48
-
49
-
50
-
51
-
52
-
53
-
54
-
55
-
56
-
57
-
58
-
59
-
60
-
61
-
62
-
63
-
64
-
65
-
66
-
67
-
68
-
69
-
70
-
71
-
72
-
73
-
74
-
75
-
76
 |
 |