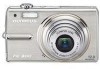
Olympus FE 300 FE-300 Instruction Manual (English)
Olympus FE 300 - Digital Camera - Compact Manual
 |
View all Olympus FE 300 manuals
Add to My Manuals
Save this manual to your list of manuals |
Olympus FE 300 manual content summary:
- Olympus FE 300 | FE-300 Instruction Manual (English) - Page 1
DIGITAL CAMERA FE-300/X-830 Instruction Manual Quick Start Guide Get started using your camera right away. Button operations Menu operations Printing pictures Using OLYMPUS Master Getting to know your camera better Appendix ( Thank you for purchasing an Olympus digital camera. Before you start to - Olympus FE 300 | FE-300 Instruction Manual (English) - Page 2
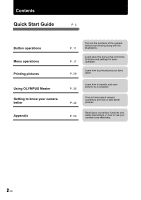
Contents Quick Start Guide P. 3 Button operations Menu operations Printing pictures Using OLYMPUS Master Getting to know your camera better Appendix P. 11 P. 17 P. 29 Test out the functions of the camera buttons by following along with the illustrations. Learn about the menus that control the - Olympus FE 300 | FE-300 Instruction Manual (English) - Page 3
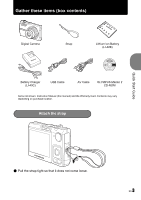
) Digital Camera Strap Lithium Ion Battery (LI-42B) Battery Charger (LI-40C) USB Cable AV Cable OLYMPUS Master 2 CD-ROM Items not shown: Instruction Manual (this manual) and the Warranty Card. Contents may vary depending on purchase location. Attach the strap Quick Start Guide ( Pull - Olympus FE 300 | FE-300 Instruction Manual (English) - Page 4
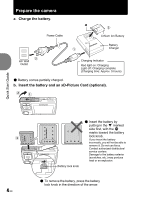
the camera a. Charge the battery. Power Cable W 3 Lithium Ion Battery Battery 1 Charger 2 AC Wall Outlet Charging Indicator Red light on: Charging Light off: Charging complete (Charging time: Approx. 5 hours) ( Battery comes partially charged. b. Insert the battery and an xD-Picture Card - Olympus FE 300 | FE-300 Instruction Manual (English) - Page 5
without inserting the optional xDPicture Card™ (hereinafter referred to as "the card"). If you shoot pictures with this camera without using an xD-Picture Card, the pictures will be recorded in the internal memory. For details on the card, please refer to "The card" (P. 53). Quick Start Guide EN 5 - Olympus FE 300 | FE-300 Instruction Manual (English) - Page 6
reduces the blur incurred by a moving subject, or camera shake when taking pictures. Suitable for taking pictures of people. Suitable for taking pictures of a landscape. Select from 12 available scene modes according to the shooting conditions. Use the shooting guide displayed on the screen to shoot - Olympus FE 300 | FE-300 Instruction Manual (English) - Page 7
Cancels the setting a. Press the OF/< and NY buttons to select [Y]. • The first two digits of the year are fixed. OF/< button Y M D TIME 2007 Y / M / D NY button b. Press the Y# button. CANCEL MENU Quick Start Guide Y# button c. Press the OF/< and NY buttons to select [M]. Y M D TIME 2007 - Olympus FE 300 | FE-300 Instruction Manual (English) - Page 8
Guide Set the date and time d. Press the Y# button. e. Press the OF/< and NY buttons to select [D]. Y M D TIME 2007.12 CANCEL MENU Y M D TIME 2007.12.10 12:30 Y / M / D h. Press the Y# button. to select [Y/M/D]. CANCEL MENU SET OK Y M D TIME 2007.12.10 12:30 Y / M / D CANCEL MENU j. After all - Olympus FE 300 | FE-300 Instruction Manual (English) - Page 9
Take a picture a. Hold the camera. Horizontal grip Vertical grip Quick Start Guide b. Focus. c. Shoot. Shutter Button (Press Halfway) Place this mark over your subject. 1/1000 F2.8 [] [IN] HQ 4000×3000 4 The number of pictures that can be taken is displayed. When the focus and exposure are - Olympus FE 300 | FE-300 Instruction Manual (English) - Page 10
Quick Start Guide Review your pictures a. Press the q button. q button Arrow pad Displays the next image Displays the previous image [IN] HQ 4000×3000 F2.8 1/1000 0.0 ISO 1600 '07.12.10 12:30 100-0004 4 Erase pictures a. Press the X& and Y# buttons to display the picture you want to erase. b. - Olympus FE 300 | FE-300 Instruction Manual (English) - Page 11
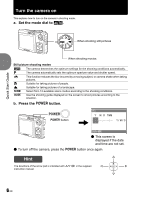
Button operations 12 d 3 4 5 Shooting mode Self-timer Flash mode 6 8 [] b c 9 a [IN] HQ 4000×3000 4 7 Macro mode 0 1 o button Power on: Camera turns on in shooting mode. • Lens extends • Monitor turns on Turning the camera on and off 2 Shutter button Shooting pictures/movies - Olympus FE 300 | FE-300 Instruction Manual (English) - Page 12
CAMERA MENU] settings such as [WB], [ISO] can be changed. h Shooting pictures using digital image stabilization This function reduces the blur incurred by a moving subject, or camera shake when taking pictures. B E Shooting pictures images and the shooting mode to best suit the situation. • To - Olympus FE 300 | FE-300 Instruction Manual (English) - Page 13
pictures manually by pressing the shutter button in this mode. • There may be cases in which the camera guide again. • To change the setting without using the shooting guide, set the shooting mode to another one. • The content set using the shooting guide recording, only the digital zoom can be used - Olympus FE 300 | FE-300 Instruction Manual (English) - Page 14
+ 1.0 Button operations Playback mode: Printing pictures Display a picture to print out in playback mode, connect the camera to the printer, and then press OF/< to print the picture. g "Direct printing (PictBridge)" (P. 29) 9 X& button Shooting pictures close to the subject Press X& in shooting - Olympus FE 300 | FE-300 Instruction Manual (English) - Page 15
keep. g "0 Protecting pictures" (P. 25) d Zoom lever Zooming while shooting/Close-up playback Shooting mode: Zooming in on your subject Optical zoom: 3x Digital zoom: 4x (optical zoom × digital zoom: Max. 12x) Zoom out: Turn the zoom lever to the Wside. [] [IN] HQ 4000×3000 4 [] [IN] HQ - Olympus FE 300 | FE-300 Instruction Manual (English) - Page 16
display Single-frame playback • Use the arrow pad to browse pictures. [IN] HQ 4000×3000 W F2.8 1/1000 0.0 T T [IN] ISO 1600 W '07.12.10 12:30 100-0004 4 1 2 3 4 T [IN] W Index display Close-up playback • Turn and hold the zoom lever to 1 2 3 • Use the arrow pad to select - Olympus FE 300 | FE-300 Instruction Manual (English) - Page 17
to the mode. Top menu (Still picture shooting mode) SETUP menu items RESET IMAGE QUALITY CAMERA MENU SETUP EXIT MENU SCENE SILENT MODE settings are made by following the shooting guide, press m to display the shooting guide screen. Operation guide During menu operations, the buttons and - Olympus FE 300 | FE-300 Instruction Manual (English) - Page 18
SHUTTER SOUND LOW VOLUME HIGH BACK MENU SET OK Shooting mode menu 2 18 EN 1 RESET IMAGE QUALITY CAMERA MENU SETUP EXIT MENU SCENE SILENT MODE SET OK 3 4CAMERA MENU WB 4 ISO FINE ZOOM R (still pictures) 5 R (movies) PANORAMA* AF MODE * An Olympus xD-Picture Card is required. K - Olympus FE 300 | FE-300 Instruction Manual (English) - Page 19
Still picture image quality and their applications Image quality/Image size Compression Application SHQ 4000 × 3000 HQ 4000 × 3000 Low & Y # Function Factory default setting MNIGHT+PORTRAIT 0.0 OFF OFF AUTO Ref. Page P. 12 P. 14 P. 14 P. 14 P. 14 IMAGE QUALITY HQ P. 19 WB AUTO P. 20 - Olympus FE 300 | FE-300 Instruction Manual (English) - Page 20
shooting mode to best suit the situation. This can be set only when the mode dial is set to f. • By switching to another scene, most settings will be changed to the default settings of each scene. g "f Shooting pictures by selecting a scene mode according to the situation" (P. 12) 4 CAMERA MENU WB - Olympus FE 300 | FE-300 Instruction Manual (English) - Page 21
digital zoom can be used. PANORAMA Creating a panoramic picture Panorama shooting lets you create a panoramic picture, using the OLYMPUS Master software on the provided CD-ROM. An Olympus xD-Picture Card AF target mark. • There may be cases in which the camera cannot detect a face even if [FACE - Olympus FE 300 | FE-300 Instruction Manual (English) - Page 22
picture is selected 5 8*1 1 SLIDE- PRINT SHOW EDIT ORDER 3 PERFECT PLAYBACK FIX MENU SETUP MY SILENT FAVORITE ERASE MODE EXIT MENU SET OK 4 76 6PLAYBACK MENU 0 y*2 R*2 *1 A card a picture with the movie icon (n) and press to play back the movie. Menu operations '07.12.10 12:30 - Olympus FE 300 | FE-300 Instruction Manual (English) - Page 23
BACK MENU SET OK ALL DIS EDIT LIGHTING FIX REDEYE FIX Digital image stabilization edit, lighting fix and redeye fix are activated Movies, pictures shot by another camera, and previously fixed or edited pictures cannot be corrected. • When fixed pictures are displayed, the picture cannot be - Olympus FE 300 | FE-300 Instruction Manual (English) - Page 24
pictures registered in MY FAVORITE are erased, original pictures in the internal memory or the card may not be erased. SET Registering favorite pictures SET • Select a picture press . SET OK EDIT ...Cutting a part of the movie 00:00 / 00:36 Select a part of the movie you wish to save, - Olympus FE 300 | FE-300 Instruction Manual (English) - Page 25
cannot be restored. Check each picture before erasing to avoid accidentally erasing pictures you want to keep. • When erasing pictures in the internal memory, do not insert the card into the camera. • When erasing pictures from the card, insert a card into the camera in advance. Menu operations EN - Olympus FE 300 | FE-300 Instruction Manual (English) - Page 26
is inserted in the camera when formatting the card. • Before using non-Olympus cards or cards which have been formatted on a computer, you must format them with this camera. BACKUP Copying pictures in the internal memory to the card Insert the optional card into the camera. Copying data does not - Olympus FE 300 | FE-300 Instruction Manual (English) - Page 27
where you purchased this camera. You can add other languages to your camera with the provided OLYMPUS Master software. PIXEL MAPPING Adjusting one minute after taking or viewing pictures to allow the pixel mapping function to perform properly. If you turn the camera off during pixel mapping, start - Olympus FE 300 | FE-300 Instruction Manual (English) - Page 28
operations AV cable (provided) Settings on the camera Turn the camera on and press q to select the playback mode. • The last picture taken is instruction manual. • Images and the information displayed on the screen may be cropped depending on the TV's settings. POWER SAVE Setting the camera to - Olympus FE 300 | FE-300 Instruction Manual (English) - Page 29
the multi-connector of the camera and the printer's USB port. Multi-connector USB cable Printing pictures • The [EASY PRINT START] screen is displayed. • For details of how to turn the printer on and the position of the USB port, refer to the printer's instruction manual. 3 Press OF/ - Olympus FE 300 | FE-300 Instruction Manual (English) - Page 30
USB cable from the camera with the picture selection screen displayed. EXIT 4 Disconnect the USB cable from the camera. PRINT 5 Disconnect the USB cable from the printer. You can use [EASY PRINT] even when the camera PRINT], and press . USB Operation guide PC EASY PRINT CUSTOM PRINT EXIT SET - Olympus FE 300 | FE-300 Instruction Manual (English) - Page 31
stored in the internal memory or on the card. Prints one picture in multiple layout format. Prints an index of all the pictures stored in the internal memory or on the card. Prints the pictures according to the print reservation data on the card. If no print reservations have been made, this - Olympus FE 300 | FE-300 Instruction Manual (English) - Page 32
from the camera. EXIT MENU SET OK 7 Disconnect the USB cable from the printer. Printing pictures Print settings (DPOF) How to make print reservations Print reservations allow you to save printing data (the number of prints and the date and time information) with the pictures stored on the card - Olympus FE 300 | FE-300 Instruction Manual (English) - Page 33
. For more details, refer to the printer's instruction manual. A PC card adapter may also be necessary. Note • DPOF reservations set by another device cannot be changed by this camera. Make changes using the original device. If a card contains DPOF reservations set by another device, entering - Olympus FE 300 | FE-300 Instruction Manual (English) - Page 34
reservation Reserves all the pictures stored on the card. The number of prints is set at one print per picture. 1 Press m in the playback mode and display the top menu. 2 Select [PRINT ORDER] [U], and press . 3 Select the date and time setting, and press . NO The pictures are printed without the - Olympus FE 300 | FE-300 Instruction Manual (English) - Page 35
using the OLYMPUS Master software, also provided with the camera. Prepare the following items before starting. Install the OLYMPUS Master software gP. 36 OLYMPUS Master 2 USB cable CD-ROM Connect the camera to the computer using the gP. 38 USB cable Start up the OLYMPUS Master software gP. 38 - Olympus FE 300 | FE-300 Instruction Manual (English) - Page 36
OS X 10.3 are not supported. • Operations are not guaranteed when using an added USB or IEEE 1394 (FireWire) port. • To install the software, you must log on as • Disconnect the cable connecting the camera to the computer • Turn off the camera • Open the camera's battery/card compartment cover 36 EN - Olympus FE 300 | FE-300 Instruction Manual (English) - Page 37
3 Click "Next" and follow the on-screen instructions. • When the OLYMPUS Master licensing agreement is displayed, read the agreement and , the screen confirming whether to install OLYMPUS muvee theaterPack Trial Version is displayed. To install this software, click "Install". Macintosh 1 Insert the - Olympus FE 300 | FE-300 Instruction Manual (English) - Page 38
the provided USB cable. • Refer to your computer's instruction manual to locate the position of the USB port. • The camera turns on automatically. • The monitor turns on and the selection screen for the USB connection is displayed. Multi-connector Connector cover Using OLYMPUS Master 3 Select - Olympus FE 300 | FE-300 Instruction Manual (English) - Page 39
-screen instructions. To exit OLYMPUS Master 1 Click "Exit" on any window. • OLYMPUS Master is exited. Displaying camera images camera 1 Make sure that the card access lamp has stopped blinking. Card access lamp Using OLYMPUS Master 2 Make the following preparations for disconnecting the USB cable - Olympus FE 300 | FE-300 Instruction Manual (English) - Page 40
and save images to a computer without using OLYMPUS Master This camera is compatible with USB mass storage. You can connect the camera to your computer using the USB cable provided with the camera to download and save images without using OLYMPUS Master. The following environment is required to use - Olympus FE 300 | FE-300 Instruction Manual (English) - Page 41
USB port. • Computers with a USB port added by means of an extension card battery is fully charged! 1 Make sure that your computer is connected to the Internet. 2 Plug the USB cable into the USB port on the computer. 3 Plug the other end of the USB cable into the camera's USB connector. • The camera - Olympus FE 300 | FE-300 Instruction Manual (English) - Page 42
SETUP] screen appears. In this case, select [xD CARD CLEAN], press , remove the card, and then wipe the contact area with a soft dry cloth. No picture is taken when the shutter button is pressed The camera is in sleep mode • To save battery power, the camera automatically goes into sleep mode and - Olympus FE 300 | FE-300 Instruction Manual (English) - Page 43
returned to the factory default settings if the camera is left without the battery for approximately 3 days. If the battery is in the camera for a short period of time, the date and time setting will be reset earlier than this. Before taking important pictures, check that the date and time settings - Olympus FE 300 | FE-300 Instruction Manual (English) - Page 44
the flash, set the flash mode to [$] (flash off). The picture is too grainy There are several factors that can cause the picture to appear grainy. Using the digital zoom to take close-up pictures • With the digital zoom, part of the image is cropped and enlarged. The greater the magnification, the - Olympus FE 300 | FE-300 Instruction Manual (English) - Page 45
the internal memory. Using a card (xD-Picture Card) (optional) • Pictures are recorded to the card when inserted in the camera. When the card is full, you can download the pictures to a computer and then either erase the pictures from the card or use a new card. • Pictures are not recorded to the - Olympus FE 300 | FE-300 Instruction Manual (English) - Page 46
render the internal memory or card unusable. • Open the battery/card compartment cover • Remove the battery and the card Green lamp of the monitor are attempting to edit pictures taken with another camera. • Some functions cannot be used when there is no card in the camera. [PANORAMA], [PRINT - Olympus FE 300 | FE-300 Instruction Manual (English) - Page 47
View the picture using image browsing software • Install the OLYMPUS Master 2 software from the provided CD-ROM. Change the monitor setting • The icons on the computer desktop may be rearranged. For details on changing the settings on your computer, refer to the computer's instruction manual. EN 47 - Olympus FE 300 | FE-300 Instruction Manual (English) - Page 48
image file is damaged. Use image processing software to edit the pictures. The battery/card Close the battery/card compartment cover. compartment cover is open. The battery is empty. Charge the battery. The data in the card cannot be read. Or, the card is not formatted. There is an error in - Olympus FE 300 | FE-300 Instruction Manual (English) - Page 49
the printer while changing settings on the camera. Turn off the camera and printer. Check the printer and remedy any problems before turning the power on again. Pictures recorded on other Use a computer to print. cameras may not be printed on this camera. Functions available in shooting modes and - Olympus FE 300 | FE-300 Instruction Manual (English) - Page 50
and card, and keep in a cool, dry place that is well ventilated. • Periodically, insert the battery and test the camera functions. Note • Avoid leaving the camera in places where chemical products are handled since this may result in corrosion. Battery and charger ( This camera uses one Olympus - Olympus FE 300 | FE-300 Instruction Manual (English) - Page 51
Representative plug of power supply cord of countries/regions around the world A Type B Type BF Type B3 Type C Type SE Type O Type (American Type) (British Type) (British Type) (British Type) (CEE Type) (CEE Type) (Oceania Type) The representative supply voltage and plug type are described - Olympus FE 300 | FE-300 Instruction Manual (English) - Page 52
(50/60Hz) around the world. However, depending on the country or area you are in, the AC wall outlet may be shaped differently and the charger may require a plug adapter to match the wall outlet. For details, ask at your local electrical shop or travel agent. ( Do not use travel voltage - Olympus FE 300 | FE-300 Instruction Manual (English) - Page 53
use this space to write the contents of the card. 2 Contact area The part where the data transferred from the camera enters the card. 1 Compatible cards 2 xD-Picture Card (16MB - 2GB) (Type H/M, Standard) Using the internal memory or card You can confirm on the monitor whether the internal - Olympus FE 300 | FE-300 Instruction Manual (English) - Page 54
SERVICEABLE PARTS INSIDE. REFER SERVICING TO QUALIFIED OLYMPUS SERVICE PERSONNEL. An exclamation mark enclosed in a triangle alerts you to important operating and maintenance instructions All Instructions - Before you use the product, read all operating instructions. Save all manuals and - Olympus FE 300 | FE-300 Instruction Manual (English) - Page 55
shocks or burns. DANGER • The camera uses a lithium ion battery specified by Olympus. Charge the battery with the specified charger. Do not use any other chargers. • Never heat or incinerate batteries. • Take precautions when carrying or storing batteries to prevent them from coming into - Olympus FE 300 | FE-300 Instruction Manual (English) - Page 56
batteries recommended for use with this product. • Insert the battery carefully as described in the operating instructions. • If rechargeable batteries remove it immediately after using the camera. • Always unload the battery from the camera before storing the camera for a long period. Caution for - Olympus FE 300 | FE-300 Instruction Manual (English) - Page 57
uses a lithium ion battery specified by Olympus. Do not use any other type of battery. For safe and proper use, read the battery's instruction manual carefully before using it. • If the battery's terminals get wet or greasy, camera contact failure may result. Wipe the battery well with a dry cloth - Olympus FE 300 | FE-300 Instruction Manual (English) - Page 58
the camera to USB enabled personal computers (PC). Any unauthorized changes or modifications to this equipment would void the user's authority to operate. For customers in North and South America For customers in USA Declaration of Conformity Model Number : FE-300/X-830 Trade Name : OLYMPUS - Olympus FE 300 | FE-300 Instruction Manual (English) - Page 59
of Apple Inc. • xD-Picture Card™ is a trademark. • All other company and product names are registered trademarks and/or trademarks of their respective owners. • The standards for camera file systems referred to in this manual are the "Design Rule for Camera File System/DCF" standards stipulated - Olympus FE 300 | FE-300 Instruction Manual (English) - Page 60
AVI Motion JPEG : Internal memory xD-Picture Card (16 MB - 2 GB) (Type H/M, Standard) : 12,000,000 pixels : 1/1.72" CCD (primary color filter), 12,400,000 pixels (gross) : Olympus lens 7.4 to 22.2 mm, f2.8 to 4.7 (equivalent to 35 to 105 mm on a 35 mm camera) : Digital ESP metering : 4 to 1/1000 sec - Olympus FE 300 | FE-300 Instruction Manual (English) - Page 61
Names of Parts Camera Multi-connector gP. 28, 29, 38 Zoom lever gP. 15 o button gP. 11 Self-timer lamp gP. 14 Flash gP. 14 Strap eyelet gP. 3 Connector cover gP. 28, 38 Microphone Lens Card access lamp gP. 39, 46, 53 K button (Shooting) q button (Playback) gP. 12 gP. 12 Shutter - Olympus FE 300 | FE-300 Instruction Manual (English) - Page 62
18 17 16 2 1/1000 F2.8 +2.0 3 15 4 5 6 ISO 1600 14 13 7 HQ 4000×3000 4 12 20 19 1 3 4 5 7 HQ 16 +2.0 15 14 13 00:36 8 9 10 11 Still pictures 8 10 11 Movies Item 1 Battery check 2 Flash standby Camera movement warning/flash charge 3 Green lamp 4 Silent mode 5 White balance 6 ISO - Olympus FE 300 | FE-300 Instruction Manual (English) - Page 63
16 15 1 10 14 2 HQ 13 2 3 4000×3000 12 F2.8 1/1000 +2.0 11 4 10 ISO 1600 9 '07.12.10 12:30 8 100-0004 7 46 5 Still pictures 17 16 15 14 HQ 13 320×240 12 10 '07.12.10 12:30 8 100-0004 7 00:00 / 00:36 6 Movies Item 1 Battery check 2 Silent mode Indications e = full power, f = low - Olympus FE 300 | FE-300 Instruction Manual (English) - Page 64
AUTO (WB) WB AUTO 20 Auto flash AUTO 14 Auto focus 43 AV cable 3, 28 B BACKUP 26 Battery 4, 50 Battery charger 3, 4, 50 Battery check 62 BEEP 27 BEHIND GLASS P 12 C CAMERA MENU 20 CANDLE W 12 Card 45, 53 Card access lamp 39, 46, 53 Close-up playback U 16 Cloudy day 3 20 Compression - Olympus FE 300 | FE-300 Instruction Manual (English) - Page 65
19 Strap 3 Sunny day 5 20 SUNSET S 12 Super macro mode 14 T Top menu 17 Trimming P 24, 32, 33 Tripod socket 61 Tungsten light 1 20 U USB cable 3, 29, 35, 38, 39 V VIDEO OUT 28 VOLUME 22, 27 W Warning sound 8 27 White balance WB 20 X xD-Picture Card 21, 53 Z Zoom 15 Zoom lever 15 EN - Olympus FE 300 | FE-300 Instruction Manual (English) - Page 66
66 EN - Olympus FE 300 | FE-300 Instruction Manual (English) - Page 67
EN 67 - Olympus FE 300 | FE-300 Instruction Manual (English) - Page 68
Printed in Japan 1AG6P1P3567-- VS169201
-
 1
1 -
 2
2 -
 3
3 -
 4
4 -
 5
5 -
 6
6 -
 7
7 -
8
-
9
-
10
-
11
-
12
-
13
-
14
-
15
-
16
-
17
-
18
-
19
-
20
-
21
-
22
-
23
-
24
-
25
-
26
-
27
-
28
-
29
-
30
-
31
-
32
-
33
-
34
-
35
-
36
-
37
-
38
-
39
-
40
-
41
-
42
-
43
-
44
-
45
-
46
-
47
-
48
-
49
-
50
-
51
-
52
-
53
-
54
-
55
-
56
-
57
-
58
-
59
-
60
-
61
-
62
-
63
-
64
-
65
-
66
-
67
-
68
 |
 |
DIGITAL CAMERA
Instruction
Manual
Getting to know your
camera better
Quick Start Guide
Get started using your
camera right away.
Button operations
Menu operations
Printing pictures
Using OLYMPUS Master
(
Thank you for purchasing an Olympus digital camera. Before you start to use your new camera, please
read these instructions carefully to enjoy optimum performance and a longer service life. Keep this manual
in a safe place for future reference.
(
We recommend that you take test shots to get accustomed to your camera before taking important
photographs.
(
In the interest of continually improving products, Olympus reserves the right to update or modify
information contained in this manual.
Appendix
FE-300/X-830