Olympus FE20 FE-360 Instruction Manual (English) - Page 25
Adjusting to a, natural color scheme, Selecting the, ISO sensitivity [ISO], Recording sound when
 |
UPC - 050332166332
View all Olympus FE20 manuals
Add to My Manuals
Save this manual to your list of manuals |
Page 25 highlights
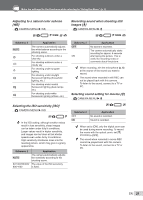
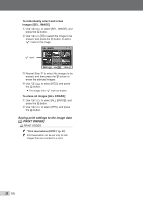
Make the settings for the functions while referring to "Using the Menu" (p. 3). Adjusting to a natural color scheme [WB] K CAMERA MENU X WB Recording sound when shooting still images [R] K CAMERA MENU X R n/D: P f n h n/D: P f h Submenu 2 AUTO 5 3 1 w x y Application The camera automatically adjusts the white balance according to the shooting scene. For shooting outdoors under a clear sky For shooting outdoors under a cloudy sky For shooting under tungsten lighting For shooting under daylight fluorescent lighting (household lighting, etc.) For shooting under neutral fluorescent lighting (desk lamps, etc.) For shooting under white fluorescent lighting (offices, etc.) Submenu 2 OFF ON Application No sound is recorded. The camera automatically starts recording for approx. 4 seconds after taking the picture. This is useful for recording notes or comments about the picture. When recording, aim the microphone (p. 6) at the source of the sound you want to record. The sound when recorded in still REC can not be played back with this camera. To listen to the sound, connect to a TV or PC. Selecting sound setting for movies [R] K CAMERA MENU X R Selecting the ISO sensitivity [ISO] K CAMERA MENU X ISO n/D: P In the ISO setting, although smaller values result in less sensitivity, sharp images can be taken under fully lit conditions. Larger values result in higher sensitivity, and images can be taken at fast shutter speeds even under dimly lit conditions. High sensitivity introduces noise into the resulting picture, which may give it a grainy appearance. Submenu 2 AUTO 64/100/200/400/ 800/1000 Application The camera automatically adjusts the sensitivity according to the shooting scene. The value of the ISO sensitivity is fixed. n/D: n Submenu 2 OFF ON Application No sound is recorded. Sound is recorded. When set to [ON], only the digital zoom can be used during movie recording. To record the movie with the optical zoom, set [R] (movies) to [OFF]. The sound when recorded in movie REC cannot be played back with this camera. To listen to the sound, connect to a TV or PC. EN 25
-
 1
1 -
2
-
3
-
4
-
5
-
6
-
7
-
8
-
9
-
10
-
11
-
12
-
13
-
14
-
15
-
16
-
17
-
18
-
19
-
 20
20 -
 21
21 -
 22
22 -
 23
23 -
 24
24 -
 25
25 -
 26
26 -
 27
27 -
 28
28 -
 29
29 -
 30
30 -
31
-
32
-
33
-
34
-
35
-
36
-
37
-
38
-
39
-
40
-
41
-
42
-
43
-
44
-
45
-
46
-
47
-
48
-
49
-
50
-
51
-
52
-
53
-
54
-
55
-
56
-
57
-
58
-
59
-
60
-
61
-
62
 |
 |
