Olympus PT-E06 PT-E06 Underwater Housing for the E-620 DSLR Instruction Manual - Page 16
Open the Case, Attach the digital camera to the camera table
 |
UPC - 050332168954
View all Olympus PT-E06 manuals
Add to My Manuals
Save this manual to your list of manuals |
Page 16 highlights
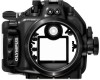
Open the Case 1 Slide and hold the slide lock towards the arrow direction (1) and turn the open/close dial counter clockwise (2). 2 Turn the open/close dial to the position where it cannot be turned further. 3 Open the rear lid of the Case gently. Slide lock 1 2 CAUTION: Do not exert too much force while turning the open/close dial. Doing so may damage the dial. Attach the digital camera to the camera table In order to load the camera into the Case, attach the camera table (located on the front-lid side of the Case) to the digital camera. 1 The eyecup and the hot shoe cover of the digital camera can be stored in the camera table. 2 Attach the camera table to the tripod seat section on the bottom of the digital camera. Use the camera's tripod screw hole for attaching. En 3 The camera table has fixed up-down and front-rear Front orientations. To ensure that it is properly attached, refer to the illustration on the right. Up Down Rear EN 15
-
 1
1 -
2
-
3
-
4
-
5
-
6
-
7
-
8
-
9
-
10
-
 11
11 -
 12
12 -
 13
13 -
 14
14 -
 15
15 -
 16
16 -
 17
17 -
 18
18 -
 19
19 -
 20
20 -
 21
21 -
22
-
23
-
24
-
25
-
26
-
27
-
28
-
29
-
30
 |
 |
