Olympus PT-E06 PT-E06 Underwater Housing for the E-620 DSLR Instruction Manual - Page 20
Water Leakage Test
 |
UPC - 050332168954
View all Olympus PT-E06 manuals
Add to My Manuals
Save this manual to your list of manuals |
Page 20 highlights
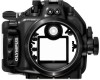
Water Leakage Test The final test after loading the camera is explained below. Always perform this test. It can be performed easily in a water tank or a bathtub. The required time is about five minutes. Simple water leakage test Explanatory image Hints 1 Place the Case slowly into the water. As the rear lid of the Case is transparent, waterdrops entering into it can be confirmed easily. 2 At first, immerse the Case for only three seconds. In case of trouble with the O-ring, three seconds is enough for water to enter. Are there air bubbles coming out between the lids? 3 Check that no water has entered the Case. Remove the Case from the water and check that no water has leaked at the inside of the Case. 4 Next, immerse the Case for 30 seconds. Check carefully for air bubbles! Do not perform any operation yet, but just observe. 5 Check that no water has entered the Case. En 6 Next, check by immersing for three minutes. Remove the Case from the water and check that no water has leaked at the bottom of the Case. Check carefully for air bubbles! Try operation of the buttons used frequently. Check carefully for air bubbles! 7 This is the final check. Has the silica gel become moist? 8 If there is no water leakage and everything is functioning correctly, you are ready to start shooting underwater. Has the silica gel become moist? Please check carefully! Now everything is all right! EN 19
-
 1
1 -
2
-
3
-
4
-
5
-
6
-
7
-
8
-
9
-
10
-
11
-
12
-
13
-
14
-
 15
15 -
 16
16 -
 17
17 -
 18
18 -
 19
19 -
 20
20 -
 21
21 -
 22
22 -
 23
23 -
 24
24 -
 25
25 -
26
-
27
-
28
-
29
-
30
 |
 |
