Olympus SP-600UZ SP-600UZ Instruction Manual (English)
Olympus SP-600UZ Manual
 |
UPC - 050332173569
View all Olympus SP-600UZ manuals
Add to My Manuals
Save this manual to your list of manuals |
Olympus SP-600UZ manual content summary:
- Olympus SP-600UZ | SP-600UZ Instruction Manual (English) - Page 1
DIGITAL CAMERA SP-600UZ Instruction Manual ● Thank you for purchasing an Olympus digital camera. Before you start to use your new camera, please read these instructions carefully to enjoy optimum performance and a longer service life. Keep this manual in a safe place for future reference. ● The - Olympus SP-600UZ | SP-600UZ Instruction Manual (English) - Page 2
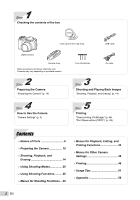
lens cap strap USB cable Digital camera Camera strap Other accessories not shown: Warranty card Contents may vary depending on purchase location. 2 Step Preparing the Camera "Preparing the Camera" (p. 10) 4 Step How to Use the Camera "Camera Settings" (p. 3) Four AA batteries AV cable 3 Step - Olympus SP-600UZ | SP-600UZ Instruction Manual (English) - Page 3
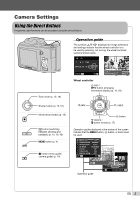
bottom of the screen indicate that the m button, A button, or zoom lever be used. 1 IMAGE SIZE 12M 2 COMPRESSION NORMAL SHADOW ADJUST AUTO AF MODE FACE/iESP 1 ESP/ ESP 2 FINE ZOOM OFF 3 DIGITAL ZOOM OFF EXIT MENU SET OK SEL. IMAGE SET OK Operation guide OK ERASE/CANCEL MENU EN 3 - Olympus SP-600UZ | SP-600UZ Instruction Manual (English) - Page 4
screen display. 1 Select [SETUP] and then press the A button. ● The [SETUP] menu is displayed. 1 IMAGE SIZE 12M 2 COMPRESSION NORMAL SHADOW ADJUST AUTO AF MODE FACE/iESP 1 ESP/ ESP 2 FINE ZOOM OFF 3 DIGITAL ZOOM OFF EXIT MENU SET OK 2 Press H to select the page tabs. Use FG to select - Olympus SP-600UZ | SP-600UZ Instruction Manual (English) - Page 5
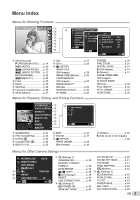
ZOOM p. 31 DIGITAL ZOOM p. 31 R (Still images p. 31 R (Movies p. 31 IMAGE STABILIZER (Still images)/ IS MOVIE MODE (Movies p. 32 FULLTIME AF p. 32 AF ILLUMINAT p. 32 ICON GUIDE p. 38 R (Add sound to still images) p. 38 Menus for Other Camera Settings 1 INTERNAL/SD 2 MEMORY FORMAT DATA - Olympus SP-600UZ | SP-600UZ Instruction Manual (English) - Page 6
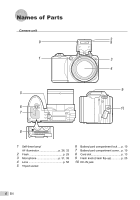
Names of Parts Camera unit 2 9 9 1 3 4 9 5 6 10 7 8 1 Self-timer lamp/ AF illuminator p. 26, 32 2 Flash p. 25 3 Microphone p. 31, 38 4 Lens p. 56 5 Tripod socket 6 Battery/card compartment lock .... p. 10 7 Battery/card compartment cover... p. 10 8 Card slot p. 13 9 Flash knob ( - Olympus SP-600UZ | SP-600UZ Instruction Manual (English) - Page 7
p. 3 INFO button (changing information display p. 16, 18 D button (erase p. 17 8 E button (camera guide/menu guide) ......... p. 19 9 m button p. 3, 4 10 Connector cover p. 11, 44, 46 11 HDMI micro connector p. 44 12 Multi-connector p. 11, 44, 46 13 Speaker 14 Zoom lever p. 15, 18 - Olympus SP-600UZ | SP-600UZ Instruction Manual (English) - Page 8
F3.5 26 25 Still image 1 Battery check p. 10, 52 2 Shooting mode p. 14, 20 3 Flash Image stabilization (still images)/ Digital image stabilization (movies) p. 32 13 Metering p. 30 14 Shadow Adjustment Technology p. 30 15 Compression (still images)..... p. 29, 58 16 Image size (still images - Olympus SP-600UZ | SP-600UZ Instruction Manual (English) - Page 9
Playback mode display ● Standard display 1 2 34 56 1 10 4/30 '10/02/26 12:30 17 Still image 00:12/00:34 6 Movie ● Advanced display 1 2 34 56 8 16 FILE 100 0004 '10/02/26 12:30 '10/02/26 12:30 17 1 Battery check p. 10, 52 2 Print reservation/ number of prints p. 49, 48 3 Protect - Olympus SP-600UZ | SP-600UZ Instruction Manual (English) - Page 10
to open during shooting and the batteries to fall out, resulting in loss of image data. For the types of batteries that can be used, see "Battery" (p. 56). If using rechargeable batteries, charge the batteries. Turn off the camera before opening the battery/card compartment cover. When using the - Olympus SP-600UZ | SP-600UZ Instruction Manual (English) - Page 11
.exe to start the camera setup. 3 Follow the instructions on the computer screen and setup the camera. Camera setup Set the camera date and time, time zone and display language automatically; install the camera instruction manual and PC software (ib); then perform user registration. Do not insert - Olympus SP-600UZ | SP-600UZ Instruction Manual (English) - Page 12
time set here are saved to image file names, date prints, and other data. 1 Press the n button to turn on the camera. ● The date and time more accurate setting, press the A button when the time signal hits 00 seconds. To change the date and time, adjust the setting from the menu. [X] (Date/time) - Olympus SP-600UZ | SP-600UZ Instruction Manual (English) - Page 13
Changing the display movies) in the internal memory and SD/SDHC memory cards" (p. 58) To remove the SD/SDHC memory card 1 2 Always use SD/SDHC memory cards with this camera. Do not insert other types of memory card. "Using an SD/SDHC memory card" (p. 57) Although the camera can store images - Olympus SP-600UZ | SP-600UZ Instruction Manual (English) - Page 14
settings are activated while also allowing changes to a wide range of other shooting menu functions, such as exposure compensation, white balance, etc. as needed. 1 Remove the lens cap. 2 Press the n button to turn on the camera. P mode indicator 3 Hold the camera and compose the shot. Monitor - Olympus SP-600UZ | SP-600UZ Instruction Manual (English) - Page 15
optical zoom, set [R] (movies) (p. 31) to [OFF]. Zoom bar P P 0.0 0.0 WB WB AUTO AUTO ISO ISO AUTO AUTO 00:34 00:34 4 12M 4 12M Optical zoom: 15x, Digital zoom: 5x To take larger images without reducing image quality [FINE ZOOM] (p. 31) To take larger images [DIGITAL ZOOM] (p. 31 - Olympus SP-600UZ | SP-600UZ Instruction Manual (English) - Page 16
F (INFO). ● The displayed shooting information changes in the order shown below each time the button is pressed. "Shooting mode display" (p. 8) Normal P Viewing images 1 Press the q button. Number of frames/ Total number of images 4/30 '10/02/26 12:30 Playback image 00:34 4 12M 0.0 WB AUTO No - Olympus SP-600UZ | SP-600UZ Instruction Manual (English) - Page 17
Hold I or H pressed for continuous advance or rewind. To stop movie playback Press the m button. Erasing images during playback (Single image erase) 1 Display the image you want to erase and press G (D). ERASE BACK MENU ALL ERASE SEL. IMAGE ERASE CANCEL SET OK 2 Press FG to select [ERASE], and - Olympus SP-600UZ | SP-600UZ Instruction Manual (English) - Page 18
grouped into the same event using the PC software (ib). 1 Turn the zoom lever. W side T side Single-image view Close-up view W 4/30 4/30 '10/02/26 12:30 T '10/02/26 12:30 To select an image in index view Use FGHI to select an image, and press the A button to display the selected - Olympus SP-600UZ | SP-600UZ Instruction Manual (English) - Page 19
guide to look up camera operations. 1 Press the E button in the standby mode screen or the playback screen. REPLAY OK 2 Press the A button. '10/02/26 12:30 IN-CAMERA MANUAL Search Learn about the camera History Message EXIT SET OK Current viewing area To control panorama image playback Zoom - Olympus SP-600UZ | SP-600UZ Instruction Manual (English) - Page 20
icon changes depending on the scene that the camera automatically selects. Using the best mode for the shooting scene (s mode) 1 Set the shooting mode to s. SCENE MODE 0.0 WB AUTO 4 12M 2 Press G to go to the submenu. PORTRAIT 0.0 WB AUTO 4 12M 00:34 4 12M NORM In some cases, the camera may not - Olympus SP-600UZ | SP-600UZ Instruction Manual (English) - Page 21
specific shooting scenes. For this reason, settings may not be changed in some modes. Option B PORTRAIT/F LANDSCAPE/ G NIGHT SCENE*1/ M NIGHT+ a moving subject like a pet ([ PET] mode) 1 Use HI to select [ PET], and press the A button to set. 2 Hold the camera to align the AF target mark on the - Olympus SP-600UZ | SP-600UZ Instruction Manual (English) - Page 22
taken and combined by the camera. The user composes the shots using the guide frame and manually releases the shutter. The frames that were taken are combined into a panorama image using the PC software (ib). For details on installing the PC software (ib), see "Camera setup" (p. 11). When set to - Olympus SP-600UZ | SP-600UZ Instruction Manual (English) - Page 23
MANUAL 2 BACK MENU MANUAL MANUAL 1 2 1 2 BACK overlaps joint area 2. MANUAL 1 2 CANCEL MENU SAVE camera automatically processes the frames and the combined panorama image is displayed. To exit the panorama function without saving an image they overlap with the image in the monitor. - Olympus SP-600UZ | SP-600UZ Instruction Manual (English) - Page 24
the picture. 1 Set the shooting mode to Q. BEAUTY P 0.0 WB AUTO 4 12M 2 Point the camera toward the subject. Check the frame appearing around the face detected by the camera, and then press the shutter button to take the picture. ● The unedited image and edited image are both saved. ● If the - Olympus SP-600UZ | SP-600UZ Instruction Manual (English) - Page 25
be selected to best match the shooting conditions the flash down back into the camera. This sets to $ (FLASH OFF) mode. 2 Select the flash option in zoom is at the widest (W) position. *2 When the zoom is at the most telephoto (T) position. *3 The zoom is automatically fixed. The flash (p. 25) and zoom - Olympus SP-600UZ | SP-600UZ Instruction Manual (English) - Page 26
2 seconds, then the picture is taken. Adjusting the brightness (Exposure compensation) The standard brightness (appropriate exposure) set by the camera based on the shooting mode (except for M) can be adjusted brighter or darker to obtain a desired shot. 1 Select the exposure compensation option in - Olympus SP-600UZ | SP-600UZ Instruction Manual (English) - Page 27
sensitivity for digital cameras and film , thus codes such as "ISO 100" are used to represent sensitivity. In the ISO setting, although smaller values result in less sensitivity, sharp images can be taken under fully lit conditions. Larger values result in higher sensitivity, and images - Olympus SP-600UZ | SP-600UZ Instruction Manual (English) - Page 28
sequential shots at a faster speed than in [j]. The camera takes sequential shots at approximately 11.8 frames/sec. The camera takes sequential shots at approximately 15.5 frames/sec. *1 The shooting speed varies depending on the settings for "image quality" (p. 29). When set to [j], the flash (p.25 - Olympus SP-600UZ | SP-600UZ Instruction Manual (English) - Page 29
) in the internal memory and SD/SDHC memory cards" (p. 58) Selecting the image quality for movies [IMAGE SIZE/IMAGE QUALITY] A (Movie menu) X IMAGE SIZE/IMAGE QUALITY Available shooting modes:P M s P A Q Submenu 1 Submenu 2 Application IMAGE SIZE 720P VGA (640×480) QVGA (320×240) Select the - Olympus SP-600UZ | SP-600UZ Instruction Manual (English) - Page 30
[AF MODE] I (Shooting menu 1) X AF MODE Available shooting modes:P M s P A Q Submenu 2 Application FACE/iESP*1 SPOT AF TRACKING The camera focuses fail to track the subject movement. When the camera fails to track the subject movement, the AF target mark changes to red. When set to [ON], [ESP - Olympus SP-600UZ | SP-600UZ Instruction Manual (English) - Page 31
when shooting movies [R] A (Movie menu) X R Available shooting modes:P M s P A Q Submenu 2 Application OFF No sound is recorded. ON Sound is recorded. When set to [ON], only the digital zoom can be used during movie recording. To record the movie with the optical zoom, set [R] (movies) to - Olympus SP-600UZ | SP-600UZ Instruction Manual (English) - Page 32
by the camera shake when shooting [IMAGE STABILIZER] (still images)/ [IS MOVIE MODE] (movies) J (Shooting menu 2) X IMAGE STABILIZER (still images)/ A (Movie menu) X IS MOVIE MODE (movies) Available shooting modes:P M s P A Q Submenu 2 Application OFF ON The image stabilizer is deactivated - Olympus SP-600UZ | SP-600UZ Instruction Manual (English) - Page 33
the type of FADE/ transition effect used ZOOM between slides. ― Starts the slideshow. *1 [COLLECTION] can be selected only when My Cinema created with the PC software (ib) has been imported back into the camera. Refer to the PC software (ib) help guide for details on how to make [COLLECTION - Olympus SP-600UZ | SP-600UZ Instruction Manual (English) - Page 34
was selected, is played back.) Use HI to advance or rewind by one frame. To stop [EVENT q], press the m button. 4/30 Playing back images by Collection created with the PC software (ib) [COLLECTION q] COLLECTION q In [COLLECTION q], the collection is played back that has been created with the PC - Olympus SP-600UZ | SP-600UZ Instruction Manual (English) - Page 35
(ib) is imported back to the camera. Refer to the PC software (ib) help guide for details on how to use the PC software (ib). [PHOTO SURFING] Information of persons or shooting locations and new Collections can be added in the related items. [EVENT q] Images can be played back by event created - Olympus SP-600UZ | SP-600UZ Instruction Manual (English) - Page 36
2 Use the zoom lever to select the size of the cropping frame, and use FGHI to move the frame. Cropping frame Changing the color tone of image [COLOR EDIT] EDIT X COLOR EDIT Submenu 2 Application BLACK & WHITE This changes the image to black and white. SEPIA This changes the image to a sepia - Olympus SP-600UZ | SP-600UZ Instruction Manual (English) - Page 37
[INTERNAL/ SD]" (p. 39) Protected images cannot be erased. To individually select and erase images [SEL. IMAGE] 1 Use FG to select [SEL. IMAGE], and press the A button. 2 Use HI to select the image to be erased, and press the A button to add a R mark to the image. ● Turn the zoom lever to the W end - Olympus SP-600UZ | SP-600UZ Instruction Manual (English) - Page 38
m button. 3 Press the A button. ● Recording starts. ● The camera adds (records) sound for approx. 4 seconds while playing back the image. Rotating images [y] q (Playback menu) X y 1 Use HI to select an image. 2 Press the A button to rotate the image. 3 If necessary, repeat Steps 1 and 2 to make - Olympus SP-600UZ | SP-600UZ Instruction Manual (English) - Page 39
Before formatting, check that no important data is left in the internal memory or card. If the internal memory is formatted, the camera instruction manual and the PC software (ib) data that are stored on the internal memory are erased. If necessary, store the backup before formatting. Cards must be - Olympus SP-600UZ | SP-600UZ Instruction Manual (English) - Page 40
changed. Submenu 2 YES NO Application Pressing the q button turns on the camera and starts the camera in the playback mode. The camera is not turned on. To turn on the camera, press the n button. Saving the mode when the camera is not guaranteed in the following cases: ● Computers with USB ports - Olympus SP-600UZ | SP-600UZ Instruction Manual (English) - Page 41
sound during playback. Selects the operating sound and volume of the camera buttons (except the shutter button). Selects the type and volume of the shutter sound. Selects the warning sound volume. Selects the image playback volume. *1 Even when [SILENT MODE] is [ON], FG can be used to adjust volume - Olympus SP-600UZ | SP-600UZ Instruction Manual (English) - Page 42
. For best results, wait at least one minute after taking or viewing pictures before performing pixel mapping. If the camera is turned and the image processing function Press the A button when [START] (Submenu 2) is displayed. ● The camera checks and adjusts the CCD and the image processing function - Olympus SP-600UZ | SP-600UZ Instruction Manual (English) - Page 43
on a TV [TV OUT] t (Settings 3) X TV OUT The TV video signal system varies depending on the countries and regions. Before viewing camera images on your TV, select the video output according to your TV's video signal type. Submenu 2 VIDEO OUT HDMI OUT HDMI CONTROL Submenu 3 NTSC PAL 480p/ - Olympus SP-600UZ | SP-600UZ Instruction Manual (English) - Page 44
CB-HD1) 3 Turn on the TV, and change "INPUT" to "VIDEO (an input jack connected to the camera)." 4 Turn on the camera, and use HI to select the image for playback. For details on changing the input source of the TV, refer to the TV's instruction manual. Use an HDMI cable that matches the HDMI micro - Olympus SP-600UZ | SP-600UZ Instruction Manual (English) - Page 45
SAVE Submenu 2 OFF ON Application Cancels [POWER SAVE]. When the camera is not being used for approx. 10 seconds, the monitor automatically turns off to save battery power. To resume standby mode Press any button. Viewing the image immediately after shooting [REC VIEW] t (Settings 3) X REC VIEW - Olympus SP-600UZ | SP-600UZ Instruction Manual (English) - Page 46
you can print images directly without using a computer. To find out if your printer supports PictBridge, refer to the printer's instruction manual. *1 PictBridge is a standard for connecting digital cameras and printers of different makers and printing out pictures directly. The printing modes, paper - Olympus SP-600UZ | SP-600UZ Instruction Manual (English) - Page 47
the print mode, and press the A button. PRINT MODE SELECT PRINT ALL PRINT MULTI PRINT ALL INDEX PRINT ORDER EXIT MENU SET OK 5 Use FG to select the [BORDERLESS] or [PICS/SHEET] settings, and press the A button. Submenu 4 (BORDERLESS or PICS/SHEET) Application OFF/ON*1 The image is printed - Olympus SP-600UZ | SP-600UZ Instruction Manual (English) - Page 48
/ WITHOUT Selecting [WITH] prints the file name on the image. Selecting [WITHOUT] does not print any file name on the image. (Proceeds P to the setting This selects a portion of the image for printing. screen.) To crop an image [P] 1 Use the zoom lever to select the size of the cropping frame - Olympus SP-600UZ | SP-600UZ Instruction Manual (English) - Page 49
printout information from digital cameras. Print reservations can be set only for the images stored on the card. Insert a card with recorded images before making print reservations. DPOF reservations set by another DPOF device cannot be changed by this camera. Make changes using the original - Olympus SP-600UZ | SP-600UZ Instruction Manual (English) - Page 50
1 and 2 in [ - Olympus SP-600UZ | SP-600UZ Instruction Manual (English) - Page 51
do, refer to the information below to fix the problem(s). Troubleshooting Battery "The camera does not work even when batteries are installed". ● Insert new or recharged batteries in the correct direction. "Inserting the battery" (p. 10) ● Battery performance may have been reduced temporarily due to - Olympus SP-600UZ | SP-600UZ Instruction Manual (English) - Page 52
print settings on the camera. *4 This camera may be unable to print images taken by other cameras. THE IMAGE CANNOT BE EDITED BATTERY EMPTY Problem with selected image Use photo retouch software, etc. to edit the image on a computer. Battery problem • Insert new batteries. • If using rechargeable - Olympus SP-600UZ | SP-600UZ Instruction Manual (English) - Page 53
Taking pictures without camera shake" ● Taking pictures using [IMAGE STABILIZER] (p. 32) When a picture is taken of a shadowy subject, the CCD*1 shifts to correct for camera shake even if the ISO speed is not increased. This function is also effective when taking pictures at a high zoom magnification - Olympus SP-600UZ | SP-600UZ Instruction Manual (English) - Page 54
white beach or snow scene Set the mode to [q BEACH & SNOW] (p. selecting white balance (p. 27) Best results in most environments can normally Image quality "Taking sharper pictures" ● Taking pictures with the optical zoom Avoid using digital zoom camera at the center prevents shifting of the image. - Olympus SP-600UZ | SP-600UZ Instruction Manual (English) - Page 55
separately)" (p. 13) ● Selecting a storage device [INTERNAL/SD] (p. 39) "Viewing images with high picture quality on a high-definition TV" ● Connect the camera to the TV using an HDMI cable (sold separately) ● "To play back camera images on a TV" (p. 44) Editing "Erasing the sound recorded to a still - Olympus SP-600UZ | SP-600UZ Instruction Manual (English) - Page 56
can take may vary considerably depending on the battery manufacturer and shooting conditions. AA NiMH batteries (rechargeable batteries) Being rechargeable, Olympus NiMH batteries are reusable and economical. For details, refer to the instruction manual for your charger. Caution: There is a risk of - Olympus SP-600UZ | SP-600UZ Instruction Manual (English) - Page 57
mode LOCK Cards compatible with this camera SD/SDHC memory cards (for more information, visit the Olympus website) Using a new card Cards must be formatted with this camera before first use or after being used with other cameras or computers. [MEMORY FORMAT]/[FORMAT] (p. 39) Checking the image - Olympus SP-600UZ | SP-600UZ Instruction Manual (English) - Page 58
The maximum file size of a single movie is 4 GB, regardless of the capacity of the card. Increasing the number of pictures that can be taken Either erase unwanted images, or connect the camera to a computer or other device to save the images, and then erase the images in the internal memory or card - Olympus SP-600UZ | SP-600UZ Instruction Manual (English) - Page 59
USER-SERVICEABLE PARTS INSIDE. REFER SERVICING TO QUALIFIED OLYMPUS SERVICE PERSONNEL. DANGER WARNING CAUTION An exclamation mark enclosed in a triangle alerts you to important operating and maintenance instructions the camera strap, causing strangulation. • Accidentally swallowing the battery, - Olympus SP-600UZ | SP-600UZ Instruction Manual (English) - Page 60
When used for a long period, the camera will get hot. If you hold on to the camera in this state, a low-temperature burn battery packs. • Insert the battery carefully as described in the operating instructions. Batteries whose - terminals are raised, but not covered by an insulating sheet. Batteries - Olympus SP-600UZ | SP-600UZ Instruction Manual (English) - Page 61
. • Always observe the operating environment restrictions described in the camera's manual. Battery Handling Precautions • Olympus NiMH batteries (included in some areas) are intended for use only with Olympus digital cameras. Never use these batteries with any other device. • Always charge NiMH - Olympus SP-600UZ | SP-600UZ Instruction Manual (English) - Page 62
playback mode. • In places subject to low temperatures, the LCD monitor may take a long time to turn on or its color may change temporarily. When using the camera in of Olympus. No liability is assumed with respect to the use of the information contained in these written materials or software, or - Olympus SP-600UZ | SP-600UZ Instruction Manual (English) - Page 63
with the instructions, may cause OLYMPUS-supplied USB cable should be used to connect the camera to USB enabled personal computers (PC). Any unauthorized changes or modifications to this equipment would void the user's authority to operate it. Use Only Dedicated Rechargeable Battery, Battery - Olympus SP-600UZ | SP-600UZ Instruction Manual (English) - Page 64
: SP-600UZ Trade Name : OLYMPUS Responsible digital apparatus meets all requirements of the Canadian InterferenceCausing Equipment Regulations. OLYMPUS WORLDWIDE LIMITED WARRANTY - IMAGING PRODUCTS Olympus warrants that the enclosed Olympus® imaging product(s) and related Olympus® accessories - Olympus SP-600UZ | SP-600UZ Instruction Manual (English) - Page 65
FAILURE, PRODUCT DESIGN, SELECTION, OR PRODUCTION, IMAGE OR DATA LOSS OR IMPAIRMENT OR FROM Olympus does not place and record serial numbers). 3 A detailed description of the problem. 4 Sample prints, negatives, digital prints (or files on disk) if available and related to the problem. When service - Olympus SP-600UZ | SP-600UZ Instruction Manual (English) - Page 66
protection. "CE" mark cameras are intended for sales in instructions, etc.) b. Any defect that occurs due to repair, modification, cleaning, etc. performed by anyone other than Olympus or an Olympus authorized service accessory equipment, such as the case, strap, lens cap and batteries. 4 Olympus - Olympus SP-600UZ | SP-600UZ Instruction Manual (English) - Page 67
does not apply to any other accessory equipment, such as the case, strap, lens cap and batteries. 5 Olympus' sole liability under this warranty regarding this Warranty, call any of the Olympus authorized service stations listed in the instructions. Notes regarding warranty maintenance 1 This Warranty - Olympus SP-600UZ | SP-600UZ Instruction Manual (English) - Page 68
of Warranty Olympus makes no representations or warranties, either expressed or implied, by or concerning any content if these written materials or software, and in . • The standards for camera file systems referred to in this manual are the "Design rule for Camera File system/DCF" standards - Olympus SP-600UZ | SP-600UZ Instruction Manual (English) - Page 69
Image pickup device : 1/2.33" CCD (primary color filter) Lens : Olympus lens 5.0 to 75.0 mm, f3.5 to 5.4 (equivalent to 28 to 420 mm on a 35 mm camera) Photometric system : Digital g (15.3 oz) (Including battery and card) Design and specifications subject to change without notice. HDMI, the HDMI - Olympus SP-600UZ | SP-600UZ Instruction Manual (English) - Page 70
VN692201
-
 1
1 -
 2
2 -
 3
3 -
 4
4 -
 5
5 -
 6
6 -
 7
7 -
8
-
9
-
10
-
11
-
12
-
13
-
14
-
15
-
16
-
17
-
18
-
19
-
20
-
21
-
22
-
23
-
24
-
25
-
26
-
27
-
28
-
29
-
30
-
31
-
32
-
33
-
34
-
35
-
36
-
37
-
38
-
39
-
40
-
41
-
42
-
43
-
44
-
45
-
46
-
47
-
48
-
49
-
50
-
51
-
52
-
53
-
54
-
55
-
56
-
57
-
58
-
59
-
60
-
61
-
62
-
63
-
64
-
65
-
66
-
67
-
68
-
69
-
70
 |
 |
●
Thank you for purchasing an Olympus digital camera. Before you start to
use your new camera, please read these instructions carefully to enjoy
optimum performance and a longer service life. Keep this manual in a
safe place for future reference.
●
The application software and instruction manual PDF
fi
le are stored on
the internal memory of the camera.
●
We recommend that you take test shots to get accustomed to your
camera before taking important photographs.
●
In the interest of continually improving products, Olympus reserves the
right to update or modify information contained in this manual.
SP-600UZ
Instruction Manual
DIGITAL CAMERA