Olympus SP-600UZ SP-600UZ Instruction Manual (English) - Page 4
Using the Menu, PROGRAM AUTO - camera
 |
UPC - 050332173569
View all Olympus SP-600UZ manuals
Add to My Manuals
Save this manual to your list of manuals |
Page 4 highlights
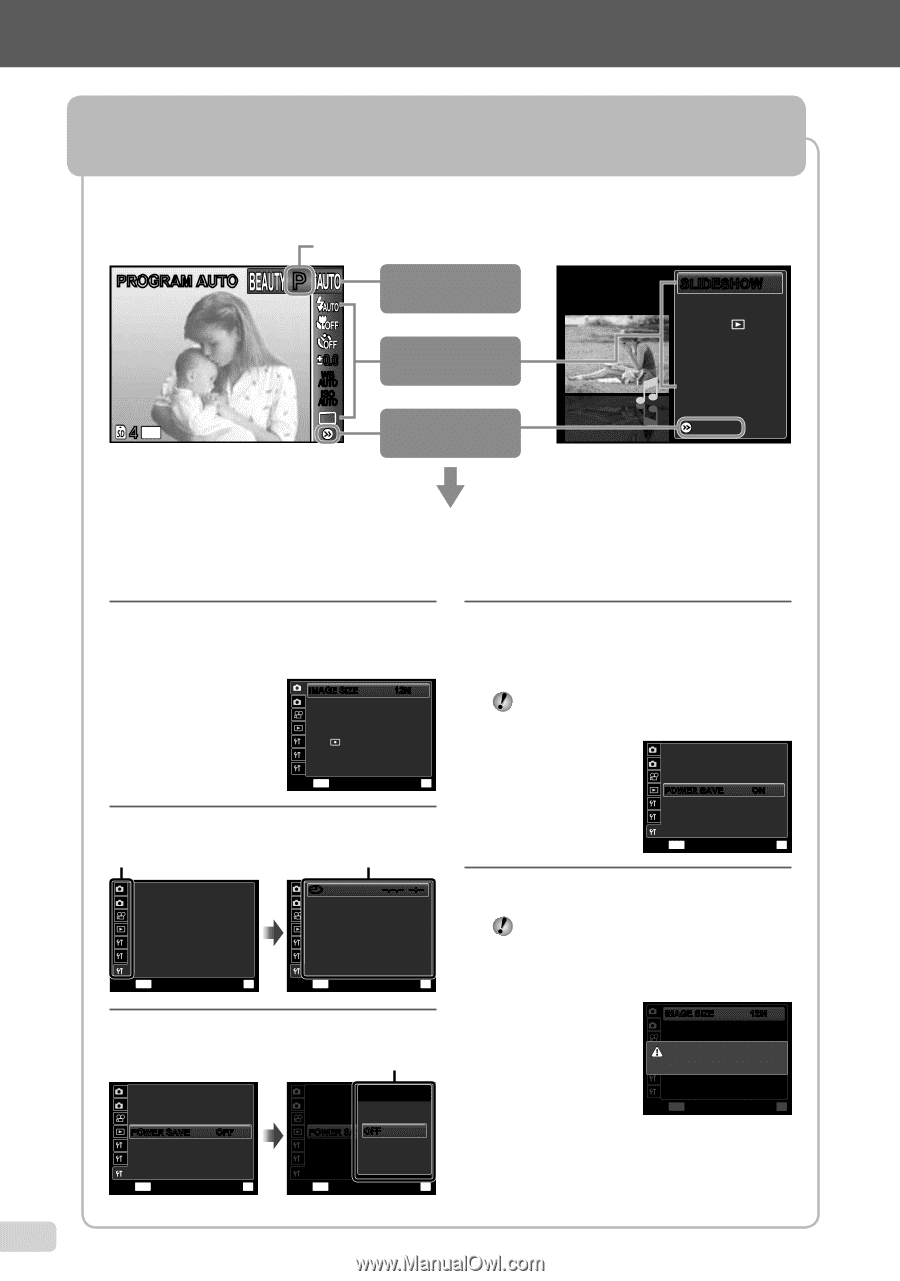
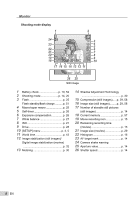
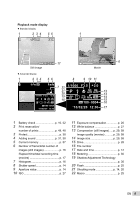
Using the Menu Use the menu to change camera settings such as the shooting mode. Press the m button to display the function menu. The function menu can be used to set frequently used shooting and playback functions such as shooting mode. Shooting Selected option Playback PROGRAM AUTO P 0.0 WB AUTO ISO AUTO 4 12M To select the shooting mode Use HI to select the shooting mode and press the A button. To select the function menu Use FG to select a menu and use HI to select a menu option. Press the A button to set the function menu. Shooting mode Function menu o [SETUP] menu SLIDESHOW PHOTO SURFING EVENT BEAUTY FIX EDIT ERASE SETUP Use FG to select a menu and press the A button. In the [SETUP] menu, various camera functions can be set, including shooting and playback functions not displayed in the function menu, and other settings such as date, time and screen display. 1 Select [SETUP] and then press the A button. ● The [SETUP] menu is displayed. 1 IMAGE SIZE 12M 2 COMPRESSION NORMAL SHADOW ADJUST AUTO AF MODE FACE/iESP 1 ESP/ ESP 2 FINE ZOOM OFF 3 DIGITAL ZOOM OFF EXIT MENU SET OK 2 Press H to select the page tabs. Use FG to select the desired page tab and press I. Page tab Submenu 1 1X 2 WORLD TIME x TV OUT POWER SAVE OFF 1 REC VIEW ON 2 PIC ORIENTATION ON 3 EXIT MENU SET OK 1X 2 WORLD TIME x TV OUT POWER SAVE OFF 1 REC VIEW ON 2 PIC ORIENTATION ON 3 EXIT MENU SET OK 4 Use FG to select the desired submenu 2 and then press the A button. ● Once a setting is selected, the display returns to the previous screen. There may be additional operations. "Menu Settings" (p. 29 to 45) 1X 2 WORLD TIME x TV OUT POWER SAVE ON 1 REC VIEW ON 2 PIC ORIENTATION ON 3 EXIT MENU SET OK 5 Press the m button to complete the setting. Some functions cannot be used in some shooting modes. In such cases, the following message is displayed after setting. 3 Use FG to select the desired submenu 1 and then press the A button. Submenu 2 1X 2 WORLD TIME x TV OUT POWER SAVE OFF 1 REC VIEW ON 2 PIC ORIENTATION ON 3 EXIT MENU SET OK 1X POW--E.-R-.-S- A-V-:E-- 2 WORLD TIME HOME TV OUT VIDEO OUT POWER SAVEOFF OFF 1 REC VIEW ON 2 PIC ORIENTATION 3 EXIT MENU SET OK 1 IMAGE SIZE 12M 2 COMPRESSION NORMAL SHADOW ADJUST AUTO ACFONMFOLDICETING SETTiIENSGPS 1 ESP/*1 ESP 2 FINE ZOOM OFF 3 DIGITAL ZOOM OFF EXIT MENU SET OK 4 EN
-
 1
1 -
 2
2 -
 3
3 -
 4
4 -
 5
5 -
 6
6 -
 7
7 -
 8
8 -
 9
9 -
 10
10 -
11
-
12
-
13
-
14
-
15
-
16
-
17
-
18
-
19
-
20
-
21
-
22
-
23
-
24
-
25
-
26
-
27
-
28
-
29
-
30
-
31
-
32
-
33
-
34
-
35
-
36
-
37
-
38
-
39
-
40
-
41
-
42
-
43
-
44
-
45
-
46
-
47
-
48
-
49
-
50
-
51
-
52
-
53
-
54
-
55
-
56
-
57
-
58
-
59
-
60
-
61
-
62
-
63
-
64
-
65
-
66
-
67
-
68
-
69
-
70
 |
 |