Olympus SP-600UZ SP-600UZ Instruction Manual (English) - Page 40
Pw On Setup], Usb Connection]
 |
UPC - 050332173569
View all Olympus SP-600UZ manuals
Add to My Manuals
Save this manual to your list of manuals |
Page 40 highlights
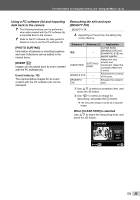
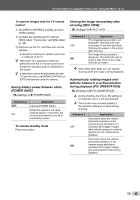
Restoring the shooting functions to the default settings [RESET] r (Settings 1) X RESET Turning on the camera with the q button [q POWER ON] s (Settings 2) X q POWER ON Submenu 2 YES NO Application Restores the following menu functions to the default settings. • Flash (p. 25) • Macro (p. 25) • Self-timer (p. 26) • Exposure compensation (p. 26) • White balance (p. 27) • ISO (p. 27) • Drive (p. 28) • Menu functions in [I, J, A] (p. 29 to 32) The current settings will not be changed. Submenu 2 YES NO Application Pressing the q button turns on the camera and starts the camera in the playback mode. The camera is not turned on. To turn on the camera, press the n button. Saving the mode when the camera is turned off [SAVE SETTINGS] s (Settings 2) X SAVE SETTINGS Selecting a method for connecting the camera to other devices [USB CONNECTION] r (Settings 1) X USB CONNECTION Submenu 2 AUTO STORAGE PC PRINT Application When the camera is connected to another device, the settings selection screen is displayed. Select when connecting the camera to a computer via a storage device. Select when connecting a camera and computer. Select when connecting to a PictBridge-compatible printer. System requirements Windows : Windows 2000 Professional/ XP Home Edition/ XP Professional/Vista/ Windows 7 Macintosh : Mac OS X v10.3 or later Even if a computer has USB ports, proper operation is not guaranteed in the following cases: ● Computers with USB ports installed using an expansion card, etc. ● Computers without a factory-installed OS and home-built computers Submenu 2 YES NO Application The shooting mode is saved when the camera is turned off and is reactivated the next time the camera is turned on. The shooting mode is set to P mode when the camera is turned on. Choosing the opening screen display [PW ON SETUP] s (Settings 2) X PW ON SETUP Submenu 2 OFF ON Application No opening screen is displayed. The opening screen is displayed when the camera is turned on. 40 EN
-
 1
1 -
2
-
3
-
4
-
5
-
6
-
7
-
8
-
9
-
10
-
11
-
12
-
13
-
14
-
15
-
16
-
17
-
18
-
19
-
20
-
21
-
22
-
23
-
24
-
25
-
26
-
27
-
28
-
29
-
30
-
31
-
32
-
33
-
34
-
 35
35 -
 36
36 -
 37
37 -
 38
38 -
 39
39 -
 40
40 -
 41
41 -
 42
42 -
 43
43 -
 44
44 -
 45
45 -
46
-
47
-
48
-
49
-
50
-
51
-
52
-
53
-
54
-
55
-
56
-
57
-
58
-
59
-
60
-
61
-
62
-
63
-
64
-
65
-
66
-
67
-
68
-
69
-
70
 |
 |
