Olympus WS 331M WS-331M Instruction Manual (English) - Page 24
Recording Modes Rec Mode
 |
UPC - 050332400481
View all Olympus WS 331M manuals
Add to My Manuals
Save this manual to your list of manuals |
Page 24 highlights
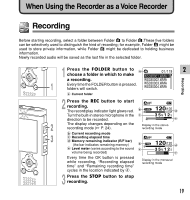
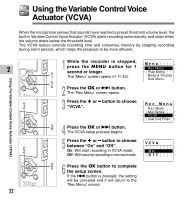
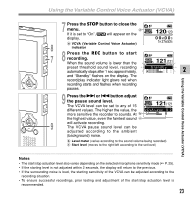
Recording Modes (Rec Mode) The recording mode can be chosen from ST XQ (stereo extra high quality sound recording), ST HQ (stereo high quality sound recording), ST SP (stereo standard recording), HQ (high quality sound recording), SP (standard recording), and LP (long-term recording). Recording Modes (Rec Mode) 2 4 1 While the recorder is stopped, press the MENU button for 1 1 second or longer. The "Menu" screen opens (☞ P. 42). 2 2 Press the OK or 9 button. The "Rec Menu" screen opens. Re c Me nu Rec Mode Mic Sense VCVA 3 Press the OK or 9 button. The recording mode setup process begins. Low Cut Filter 3 4 Press the + or - button to select the recording mode. Re c ST ST ST Mo d e XQ HQ SP HQ 6 5 Press the OK button to complete the setup screen. If the 0 button is pressed, the setting will be canceled and it will return to the "Rec Menu" screen. 5 6 Press the STOP button to close the menu. a Record mode indicator a HQ 120 120 Press and hold the STOP button while the 0 0M0 0S recorder is stopped to check "Remaining 1H 27M53S Memory" and "Remaining Recording Time" in the selected recording mode. ... Notes • When a meeting and lecture is to be recorded clearly, set other than LP mode to record. • When an external monaural microphone is used while the recorder is set to ST XQ, ST HQ, or ST SP 24 mode, audio will be recorded to the L channel only.
-
 1
1 -
2
-
3
-
4
-
5
-
6
-
7
-
8
-
9
-
10
-
11
-
12
-
13
-
14
-
15
-
16
-
17
-
18
-
 19
19 -
 20
20 -
 21
21 -
 22
22 -
 23
23 -
 24
24 -
 25
25 -
 26
26 -
 27
27 -
 28
28 -
 29
29 -
30
-
31
-
32
-
33
-
34
-
35
-
36
-
37
-
38
-
39
-
40
-
41
-
42
-
43
-
44
-
45
-
46
-
47
-
48
-
49
-
50
-
51
-
52
-
53
-
54
-
55
-
56
-
57
-
58
-
59
-
60
-
61
-
62
-
63
-
64
-
65
-
66
-
67
-
68
-
69
-
70
-
71
-
72
-
73
-
74
-
75
-
76
-
77
-
78
-
79
-
80
-
81
-
82
-
83
-
84
-
85
-
86
-
87
-
88
-
89
-
90
-
91
-
92
-
93
-
94
-
95
-
96
-
97
-
98
-
99
-
100
-
101
-
102
 |
 |
