Olympus WS 331M WS-331M Instruction Manual (English) - Page 26
Set the Low Cut Filter Low Cut Filter
 |
UPC - 050332400481
View all Olympus WS 331M manuals
Add to My Manuals
Save this manual to your list of manuals |
Page 26 highlights
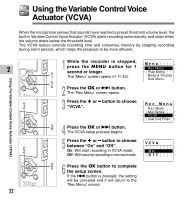
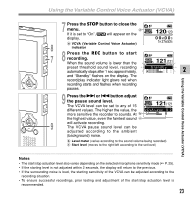
Set the Low Cut Filter (Low Cut Filter) The recorder has a Low Cut Filter function to minimize low-frequency sounds and record voices more clearly. This function can reduce noise from air conditioners, projectors and other similar noises. 3 2 1 While the recorder is stopped, press the MENU button for 1 second or longer. The "Menu" screen opens (☞ P. 42). 1 2 2 Press the OK or 9 button. The "Rec Menu" screen opens. 3 Press the + or - button to choose "Low Cut Filter". Re c Me nu Rec Mode Mic Sense VCVA Low Cut Filter 5 4 Press the OK or 9 button. The Low Cut Filter setup process begins. 5 Press the + or - button to choose between "On" and "Off". Low Cut Filter 4 On: Low Cut Filter will be turned on. Off: Low Cut Filter will be canceled. On Of f Set the Low Cut Filter (Low Cut Filter) 6 Press the OK button to complete the setup screen. 7 If the 0 button is pressed, the setting will be canceled and it will return to the "Rec Menu" screen. 6 7 Press the STOP button to close the a menu. If it is set to "On", will appear on the HQ 120 120 display. 0 0M0 0S a Low Cut Filter indicator 1H 27M53S 26
-
 1
1 -
2
-
3
-
4
-
5
-
6
-
7
-
8
-
9
-
10
-
11
-
12
-
13
-
14
-
15
-
16
-
17
-
18
-
19
-
20
-
 21
21 -
 22
22 -
 23
23 -
 24
24 -
 25
25 -
 26
26 -
 27
27 -
 28
28 -
 29
29 -
 30
30 -
 31
31 -
32
-
33
-
34
-
35
-
36
-
37
-
38
-
39
-
40
-
41
-
42
-
43
-
44
-
45
-
46
-
47
-
48
-
49
-
50
-
51
-
52
-
53
-
54
-
55
-
56
-
57
-
58
-
59
-
60
-
61
-
62
-
63
-
64
-
65
-
66
-
67
-
68
-
69
-
70
-
71
-
72
-
73
-
74
-
75
-
76
-
77
-
78
-
79
-
80
-
81
-
82
-
83
-
84
-
85
-
86
-
87
-
88
-
89
-
90
-
91
-
92
-
93
-
94
-
95
-
96
-
97
-
98
-
99
-
100
-
101
-
102
 |
 |
