Onkyo R-N855 User Manual English - Page 30
Advanced Settings
 |
View all Onkyo R-N855 manuals
Add to My Manuals
Save this manual to your list of manuals |
Page 30 highlights
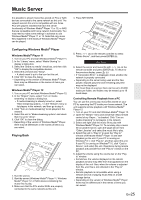
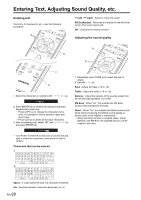
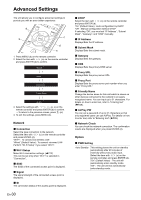
Advanced Settings The unit allows you to configure advanced settings to provide you with an even better experience. a c b d e 1. Press MENU (b) on the remote controller. 2. Select the item with / (a) on the remote controller and press ENTER (d) to confirm. Network Option System Info Factory Reset Update 3. Select the settings with / / / (a, c) on the remote controller and press ENTER (d) to confirm. 0 To return to the previous screen, press (e). 4. To exit the settings, press MENU (b). Network ˙ Connection Select the type connection to the network. Select the item with / (c) on the remote controller and press ENTER (d). "Wi-Fi" : To connect via wireless LAN "Wired" (Default Value) : To connect via wired LAN Perform "Wi-Fi Setup" if you select "Wi-Fi". ˙ Wi-Fi Setup Make Wi-Fi connection settings. ( P12) This can be set only when "Wi-Fi" is selected in "Connection". ˙ SSID The SSID of the connected access point is displayed. ˙ Signal The signal strength of the connected access point is displayed. ˙ St The connection status of the access point is displayed. En-30 ˙ DHCP Select the item with / (c) on the remote controller and press ENTER (d). "On" (Default Value) : Auto configuration by DHCP "Off" : Manual configuration without DHCP If selecting "Off", you must set "IP Address", "Subnet Mask", "Gateway", and "DNS" manually. ˙ IP Address Displays/Sets the IP address. ˙ Subnet Mask Displays/Sets the subnet mask. ˙ Gateway Displays/Sets the gateway. ˙ DNS Displays/Sets the primary DNS server. ˙ Proxy URL Displays/Sets the proxy server URL. ˙ Proxy Port Displays/Sets the proxy server port number when you enter "Proxy URL". ˙ Friendly Name Change the device name for this unit which is shown on other devices connected to the network to an easily recognized name. You can input up to 31 characters. For details on how to enter text, refer to "Entering text" ( P28). ˙ AirPlay PW You can set a password of up to 31 characters so that only registered users can use AirPlay. For details on how to enter text, refer to "Entering text" ( P28). ˙ Network Check You can check the network connection. The confirmation results are displayed when you press ENTER (d). Option ˙ PWR Setting Auto Standby This setting places the unit on standby automatically after 20 minutes of inactivity without any audio input. Select the item with / (c) on the remote controller and press ENTER (d). "On" (Default Value) : The unit will automatically enter standby mode. "Off" : The unit will not automatically enter standby mode.
-
 1
1 -
2
-
3
-
4
-
5
-
6
-
7
-
8
-
9
-
10
-
11
-
12
-
13
-
14
-
15
-
16
-
17
-
18
-
19
-
20
-
21
-
22
-
23
-
24
-
 25
25 -
 26
26 -
 27
27 -
 28
28 -
 29
29 -
 30
30 -
 31
31 -
 32
32 -
 33
33 -
 34
34 -
 35
35 -
36
-
37
-
38
-
39
-
40
-
41
-
42
-
43
-
44
 |
 |
