Onkyo TX-NR515 Owner Manual - Page 71
Entering Remote Control Codes, Remapping Colored Buttons, En-71 - zone 2 not working
 |
View all Onkyo TX-NR515 manuals
Add to My Manuals
Save this manual to your list of manuals |
Page 71 highlights
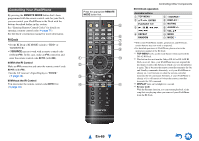
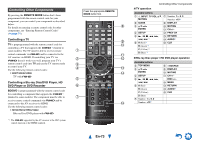
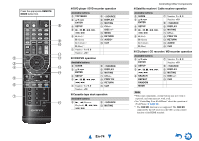
Entering Remote Control Codes You'll need to enter a code for each component that you want to control. 1 Look up the appropriate remote control code in the separate Remote Control Codes list. The codes are organized by category (e.g., DVD player, TV, etc.). 2 While holding down the REMOTE MODE button to which you want to assign a code, press and hold down DISPLAY (about 3 seconds). The remote indicator lights. Note • Remote control codes cannot be entered for RECEIVER and the multi zone button. • Only TV remote control codes can be entered for TV. • Except for RECEIVER, TV, and the multi zone button, remote control codes from any category can be assigned for the REMOTE MODE buttons. However, these buttons also work as input selector buttons (➔ page 23), so choose a REMOTE MODE button that corresponds with the input to which you connect your component. For example, if you connect your CD player to the CD input, choose TV/CD when entering its remote control code. 3 Within 30 seconds, use the number buttons to enter the 5-digit remote control code. The remote indicator flashes twice. If the remote control code is not entered successfully, the remote indicator will flash once slowly. Remapping Colored Buttons You can change the configuration of colored buttons, with which REMOTE MODE buttons are preset. 1 While holding down the REMOTE MODE button that you want to program, press and hold down A (Red) until the remote indicator lights (about 3 seconds). You can only change colored buttons for components whose codes belong to categories of the Remote Control Codes list (BD/DVD player, TV, cable set-top box, etc). 2 Within 30 seconds, press the colored buttons in the order that you want to reassign them. The button presses are assigned to each button from left to right. The remote indicator flashes twice, indicating that the sequence has been successfully assigned. If the sequence is not successfully assigned, the remote indicator will flash once slowly. Tip • To reset the REMOTE MODE buttons to their default settings, see "Resetting the REMOTE MODE Buttons" (➔ page 72). Note • If any other button than the colored buttons is pressed, the operation will be cancelled. • This operation cannot be done while the AV receiver is in Receiver mode or when ZONE 2 is active. Note • Though the provided remote control codes are correct at the time of release, they are subject to change. En-71 Controlling Other Components
-
 1
1 -
2
-
3
-
4
-
5
-
6
-
7
-
8
-
9
-
10
-
11
-
12
-
13
-
14
-
15
-
16
-
17
-
18
-
19
-
20
-
21
-
22
-
23
-
24
-
25
-
26
-
27
-
28
-
29
-
30
-
31
-
32
-
33
-
34
-
35
-
36
-
37
-
38
-
39
-
40
-
41
-
42
-
43
-
44
-
45
-
46
-
47
-
48
-
49
-
50
-
51
-
52
-
53
-
54
-
55
-
56
-
57
-
58
-
59
-
60
-
61
-
62
-
63
-
64
-
65
-
 66
66 -
 67
67 -
 68
68 -
 69
69 -
 70
70 -
 71
71 -
 72
72 -
 73
73 -
 74
74 -
 75
75 -
 76
76 -
77
-
78
-
79
-
80
-
81
-
82
-
83
-
84
-
85
-
86
-
87
-
88
-
89
-
90
-
91
-
92
-
93
-
94
-
95
-
96
-
97
-
98
-
99
-
100
-
101
-
102
-
103
-
104
-
105
-
106
-
107
-
108
-
109
-
110
-
111
-
112
-
113
-
114
-
115
-
116
-
117
-
118
-
119
-
120
-
121
-
122
-
123
-
124
-
125
-
126
-
127
-
128
-
129
-
130
-
131
-
132
-
133
-
134
-
135
-
136
-
137
-
138
-
139
-
140
 |
 |
