Optoma EH505 User Guide - Page 17
Installing the New Lens, Pull out the existing, lens slowly.
 |
View all Optoma EH505 manuals
Add to My Manuals
Save this manual to your list of manuals |
Page 17 highlights
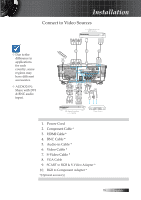
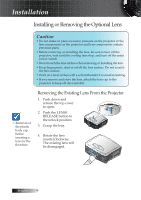
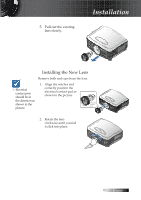
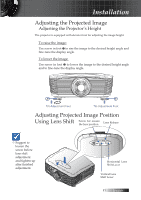
5. Pull out the existing lens slowly. Installation Installing the New Lens Remove both end caps from the lens. 1. Align the notches and v Electrical contact pins should be in correctly position the electrical contact pad as shown in the picture. the direction as shown in the picture. Electrical contact pins 2. Rotate the lens clockwise until you feel it click into place. 17 English
-
 1
1 -
2
-
3
-
4
-
5
-
6
-
7
-
8
-
9
-
10
-
11
-
 12
12 -
 13
13 -
 14
14 -
 15
15 -
 16
16 -
 17
17 -
 18
18 -
 19
19 -
 20
20 -
 21
21 -
 22
22 -
23
-
24
-
25
-
26
-
27
-
28
-
29
-
30
-
31
-
32
-
33
-
34
-
35
-
36
-
37
-
38
-
39
-
40
-
41
-
42
-
43
-
44
-
45
-
46
-
47
-
48
-
49
-
50
-
51
-
52
-
53
-
54
-
55
-
56
-
57
-
58
-
59
-
60
-
61
-
62
-
63
-
64
-
65
-
66
-
67
-
68
-
69
-
70
-
71
-
72
-
73
-
74
-
75
-
76
-
77
-
78
-
79
-
80
-
81
-
82
-
83
-
84
-
85
-
86
-
87
-
88
-
89
-
90
-
91
-
92
-
93
-
94
-
95
-
96
-
97
-
98
-
99
-
100
-
101
 |
 |

English
17
5. Pull out the existing
lens slowly.
Installing the New Lens
Remove both end caps from the lens.
1.
Align the notches and
correctly position the
electrical contact pad as
shown in the picture.
Electrical
contact
pins
2.
Rotate the lens
clockwise until you feel
it click into place.
v
Electrical
contact pins
should be in
the direction as
shown in the
picture.
Installation