Optoma PK320 User Manual
Optoma PK320 Manual
 |
View all Optoma PK320 manuals
Add to My Manuals
Save this manual to your list of manuals |
Optoma PK320 manual content summary:
- Optoma PK320 | User Manual - Page 1
FOCUS Pico Pocket Projector User's Manual - Optoma PK320 | User Manual - Page 2
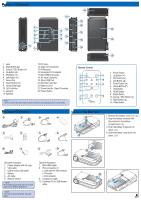
scope is indicated in the User's Manual as well as the certificate. service personnel. 24. Do not touch the projector for a long time while the projector is used. 25. CAUTION: Risk of Explosion if Battery is replaced by an Incorrect Type. 26. Dispose of Used Batteries According to the Instructions - Optoma PK320 | User Manual - Page 3
2. VGA cable 3. USB to micro USB cable 4. Battery 5. AV cable 6. Remote control The standard accessories may vary in each region due to different applications. The inclusive power plug head varies per region. Optional Accessory 7. Mini HDMI cable 8. iPod connection kit a. USB cable - Optoma PK320 | User Manual - Page 4
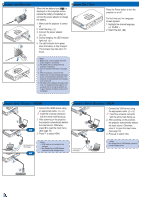
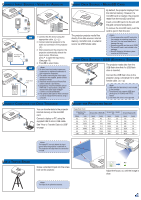
with the arrow mark facing up. 2. After powering on the projector, the projector automatically detects the input source. Otherwise, or press to open the Input menu. (See page 19) 3. Press to select VGA. Mac 2 Mini DisplayPort to HDMI Adapter or •• HDMI cable is not included - Optoma PK320 | User Manual - Page 5
(up to 5V/150mA) with FAT32 format. 3. USB hard disk drive is not supported. Connect Computer for Data Transfer Adjust the Projected Image 1 2 You can transfer data to the projector internal memory or the microSD card. Connect a laptop or PC using the supplied USB to micro USB cable. See "How - Optoma PK320 | User Manual - Page 6
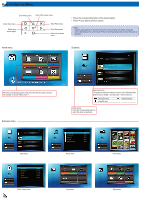
Travel Day2.mkv Travel Day3.mkv Video menu Music Internal Memory Data source icon The projector reads from memory sources in the following order: External source (USB) » microSD card » internal memory. External source MicroSD card Internal memory Button guide Press the corresponding button to - Optoma PK320 | User Manual - Page 7
, its screen is skipped when is pressed and the source icon on the button guide is not shown. 1. Select "Video" Video External Memory Travel Travel Day1.mkv Travel Day2.mkv Travel Day3.mkv Change data source Video MicroSD Card Travel Travel Day1.mkv Travel Day2.mkv Travel Day3.mkv 3. Select - Optoma PK320 | User Manual - Page 8
all Repeat one Repeat off Browser display: list view Browser display: thumbnail view • To copy video files, the video file size must not exceed 4G and the video file being copied is from a computer or an SD card with FAT32 format. • Video format does not support content with B-Frame function. - Optoma PK320 | User Manual - Page 9
. 2. Select Data Source The screen, the source icon on the button guide, and the sequence in which screens appear vary depending on the available data screen is skipped when is pressed and the source icon on the button guide is not shown. Music External Memory Summer.mp3 Rainbow.mp3 Blue.mp3 Cat - Optoma PK320 | User Manual - Page 10
To display the button guide, press any key except press and hold) 2. Select "Music Setting" Video Setting Music Setting Back Setup Display Setting Slideshow Repeat Shuffle Back Music Setting Compatibility: Music Compatible Audio Format File Format .aac .asf .flac .mp3 .ogg .ra .wma - Optoma PK320 | User Manual - Page 11
below. 2. Select Data Source The screen, the source icon on the button guide, and the sequence in which screens appear vary depending on the available data screen is skipped when is pressed and the source icon on the button guide is not shown. 1. Select "Photo" Photo External Memory 1/2 3. - Optoma PK320 | User Manual - Page 12
is not used for 3 seconds. To display the button guide, press any key except or . Play slideshow Next photo Previous background music setting is "On" to enable this feature. • Save the music files (*.mp3 format) under the "Slideshow Music" folder in the internal memory. • Only music files stored in - Optoma PK320 | User Manual - Page 13
-second interval Background music on Background music off Compatibility: Photo Compatible Photo Format File Format File Extension BMP *.bmp, JPG *.jpg JPEG *.jpeg The projector supports the following photo resolution: •• Bitmap file up to 2M (megapixels) each •• Jpeg file up to 10M - Optoma PK320 | User Manual - Page 14
on the button guide is not projector uses Picsel File Viewer Compatible Document Format to open and view Microsoft® Word files and Adobe® PDF files. File Format File Extension Supported Versions Version Microsoft® Office 95 Microsoft® Office Application (Word, Excel, Power Point) Adobe® PDF - Optoma PK320 | User Manual - Page 15
3 seconds. To display the button guide, press any key except or . Video Setting Music Setting Back Setup Display Setting Slideshow System 3. Adjust Settings Display Setting LED Mode Color Mode Back Aspect Ratio Gamma Projection LED Mode: Movie (available only when the power adapter - Optoma PK320 | User Manual - Page 16
Setup Display Setting Slideshow System 3. Select "Information" Language Information Back System Firmware Update Reset 5. Return to Home Menu 4. View Information 16 MicroSD card capacity Internal memory capacity External memory (USB) capacity Battery charging Power adapter connected - Optoma PK320 | User Manual - Page 17
Download the latest firmware from www.optoma.com and save it in the "upgrade" folder. 3. Copy the "upgrade" folder to the root folder of the microSD card. 4. Insert the microSD card into the microSD card slot of the projector. 5. Follow the steps below. 1. Select "Setup" 2. Select "System" Video - Optoma PK320 | User Manual - Page 18
. Ensure all files are backed up before resetting. 1. Select "Setup" 2. Select "System" Video Setting Music Setting Back Setup Display Setting Slideshow System Reboot the projector 4. Confirm Reset Yes No 3. Select "Reset" Language Information Back System Firmware Update Reset 18 - Optoma PK320 | User Manual - Page 19
projector or the projector cannot automatically detect the external device, you have to manually select the input source. To do this, perform the following steps. 1. Select "Input" 2. Select Input Source Video guide VGA 800 x 600 or Settings Volume up Volume down Aspect ratio Hide button guide - Optoma PK320 | User Manual - Page 20
disappears and its setting is applied. 4:3 4:3 Scroll option Adjusting Contrast Settings 1. View Source Content Display mode Display button guide 2. Select "Settings" Scroll option AUTO AUTO 3. Select "Contrast" Exit contrast settings 4. Adjust Setting Scroll other settings: Sharpness - Optoma PK320 | User Manual - Page 21
Adjusting Brightness Settings 1. View Source Content Display mode Display button guide 2. Select "Settings" 3. Select "Brightness" Exit brightness Selecting LED Mode Settings 1. View Source Content Display mode Display button guide 2. Select "Settings" 3. Select "LED Mode" Exit LED mode - Optoma PK320 | User Manual - Page 22
icon automatically disappears and its setting is applied. 4. Adjust Setting Adjusting Sharpness Settings 1. View Source Content Display mode Display button guide 2. Select "Settings" Colo r Mode settings Extended: Use to project more vibrant colored pictures Standard: Use to project standard - Optoma PK320 | User Manual - Page 23
50 / 60 Video format does not support content with B-Frame function. Troubleshooting If you experience a problem with your projector, please refer to the following information. If a problem persists, please contact your local retailer or service center. Image Problems No image appears on - Optoma PK320 | User Manual - Page 24
.mp3 MP3 .ogg Vorbis .ra RA 6, 9, 10 .wma WMA9 .wav PCM Media File Specs: Video Containers Video Containers Container Video Decoder .3gp H.263 H.264 Audio or Speech Decoder HE-AAC Container .mp4 Video Decoder H.263 H.264 MPEG4 Audio or Speech Decoder MP3 HE-AAC H.263 .avi H.264 - Optoma PK320 | User Manual - Page 25
and the Picsel Products will not be specifically mentioned in the end user license agreement. Copyright © Optoma Company Limited. All rights reserved. Optoma reserves the right to make technical changes. Optoma assumes no liability for damages incurred directly or indirectly from errors, omissions
-
 1
1 -
 2
2 -
 3
3 -
 4
4 -
 5
5 -
 6
6 -
 7
7 -
8
-
9
-
10
-
11
-
12
-
13
-
14
-
15
-
16
-
17
-
18
-
19
-
20
-
21
-
22
-
23
-
24
-
25
 |
 |
FOCUS
P
ICO
P
OCKET
P
ROJECTOR
U
SER
’
S
M
ANUAL