Panasonic 52DL52 Operating Instructions - Page 6
I Installation
 |
View all Panasonic 52DL52 manuals
Add to My Manuals
Save this manual to your list of manuals |
Page 6 highlights
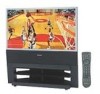
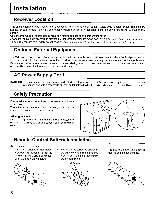
I Installation I Receiver Location This unit is intended to be used with an optional stand or entertainment center. Consult your dealer for available options. Locate for comfortable viewing. Avoid placing where sunlight or other bright light (including reflections) will fall on the screen. Use of some types of fluorescent lighting can reduce remote control transmitter range. Adequate ventilation is essential to prevent internal component failure. Keep away from areas of excessive heat or moisture. To ensure optimum color purity do not position magnetic equipment (motors, fans, other speakers, etc.) nearby. Optional External Equipment The Video/Audio connection between components can be made with shielded video and audio cables. For best performance, video cables should utilize 75 ohm coaxial shielded wire. Cables are available from your dealer or electronics supply store. Before you purchase any cables, be sure you know what type of output and input connectors your various components require. Also determine the length of cable you will need. AC Power Supply Cord CAUTION: To prevent electric shock, match wide blade of plug to wide slot of AC outlet and fully insert. De not use this (polarized) plug with a receptacle or other outlet unless the blade can be fully inserted to prevent blade exposure. Safety Precaution Please take safety precautions to prevent the unit from falling over. The unit may fall over during earthquakes, or if someone stands on or shakes the projection TV. Affixing to a wall Use a strong rope or a chain (not included) to fasten the projection TV firmly to a strong support such as a wall or pillar. Remote Control Battery Installation Requires two AA batteries, 1. Turn the Transmitter face down. Remove top cover by pressing down on marking and sliding cover off in the direction indicated. 2. Install the batteries as shown in the battery compartment. (Polarity + or - must match the markings in the compartment.) Two AA size 3. Replace the cover and slide in reverse until the lock snaps. \ 6
-
 1
1 -
 2
2 -
 3
3 -
 4
4 -
 5
5 -
 6
6 -
 7
7 -
 8
8 -
 9
9 -
 10
10 -
 11
11 -
 12
12 -
13
-
14
-
15
-
16
-
17
-
18
-
19
-
20
-
21
-
22
-
23
-
24
-
25
-
26
-
27
-
28
-
29
-
30
-
31
-
32
-
33
-
34
-
35
-
36
-
37
-
38
-
39
-
40
-
41
-
42
-
43
-
44
-
45
-
46
-
47
-
48
-
49
-
50
-
51
-
52
-
53
-
54
-
55
-
56
-
57
-
58
-
59
-
60
-
61
-
62
-
63
-
64
-
65
-
66
-
67
-
68
 |
 |
