Panasonic AG-HPX600PJ Operating Instructions - Page 25
<SDI OUT/IN OP> terminal Busy active status indication lamp
 |
View all Panasonic AG-HPX600PJ manuals
Add to My Manuals
Save this manual to your list of manuals |
Page 25 highlights
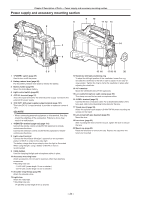
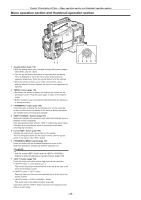
Chapter 2 Description of Parts - Shooting and recording/playback functions section 17 button (page 139) Display the [CAMERA] screen on SmartUI. 18 button (page 141) Display the [AUDIO] screen on SmartUI. 19 button (page 143) Display the [SETUP] screen on SmartUI. 20 button (page 136) Display the [HOME] screen on SmartUI. 21 switch (page 136) Disable button operations related to SmartUI and thumbnail operations. However, button operation is available. 22 terminal (device) (page 146) 23 terminal (host) (page 146) Connect the USB 2.0 cable. When the [PC MODE] item on the setting menu [PC/USB/LAN] screen is set to [ON], data transfer using USB 2.0 is enabled. In this state, recording/playback and clip operations on the camera are limited. 24 P2 card insertion slot 25 P2 card access LED (page 33) Indicate the access status of recording and playback of each card. 26 SD memory card insertion slot (page 84) This is the insertion slot for the SD memory card (optional). Use the SD memory card for recording/opening the setting menu and lens files for the camera, or uploading metadata or proxy recording (extracost option), etc. @@NOTE tt Cautions in using SD memory cards - On the camera, use SD memory cards that are compliant with the SD standard or the SDHC standard. - MMC (Multi Media Card) cannot be used. (Bear in mind that taking pictures may no longer be possible if you do use them.) - When using miniSD/microSD cards with the camera, always install the adaptor specially designed for miniSD/microSD cards. (The camera will not work properly if only the miniSD/ microSD adaptor is installed. Make sure that the card has been inserted into the adaptor before use.) - Use of Panasonic SD memory cards and miniSD/microSD cards is recommended. Be sure to format cards on the camera before use. - Any SD memory card with a capacity of 8 MB to 2 GB and any SDHC memory card up to 32 GB can be used on the camera. Also, when performing proxy recording (extra-cost option), use SDHC memory cards or SD memory cards with a capacity of 256 MB to 2 GB marked "High Speed", etc. - For the latest information not available in the Operating Instructions, visit the support desk at the following website: 30 terminal (100BASE‑TX) Enabled when the network function (extra-cost option) is installed. For the cable to be connected to the terminal, use the shielded cable. 31 terminal (page 49) 32 terminal (sub-host) Attach the wireless module AJ‑WM30 (optional). 33 button (page 82) Turn on/off the function for enlarging the video at the center of the screen. http://pro-av.panasonic.net/ 27 Busy (active status indication) lamp (page 85) Indicate the active status of the SD memory card, and is illuminated when the card is active. @@NOTE tt Do not insert or remove the card while the lamp is lit. This might damage the SD memory card. 28 terminal (page 49) Output the SDI signal. ffBy installing the HD/SD SDI input board (optional), SDI signals can be input. (page 167) 29 terminal (page 49) This is the video output terminal for the monitor. Video independent from the terminal can be output. Also, HD SDI signal or down-converted SD SDI signal, or VBS signal can be selected on the [SET02:MON/HDMI FORMAT] screen of SmartUI. Cross-conversion and up-conversion are not supported. - 25 -
-
 1
1 -
2
-
3
-
4
-
5
-
6
-
7
-
8
-
9
-
10
-
11
-
12
-
13
-
14
-
15
-
16
-
17
-
18
-
19
-
 20
20 -
 21
21 -
 22
22 -
 23
23 -
 24
24 -
 25
25 -
 26
26 -
 27
27 -
 28
28 -
 29
29 -
 30
30 -
31
-
32
-
33
-
34
-
35
-
36
-
37
-
38
-
39
-
40
-
41
-
42
-
43
-
44
-
45
-
46
-
47
-
48
-
49
-
50
-
51
-
52
-
53
-
54
-
55
-
56
-
57
-
58
-
59
-
60
-
61
-
62
-
63
-
64
-
65
-
66
-
67
-
68
-
69
-
70
-
71
-
72
-
73
-
74
-
75
-
76
-
77
-
78
-
79
-
80
-
81
-
82
-
83
-
84
-
85
-
86
-
87
-
88
-
89
-
90
-
91
-
92
-
93
-
94
-
95
-
96
-
97
-
98
-
99
-
100
-
101
-
102
-
103
-
104
-
105
-
106
-
107
-
108
-
109
-
110
-
111
-
112
-
113
-
114
-
115
-
116
-
117
-
118
-
119
-
120
-
121
-
122
-
123
-
124
-
125
-
126
-
127
-
128
-
129
-
130
-
131
-
132
-
133
-
134
-
135
-
136
-
137
-
138
-
139
-
140
-
141
-
142
-
143
-
144
-
145
-
146
-
147
-
148
-
149
-
150
-
151
-
152
-
153
-
154
-
155
-
156
-
157
-
158
-
159
-
160
-
161
-
162
-
163
-
164
-
165
-
166
-
167
-
168
-
169
-
170
-
171
-
172
-
173
-
174
-
175
-
176
-
177
-
178
 |
 |
