Panasonic CF-VDRRT3U Cd/cd-r/rw Drive - Page 13
Placing And Removing Discs
 |
UPC - 092281858111
View all Panasonic CF-VDRRT3U manuals
Add to My Manuals
Save this manual to your list of manuals |
Page 13 highlights
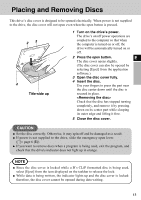
Placing and Removing Discs This drive's disc cover is designed to be opened electrically. When power is not supplied to the drive, the disc cover will not open even when the open button is pressed. 23 4 Title-side up 1 Turn on the drive's power. The drive's on/off power operations are coupled to the computer so that when the computer is turned on or off, the drive will be automatically turned on or off. 2 Press the open button. E The disc cover opens slightly. (The disc cover can also be opened by selecting [Eject] from the application software.) 3 Open the disc cover fully. 4 Insert the disc. Use your fingers to press the part near the disc center down until the disc is secured in place. Check that the disc has stopped turning completely, and remove it by pressing down on its center part while clasping its outer edge and lifting it free. 5 Close the disc cover. CAUTION Set the disc correctly. Otherwise, it may spin off and be damaged as a result. If power is not supplied to the drive, slide the emergency open lever. ( page 6 (E)). If you want to remove discs when a program is being used, exit the program, and check that the drive's indicator does not light up in orange. NOTE Since the disc cover is locked while a B's CLiP formatted disc is being used, select [Eject] from the icon displayed on the taskbar to release the lock. While data is being written, the indicator lights up and the disc cover is locked: therefore, the disc cover cannot be opened during data writing. 13
-
 1
1 -
2
-
3
-
4
-
5
-
6
-
7
-
 8
8 -
 9
9 -
 10
10 -
 11
11 -
 12
12 -
 13
13 -
 14
14 -
 15
15 -
 16
16 -
 17
17 -
 18
18 -
19
-
20
-
21
-
22
-
23
-
24
-
25
-
26
-
27
-
28
-
29
-
30
-
31
-
32
-
33
-
34
-
35
-
36
-
37
-
38
-
39
-
40
-
41
-
42
-
43
-
44
-
45
-
46
-
47
-
48
-
49
-
50
-
51
-
52
-
53
-
54
-
55
-
56
-
57
-
58
-
59
-
60
-
61
-
62
-
63
-
64
-
65
-
66
-
67
-
68
-
69
-
70
-
71
-
72
-
73
-
74
-
75
-
76
 |
 |
