Panasonic EW3152W EW3152 User Guide - Page 9
Press, press, blood, pressure, pulse, values, displayed., Remove, unit.
 |
View all Panasonic EW3152W manuals
Add to My Manuals
Save this manual to your list of manuals |
Page 9 highlights
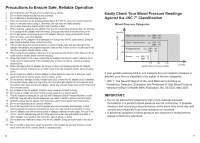
TAKING A READING (CONTINUED) Measurement On/Oft Press the On/Off Start button. The pressure cuff will be tightened automatically. © Pressurization will be performed automatically and measurements will be taken. gnn 3/ :S:33 IUD The entire display will light for approximately 1 second. On/Oft 16 V The pressure cuff will be tightened automatically. The heart mark V will blink when pulse is detected during pressurization. 2 the When measurement has been completed, blood pressure and pulse values will be displayed. After measurement values have been shown for approximately 5 seconds, the pressure cuff will be loose. (However, the time depends on the size of the arm.) • The blood pressure indicator lamps will light (for approximately 12 seconds). • If the measured value is in the high blood pressure region, the values will blink (for approximately 12 seconds). (For how to read the blood pressure display, see p. 17.) • The (D C) marks will light. (For storing measurement values, see p. 19.) • The pulse rate value is the beats per minute calculated based on the pulse rate during measurement. 3 Remove your arm from the main unit. 4 press To switch off the blood pressure monitor, the On/Off Start button. • If you forget to switch it off, the blood pressure monitor will switch off automatically after approximately 5 minutes. Alarm function signals high blood pressure Blood pressure values for both systolic and diastolic readings are determined and indicated via a three-color LED system as being within normal or hypertensive ranges based on definitions and classification of blood pressure levels by the JNC 7. Moreover, when blood pressure is in the high range, the reading displayed on screen flashes on and off to alert user. According to JNC 7 Classification, values consistently in excess of 140 mmHg (Sys.) and/or 90 mmHg (Dia.) are considered to constitute high blood pressure. LED Color Diastolic (mmHg) Hypertension 140 (Stage 1, Stage 2) 120 90 Yellow Prehypertension 90 80 80 Green Normal 120 140 (mmHg) Systolic • If the measured blood pressure value is in the high blood pressure region, the values will blink for approximately 12 seconds. (Only immediately after measurement) O = (7) • Systolic blood pressure: 140mmHg or higher • Diastolic blood pressure: 90mmHg or higher If measurements could not be taken properly The remeasure mark E will be displayed. When taking successive measurements, press the On/Off Start E button to switch off the blood pressure monitor once and stay quiet for 4 to 5 minutes, and then take the next measurement. Advice: In general, blood pressure measurements are lower for the second measurement because you are less nervous and are more tranquil. For people who easily get tense, measuring twice each time is very effective. When two measurements are taken, normally the smaller measurement is stored. When taking two measurements, always stay quiet for 4 to 5 minutes after the first measurement before taking the second measurement 17
-
 1
1 -
2
-
3
-
 4
4 -
 5
5 -
 6
6 -
 7
7 -
 8
8 -
 9
9 -
 10
10 -
 11
11 -
 12
12 -
 13
13 -
 14
14 -
15
-
16
-
17
-
18
-
19
-
20
-
21
-
22
-
23
-
24
-
25
-
26
-
27
 |
 |
