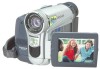
Panasonic PV GS15 Digital Video Camcorder
Panasonic PV GS15 - MiniDV Compact Digital Camcorder Manual
 |
UPC - 037988977734
View all Panasonic PV GS15 manuals
Add to My Manuals
Save this manual to your list of manuals |
Panasonic PV GS15 manual content summary:
- Panasonic PV GS15 | Digital Video Camcorder - Page 1
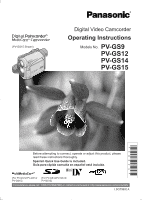
Digital Video Camcorder Operating Instructions Models No. PV-GS9 PV-GS12 PV-GS14 PV-GS15 Before attempting to connect, operate or adjust this product, please read these instructions thoroughly. Spanish Quick Use Guide is included. Guía para rápida consulta en español está incluida. [For PV-GS12/PV - Panasonic PV GS15 | Digital Video Camcorder - Page 2
choosing Panasonic! Camcorder. Be sure to retain this manual as your convenient Camcorder information source. Date of Purchase Dealer Purchased From Dealer Address Dealer Phone No. Model it should be read carefully in order to avoid any problems. The above markings are located on the appliance bottom - Panasonic PV GS15 | Digital Video Camcorder - Page 3
Panasonic Model No. : PV-GS9/PV-GS12/PV-GS14/PV-GS15 Responsibility Party : Matsushita Electric Corporation of America Address : One Panasonic Class B digital device, pursuant instructions USE THE RECOMMENDED ACCESSORIES ONLY. CAUTION DANGER OF EXPLOSION IF BATTERY IS INCORRECTLY REPLACED. - Panasonic PV GS15 | Digital Video Camcorder - Page 4
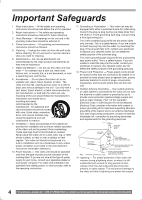
follow the manufacturer's instructions and should use a mounting accessory recommended by the be operated from battery power, or other sources, refer to the operating instructions. 11. proper grounding of the mast and supporting structure, grounding of the lead-in panasonic.com/contactinfo - Panasonic PV GS15 | Digital Video Camcorder - Page 5
instructions. Adjust only those controls that are covered by the operating instructions serviceable parts inside. Unplug your Camcorder from the power supply before cleaning. CAUTION • DO NOT AIM YOUR CAMCORDER AT THE SUN OR OTHER BRIGHT OBJECTS • DO NOT LEAVE THE CAMCORDER other rights owners. Use of - Panasonic PV GS15 | Digital Video Camcorder - Page 6
Before opening the CD-ROM package (PV-GS15: Supplied, PV-GS9/PV-GS12/PV-GS14: Optional Software), please read the following. End User License Agreement (for USB Driver, WebCam Driver and DV STUDIO (Optional Software)) You ("Licensee") are granted a license for the Software defined in this End User - Panasonic PV GS15 | Digital Video Camcorder - Page 7
PV-GS9, PV-GS12, PV-GS14, and PV-GS15. The PV-GS15 is the model used for illustrative purposes. Features may vary, so please read carefully. Differences between models Model Number Battery Pack (Supplied) Memory Card CD-ROM Remote Control PV-GS9 CGR-D08R (800 mAh) Optional Software Optional USB - Panasonic PV GS15 | Digital Video Camcorder - Page 8
a Cassette 17 Using a Memory Card (For PV-GS12/PV-GS14/PV-GS15 18 Turning on the Camcorder 18 Easy to Use Mode Dial 18 Using the Viewfinder/LCD Monitor 19 Using the Menu Screen 19 List of Menus 20 Setting Date and Time 23 Internal Lithium Battery Recharge 23 LP Mode 23 Audio Recording Mode - Panasonic PV GS15 | Digital Video Camcorder - Page 9
a Tape (For PV-GS12/PV-GS14/PV-GS15 44 Audio Dubbing (Remote Control Only 44 Copying on an S-VHS (or a VHS) Cassette ......45 Using the DV Cable for Recording 45 PC Connection With DV Interface Cable...........46 With a PC Using the Software with a Personal Computer..47 Using USB Driver 47 To - Panasonic PV GS15 | Digital Video Camcorder - Page 10
Guide 1 Attach the Battery to the AC Adaptor and charge it. Inserting a Card (For PV-GS12/PV-GS14/PV-GS15) 1 Place your Thumb on the [OPEN▼] 1 Knob and pull the LCD Monitor 2 out in the direction of the arrow. 2 • Before use, fully charge the Battery. • Since the Battery Battery to the Camcorder. - Panasonic PV GS15 | Digital Video Camcorder - Page 11
Set the Mode Dial to Card Recording Mode. 5 Press the [ ] Button to stop playback. 2 Press the [PHOTO SHOT] Button. Playing Back a Card (For PV-GS12/PV-GS14/PV-GS15) 1 Set the Mode Dial to Picture Playback Mode. Playing Back a Tape 1 Set the [OFF/ON] Switch 1 to [ON]. • The [POWER] Lamp 2 lights - Panasonic PV GS15 | Digital Video Camcorder - Page 12
are accessories supplied with the Camcorder. 1) PV-DAC11 2) LSJA0288 K2CB2CB00014 3) CR2025 CGR-D08R CGR-D14 (For PV-GS9/ LSSQ0411 (PV-GS15 Only) PV-GS12/PV-GS14) (PV-GS15 Only) 4) 5) 6) LSJA0280 7) LSFC0018 RP-SD008MMK0 (PV-GS15 Only) K1HA05CD0005 LSFT0575 (PV-GS15 Only) (PV-GS15 - Panasonic PV GS15 | Digital Video Camcorder - Page 13
PV-GS12/PV-GS14/PV-GS15) (p. 26) 26 Zoom Lever [W/T] (pp. 27-28, 35) 27 28 31 29 30 32 33 27 Cassette Holder 28 Cassette Compartment Cover (p. 17) 29 USB Jack [ ] (pp. 48-49, 51, 54) 30 DV Input/Output Terminal (pp. 45-46) • Connect this to the digital using the battery with the Camcorder to reduce - Panasonic PV GS15 | Digital Video Camcorder - Page 14
/P-IN-P] (pp. 33-34) 68 Rewind/Review Button [ ] (p. 35) 69 Pause Button PV-GS15 Only) Inserting the Button-type Battery Before using the Remote Control, insert the supplied button-type battery. 1 While pressing the Lock Button 1 , pull out the Battery Holder. Then, remove the button-type battery - Panasonic PV GS15 | Digital Video Camcorder - Page 15
(PV-GS15 Only) 1 Direct the Remote Control at the Remote Control Sensor 31 of the Camcorder Battery Before use, fully charge the Battery. • We recommend using a Panasonic Battery. • We cannot guarantee the quality of this Camcorder when batteries from other companies are used. 1 Attach the Battery - Panasonic PV GS15 | Digital Video Camcorder - Page 16
30 min. 3 h (2 h 25 min.) A Charging Time B Maximum Continuous Recording Time • "1 h 30 min." indicates 1 hour and 30 minutes. • Battery CGR-D08R (PV-GS9/PV-GS12/PV-GS14) or CGR-D14 (PV-GS15) is supplied. • The times shown in the table are approximate times. The numbers indicate the recording time - Panasonic PV GS15 | Digital Video Camcorder - Page 17
Shoulder Strap We recommend that you attach the Shoulder Strap before going out to avoid dropping the Camcorder. 1 Pull the end of the Shoulder Strap through the Shoulder Strap Holder on the Camcorder. 2 Fold the end of the Shoulder Strap, run it through the Shoulder Strap Length Adjuster, and pull - Panasonic PV GS15 | Digital Video Camcorder - Page 18
a Memory Card (For PV-GS12/ PV-GS14/PV-GS15) A Card can be used to record still pictures. • Use a genuine SD Memory Card or MultiMediaCard manufactured by Panasonic only. Before inserting or removing a Card, be sure to turn off the Camcorder. • Otherwise, the Camcorder may not function properly or - Panasonic PV GS15 | Digital Video Camcorder - Page 19
a maximum of 90° 2 to the downward direction. Forcefully rotating the LCD Monitor beyond these ranges will damage the Camcorder. LCD Brightness [LCD BRIGHTNESS] Adjusts the brightness of the image on the LCD screen. LCD Color Level [LCD COLOR LEVEL] Adjusts the color saturation of the image on the - Panasonic PV GS15 | Digital Video Camcorder - Page 20
is turned off. However, if the Battery or AC Adaptor is disconnected before turning off the Camcorder, the selected setup may not be retained. • Menu operation flow is shown in this text by >>. File Selection in the Picture Playback Mode (For PV-GS12/PV-GS14/PV-GS15) A File Selection Operation may be - Panasonic PV GS15 | Digital Video Camcorder - Page 21
(p. 64) [USB FUNCTION] USB Functions Mode (pp. 51, 54) 2) [DIGITAL] Playback Digital Setup Sub-Menu [EFFECT ON] Digital Effect On/Off (p. 38) [EFFECT SEL] Digital Effect Selection (p. 38) [TITLE IN] (For PV-GS12/PV-GS14/PV-GS15) Adding a Title (p. 40) 3) [CARD] (For PV-GS12/PV-GS14/PV-GS15) Card - Panasonic PV GS15 | Digital Video Camcorder - Page 22
PV-GS12/PV-GS14/PV-GS15) Picture Playback Menu 1) [CAMERA] Camera Setup Sub-Menu [PROG.AE] Auto Exposure Mode (p. 30) [SHTR EFFECT] Shutter Effect (p. 25) [SELF TIMER] Self-timer Recording (p. 27) 2) [DIGITAL] Digital 5) [LCD/EVF] LCD/EVF Setup Sub-Menu [LCD/EVF SET] LCD and panasonic.com/contactinfo - Panasonic PV GS15 | Digital Video Camcorder - Page 23
Control Mode (p. 15) Before Use Internal Lithium Battery Recharge The internal lithium battery sustains the operation of the clock. When the [ ] Indication flashes, the internal lithium battery is near exhaustion. 1 Connect the AC Adaptor to the Camcorder with the power turned off and then connect - Panasonic PV GS15 | Digital Video Camcorder - Page 24
] (For PV-GS12/PV-GS14/PV-GS15). When recording with the [AUTO/MANUAL/FOCUS] Switch 18 set to [AUTO], the Camcorder automatically adjusts the off, then turn on the power again. • When the Camcorder is connected to a personal computer with a USB Cable, Standby mode is not available. Recording on a - Panasonic PV GS15 | Digital Video Camcorder - Page 25
become still pictures. When the button is pressed again, the Digital Still Picture Mode is canceled. 13 Recording a Still Picture on a Card (Photoshot) (For PV-GS12/PV-GS14/ PV-GS15 ) Still pictures can be recorded on the Memory Card from the Camcorder. 1 Set the Mode Dial 40 to Card Recording Mode - Panasonic PV GS15 | Digital Video Camcorder - Page 26
LCD Monitor and rotating it forward (to the lens side), you can let the subject in front of the Camcorder monitor the shot while recording is in progress. Recording with the Built-in LED Video Light (For PV-GS12/PV-GS14/PV (7262) or, contact us via the web at: http://www.panasonic.com/contactinfo - Panasonic PV GS15 | Digital Video Camcorder - Page 27
Macro Close-up Function) When the zoom magnification is 1X, the Camcorder can focus on a subject that is as close as approximately 0.8 inches a normal zoom range of 1X to 20X (PV-GS9/PV-GS12)/22X (PV-GS14)/24X (PV-GS15) magnification. With the Digital Zoom Function, you can select a magnification from - Panasonic PV GS15 | Digital Video Camcorder - Page 28
black screen at the beginning of a scene. To Cancel the Digital Zoom Function Set [TAPE RECORDING MENU] >> [CAMERA] >> [D. Stabilizer Function If the Camcorder is shaken while recording, the camera shake in the image can be corrected. • If the Camcorder shakes too much, panasonic.com/contactinfo - Panasonic PV GS15 | Digital Video Camcorder - Page 29
Recording Mode 2 When the image is completely gone, press the Recording Start/Stop Button 43 to stop recording. 43 Soft-Skin Mode This enables you to record skin colors in a softer tone. In order to get the best result, avoid background colors similar to the skin color of the subject. Otherwise, - Panasonic PV GS15 | Digital Video Camcorder - Page 30
/MANUAL/FOCUS] Switch 18 to [MANUAL]. 18 • The [MNL] Indication appears. 2 Set [TAPE RECORDING MENU] or [CARD RECORDING MENU] (For PV-GS12/PV-GS14/ PV- this case, the white balance can be adjusted manually. When the Camcorder is turned on with the Lens Cap on, : http://www.panasonic.com/contactinfo - Panasonic PV GS15 | Digital Video Camcorder - Page 31
17 until the [AWB] Indication appears. Or, set the [AUTO/MANUAL/FOCUS] Switch to [AUTO]. Adjusting White Balance Manually White Balance Adjustment recognizes the color of light and adjusts so that white will appear pure white. The Camcorder determines the hue of light that comes through the Lens and - Panasonic PV GS15 | Digital Video Camcorder - Page 32
PV-GS12/PV-GS14/PV-GS15) The standard shutter speed is 1/60 s. Selecting a speed closer to [1/8000] causes the shutter speed to be faster. To Resume Automatic Adjustment Set the [AUTO/MANUAL MANUAL/FOCUS] Switch 18 to [MANUAL]. 18 • The [►MF] Indication (Manual the [AUTO/MANUAL/FOCUS] Switch to - Panasonic PV GS15 | Digital Video Camcorder - Page 33
) NEGA 12) SEPIA 13) B/W 14) SOLARI You can capture and record 9 consecutive small still pictures. Manual Multi-Picture Mode: You can manually capture and record 9 small still pictures. 1 Set [TAPE RECORDING MENU] >> [DIGITAL] >> [EFFECT1] >> [MULTI]. 19 13 14 15 16 17 2 Set [TAPE RECORDING MENU - Panasonic PV GS15 | Digital Video Camcorder - Page 34
Pictures One by One (When pictures were captured in [MANUAL]) When the [MULTI] Button is pressed for 1 second DIGITAL] >> [EFFECT1] >> [P-IN-P]. 1 Set [TAPE RECORDING MENU] >> [DIGITAL] >> [EFFECT1] >> [WIPE] or [MIX]. 19 13 14 15 16 17 19 13 14 15 16 17 2 Aim the Camcorder panasonic.com/contactinfo - Panasonic PV GS15 | Digital Video Camcorder - Page 35
26 41 2 Set the Mode Dial 40 to Tape Playback Mode. 40 (PV-GS12/ (PV-GS9) PV-GS14/ PV-GS15) To adjust the volume with the Remote Control, press the [T] or [ ] Button 16 . Finding a Scene You Want to Play Back Cue/Review Playback 17 14 If the [ ] Button 14 or [ ] Button 17 is pressed during Playback - Panasonic PV GS15 | Digital Video Camcorder - Page 36
) • This feature is only available with Remote Control. However it is not supplied for models PV-GS9/ PV-GS12/PV-GS14. If you would like to order, the parts number is LSSQ0411 as a replacement parts. Please refer to page 74. This Camcorder can play back at a slow speed. 72 69 57 57 1 Press the - Panasonic PV GS15 | Digital Video Camcorder - Page 37
Remote Control. However it is not supplied for models PV-GS9/ PV-GS12/PV-GS14. If you would like to order, the parts number is LSSQ0411 as a replacement parts. Please refer to page 74. To facilitate searching for desired scenes, this Camcorder automatically records index signals during recording, as - Panasonic PV GS15 | Digital Video Camcorder - Page 38
available with Remote Control. However it is not supplied for models PV-GS9/ PV-GS12/PV-GS14. If you would like to order, the parts Control to select a desired digital effect. 59 61 • When the [SELECT] Button is pressed repeatedly, the digital effect selection changes. • The panasonic.com/contactinfo - Panasonic PV GS15 | Digital Video Camcorder - Page 39
2 Picture Size (p. 60) 3 File Number To Select a Desired File and Playing Back 1 Set the Mode Dial 40 to Picture Playback Mode. Slide Show (For PV-GS12/PV-GS14/ PV-GS15) The recorded still pictures in the Card can be played back like a Slide Show. 1 Set the Mode Dial 40 to Picture Playback Mode. 40 - Panasonic PV GS15 | Digital Video Camcorder - Page 40
for creating a title and set the Camcorder to the Still Playback Mode. 13 1 see page 65. Adding a Title (For PV-GS12/PV-GS14/ PV-GS15) A title can be added to to adjust the color and press the [ENTER] Button 15 . 1 Set [DIGITAL] >> [TITLE IN] >> [ON]. 19 13 14 15 16 17 • panasonic.com/contactinfo - Panasonic PV GS15 | Digital Video Camcorder - Page 41
this item, see page 65. Writing Printing Data on a Card (For PV-GS12/PV-GS14/PV-GS15) (DPOF Setting) DPOF Setting Printing data (DPOF Settings), such as the number of images to be printed, can be written to the Card. "DPOF" means Digital Print Order Format. 1 Set the Mode Dial 40 to Picture Playback - Panasonic PV GS15 | Digital Video Camcorder - Page 42
>> [DELETE] >> [FILE BY SEL] >> [YES]. Formatting a Card (For PV-GS12/ PV-GS14/PV-GS15) If a Card becomes unreadable by the Camcorder, format it for reuse. Formatting erases all the data recorded on a Card. 1 1-800-211-PANA(7262) or, contact us via the web at: http://www.panasonic.com/contactinfo - Panasonic PV GS15 | Digital Video Camcorder - Page 43
on your TV screen. • Before connecting them, turn off the power of both the Camcorder and TV. 1 Connect the [AV OUT] Jack of the Camcorder and the Video and Audio Input Jacks of the TV. [S-VIDEO IN] 2 (For PV-GS14/ PV-GS15) [VIDEO IN] [AUDIO IN] 1 • Connect to the TV with the AV Cable - Panasonic PV GS15 | Digital Video Camcorder - Page 44
available with Remote Control. However it is not supplied for models PV-GS9/ PV-GS12/PV-GS14. If you would like to order, the parts number Dubbing Press the [ ] Button 69 on the Remote Control. The Camcorder is in the Still Playback Mode again. To Play Back the Sound panasonic.com/contactinfo - Panasonic PV GS15 | Digital Video Camcorder - Page 45
to stop playback. Using the DV Cable for Recording (Digital Dubbing) By connecting this Camcorder with other digital video equipment (such as another Camcorder of the same format/model) that has a DV input/output Terminal, and using a 4-pin to 4-pin DV Interface Cable PV-DDC9 (optional) 1 , high - Panasonic PV GS15 | Digital Video Camcorder - Page 46
being OHCI compliant should have no problem working with any OHCI compliant Firewire Card/video - Editing software package. • Personal Computer must be equipped with an DV Terminal. • During Camcorder playback, do not disconnect the DV Interface Cable or turn the Camcorder off as this may cause a PC - Panasonic PV GS15 | Digital Video Camcorder - Page 47
. [PV-GS15: Supplied] [PV-GS9/PV-GS12/PV-GS14: Optional Software] 3 Select the software to be installed from [Setup Menu]. ● USB Driver (pp. 47-49) : Software for USB Driver allows you to transfer images directly from the Memory Card into the computer. ● WebCam Driver (pp. 50-53) : If the Camcorder - Panasonic PV GS15 | Digital Video Camcorder - Page 48
Connection Kit, use of the AC Adaptor is recommended for the power supply of the Camcorder. For Using Built-in SD Drive (For PV-GS12/PV-GS14/PV-GS15) By connecting the Camcorder and Personal Computer with the USB Cable, you can transfer still images saved on a Memory Card directly to your Personal - Panasonic PV GS15 | Digital Video Camcorder - Page 49
will differ depending on the operating environment of your personal computer.) • When the Camcorder is in PC Mode: [USB Mass Storage Device] or [Panasonic DV DISK Port Driver] Windows Me: • When the Camcorder is in PC Mode: [USB Disk] • Some OS, such as Windows 98SE, may not show the icon indicating - Panasonic PV GS15 | Digital Video Camcorder - Page 50
Camcorder to the other parties via the network. • Do not connect the USB Cable until the WebCam Driver http://www.msn.com/ (For download and installation instructions, please refer to Help on the . • When DirectX9.0 is installed, applications supported by previous versions of DirectX may not run - Panasonic PV GS15 | Digital Video Camcorder - Page 51
drive. • Quit all applications. • The [Setup Menu] Screen appears. 3 Connect the Camcorder to your personal computer with USB Cable. [PV-GS15: Supplied] [PV-GS9/PV-GS12/PV-GS14: Optional Software] 3 Click the [WebCam Driver]. • The set up program starts running. 4 For Windows XP users: Depending - Panasonic PV GS15 | Digital Video Camcorder - Page 52
equipment is connected correctly. 7 Select [USB Video Device] in the [Camera] menu. 2 Select [.NET Messaging Service] and click [OK]. 8 Select [ Messenger, then turn off the Camcorder. Finally, disconnect the USB Cable. • If the Camcorder is used as Web Camera .panasonic.com/contactinfo - Panasonic PV GS15 | Digital Video Camcorder - Page 53
[Get one here]. 8 Confirm the [Panasonic DVC Web Camera Device] 1 is selected. 3 Camcorder. Finally, disconnect the USB Cable. Using the DV STUDIO 3.1E-SE (Optional Software) Following Software is not supplied with the Camcorder; • LSFT0577 (DV STUDIO 3.1E-SE) • K1HA05CD0005 (USB Cable) The Software - Panasonic PV GS15 | Digital Video Camcorder - Page 54
Playback Mode and insert a tape. • To capture images viewed through the camera lens, set the Camcorder to Tape Recording Mode. (PV-GS12/ (PV-GS9) PV-GS14/ PV-GS15) 2 Set [CAMERA] or [PLAYBACK] >> [USB FUNCTION] >> [DV STUDIO]. 3 Click [DV STUDIO]. 4 Click [Next]. 19 13 14 15 16 17 3 Connect the - Panasonic PV GS15 | Digital Video Camcorder - Page 55
>> [Panasonic] >> [DV Studio3] >> [DV Studio3]. • If a short-cut icon has been created on the desktop during installation, it is also possible to start by double-clicking on the icon. • For other information about DV STUDIO 3.1E-SE Software, please refer to Help. Using the ArcSoft Software (PV-GS15 - Panasonic PV GS15 | Digital Video Camcorder - Page 56
according to instructions. • If Panasonic icon. 4 Double click [ArcSoft] folder. (For Macintosh) 1 Double-click the [PhotoImpression] or [PhotoBase] icon on the desktop. • For other information about ArcSoft Software to the user manual of your OS. 2 After software or driver is uninstalled, - Panasonic PV GS15 | Digital Video Camcorder - Page 57
are supported as well. • In this Manual, the Panasonic make digital video camera with USB Jack is referred to as Camcorder. • These instructions do Card and MultiMediaCard (For PV-GS12/PV-GS14/PV-GS15) SD Memory Card The SD Memory Card (PV-GS15: Supplied, PV-GS12/ PV-GS14: Optional) is virtually - Panasonic PV GS15 | Digital Video Camcorder - Page 58
PV-GS12/PV-GS14/PV-GS15) Data files recorded on an "SD Memory Card" or a "MultiMediaCard" by this Camcorder for a Camcorder, Personal Computer Mode, the Camcorder automatically saves fi software without an indication function, indication data, such as date, are not displayed. Depending on the software - Panasonic PV GS15 | Digital Video Camcorder - Page 59
Mode (p. 35) : Card Recording Mode (p. 25) (For PV-GS12/PV-GS14/PV-GS15) : Picture Playback Mode (p. 38) (For PV-GS12/PV-GS14/PV-GS15) : CINEMA: PC Mode (p. 48) (For PV-GS12/PV-GS14/PV-GS15) Cinema Mode (pp. 29-30) D.ZOOM: Digital Zoom (p. 27) MULTI: P-IN-P: Multi Mode (p. 33) P-IN - Panasonic PV GS15 | Digital Video Camcorder - Page 60
• For images not recorded with this Camcorder, the size display is determined as Digital Effect Modes in [EFFECT1] • Digital condition of the Camcorder. DEW ( Audio dubbing or Digital dubbing on a BATTERY): The Battery is low. Recharge it. (p. 15) : The built-in battery solve the problem. CARD FULL - Panasonic PV GS15 | Digital Video Camcorder - Page 61
USB cable to the Camcorder. Notes and Hints Concerning the Power Supply • When the Camcorder has been used for a long time, the Camera body becomes warm, but this is not a malfunction. • If the [CHARGE] Lamp does not light up although the Battery microphone (For PV-GS14/PV-GS15). Alarm manually - Panasonic PV GS15 | Digital Video Camcorder - Page 62
Camcorder Camcorder. • Using the LED Video Light reduces battery Camcorder is left in Camcorder The Battery is Camcorder will be turned off. • If the Camcorder Camcorder the Camcorder. PV-GS14/PV-GS15). Digital Zoom Functions • As the magnification of digital digital manually manually or Digital Effect - Panasonic PV GS15 | Digital Video Camcorder - Page 63
-P] of [EFFECT1]. • Depending on the software in use, the imported Cinema picture may Zoom higher than 20X (PV-GS9/PV-GS12)/ 22X (PV-GS14)/24X (PV-GS15) • During Digital Still Picture Mode • When (p. 30), you cannot adjust the shutter speed. Manual Iris Adjustment • Depending on zoom magnification, - Panasonic PV GS15 | Digital Video Camcorder - Page 64
Digital Camcorder and recording it onto a tape • Changing the picture size to 640 x 480 pixels with DV STUDIO Slide Show • Playback time may take longer than usual depending on the picture. 64 For assistance, please call : 1-800-211-PANA(7262) or, contact us via the web at: http://www.panasonic - Panasonic PV GS15 | Digital Video Camcorder - Page 65
nothing may be shown even if you correctly connect the Camcorder with your TV. In this case, set [AV DV Terminals, you may not be able to perform Digital Dubbing in some cases. • Date or other information to be displayed cannot be displayed if the software of the connected equipment does not support - Panasonic PV GS15 | Digital Video Camcorder - Page 66
electrodes of the AC Adaptor and Battery always clean. Condensation If you turn the Camcorder on when condensation occurs on the head or the tape, Condensation Indication [ DEW ] (yellow or red) blinks on the Viewfinder or the LCD panasonic.com/contactinfo - Panasonic PV GS15 | Digital Video Camcorder - Page 67
tape • Long operating hours Using Panasonic cleanig cassette (AY-DVMCLA) 1 Insert the Head Cleaner into the Camcorder in the same manner as a Video dust, etc.) Optimal Use of the Battery Battery Characteristics This Battery is a rechargeable lithium ion battery. Its ability to generate power is - Panasonic PV GS15 | Digital Video Camcorder - Page 68
not practical to look in the Viewfinder from behind the Battery. Extremely high precision technology is employed to produce the Viewfinder screen featuring a total of approximately 67,000 pixels (PV-GS9/PV-GS12)/ 113,000 pixels (PV-GS14/PV-GS15). The result is more than 99.99 % effective pixels with - Panasonic PV GS15 | Digital Video Camcorder - Page 69
dark (vignetting). For details, please refer to the operating instructions of your accessories. • Be sure to keep the Lens Hood attached to the Camcorder so as to shut out unnecessary light. Before Requesting Service (Problems and Solutions) The Camcorder power cannot be turned on. • Is the power - Panasonic PV GS15 | Digital Video Camcorder - Page 70
Camcorder off. If the Camcorder is not turned off after operating the [OFF/ON] switch, press the [RESET] Button (p. 12) first. And detach the Battery USB cable safely, double-click the [ ] icon in the task tray and follow the instructions on the screen. (p. 49) Using the RESET button 1 Open the LCD - Panasonic PV GS15 | Digital Video Camcorder - Page 71
Code and Date/Time, as digital signals. Compatibility with S-VHS or VHS Cassettes Because this Camcorder employs a digital system for recording image and conditions. Please use the Manual Focus Mode instead. 1) Recording a subject whose one end is located closer to the Camcorder and the other end - Panasonic PV GS15 | Digital Video Camcorder - Page 72
mini jack) USB: Card reader/writer function (For PV-GS12/ PV-GS14/PV-GS15), USB 2.0 compliant (max. 12 Mbps) No copyright protection support Digital Interface: DV : 18 W DC Output: DC 7.8 V, 1.4 A (Camcorder Operation) DC 8.4 V, 1.2 A (Battery Charging) Dimensions: 70 (W) X 45 (H) X 115 (D) - Panasonic PV GS15 | Digital Video Camcorder - Page 73
(compatible with MultiMediaCard) DV STUDIO 3.1E-SE USB Cable Carrying Case PV-HB002 Carrying Case • Please refer to page 74, when placing an order. Price $119.95 $69.95 $99.95 $129.95 $229.95 $55.00 Call For Pricing Call For Pricing $79.95 $79.95 Call For Pricing Call For Pricing $49.95 Call - Panasonic PV GS15 | Digital Video Camcorder - Page 74
OBTAIN ANY OF OUR CAMCORDER ACCESSORIES YOU CAN DO ANY OF THE FOLLOWING: VISIT YOUR LOCAL PANASONIC DEALER OR CALL PANASONIC'S ACCESSORY ORDER LINE AT 1-800-332-5368 [6 AM-5 PM M-F, 6 AM-10:30 AM SAT, PACIFIC TIME] OR MAIL THIS ORDER TO: PANASONIC SERVICES COMPANY ACCESSORY ORDER OFFICE 20421 84th - Panasonic PV GS15 | Digital Video Camcorder - Page 75
is wrong with the unit and any symptom it is exhibiting. Mail this completed form and your Proof of Purchase along with your unit to: Panasonic Services Company 1705 N. Randall Road Elgin, IL. 60123-7847 Attn: Camcorder Repair 75 - Panasonic PV GS15 | Digital Video Camcorder - Page 76
made by the warrantor. Product Parts Camcorder One (1) Year (except CCD Two (2) Years Rechargeable Batteries (in exchange for defective Panasonic Web Site: http://www.panasonic.com For assistance in Puerto Rico call Panasonic Sales Company (787)-750-4300 or fax (787)-768-2910. In-Home service - Panasonic PV GS15 | Digital Video Camcorder - Page 77
may contact your dealer or Servicenter. If the problem is not handled to your satisfaction, then write to the warrantor's Consumer Affairs Department at the addresses listed for the warrantor. PARTS AND SERVICE (INCLUDING COST OF AN IN-HOME SERVICE CALL, WHERE APPLICABLE) WHICH ARE NOT COVERED BY - Panasonic PV GS15 | Digital Video Camcorder - Page 78
; locate your nearest Dealer or Servicenter; purchase Parts and Accessories; or make Customer Service and Literature requests by visiting our Web Site at: http://www.panasonic.com/support or, contact us via the web at: http://www.panasonic.com/contactinfo You may also contact us directly at: 1-800 - Panasonic PV GS15 | Digital Video Camcorder - Page 79
Guide/Guía Para Uso Rápido Precauciones para su seguridad ADVERTENCIA: Para evitar incendios y descargas eléctricas, no exponga este equipo a la lluvia ni a la humedad. Su Camcorder interfaz blindado cuando conecte una cámara de video digital a una computadora de acuerdo con las instrucciones - Panasonic PV GS15 | Digital Video Camcorder - Page 80
de memoria (Sólo para el modelo PV-GS12/PV-GS14/PV-GS15) 1 Usando su pulgar presione la perilla [OPEN▼] 1 y saque la pantalla LCD 2 en la dirección de la apaga, se ha terminado la carga. 2 Coloque la batería cargada en el Camcorder. 1 2 Deslice la palanca [OPEN] 3 para abrir la cubierta de la - Panasonic PV GS15 | Digital Video Camcorder - Page 81
2 Presione el botón [PHOTO SHOT] en el modo de pausa de grabación. 2 Gire el dial de modo a Modo de reproducción de cinta. (PV-GS12/ (PV-GS9) PV-GS14/ PV-GS15) 3 Presione el botón [ cinta. ] para rebobinar la 4 Presione el botón [►] para comenzar la reproducción. Grabación de una imagen fija en - Panasonic PV GS15 | Digital Video Camcorder - Page 82
Form 74 Camcorder Accessory System 73 Charging the Battery 15 Cinema Mode 29 Condensation 66 Cue Playback 35 Customer Services Directory 78 D Date/Time Indication 60 Date/Time Setting 23 Digital Effects 33 Digital Still Picture 25 Digital Zoom 27 DPOF Setting 41 Dubbing 45 DV STUDIO - Panasonic PV GS15 | Digital Video Camcorder - Page 83
Battery Power 59 Remaining Tape Time 59 Remote Control 14 Repeat Playback 64 Request for Service Notice 75 Review 35 SP/LP Mode 23 Spanish Quick Use Guide 79 Sports Mode 30 Spotlight Mode 30 T Time Code 71 Trailing Effect Mode 33 U USB Connection Kit 47 V Variable Speed Search 36 Video - Panasonic PV GS15 | Digital Video Camcorder - Page 84
Consumer Electronics Company, Division of Matsushita Electric Corporation of America One Panasonic Way Secaucus, New Jersey 07094 Panasonic Sales Company ("PSC"), Division of Matsushita Electric of Puerto Rico, Inc. Ave. 65 de Infanteria, Km. 9.5 San Gabriel Industrial Park Carolina, Puerto
-
 1
1 -
 2
2 -
 3
3 -
 4
4 -
 5
5 -
 6
6 -
 7
7 -
8
-
9
-
10
-
11
-
12
-
13
-
14
-
15
-
16
-
17
-
18
-
19
-
20
-
21
-
22
-
23
-
24
-
25
-
26
-
27
-
28
-
29
-
30
-
31
-
32
-
33
-
34
-
35
-
36
-
37
-
38
-
39
-
40
-
41
-
42
-
43
-
44
-
45
-
46
-
47
-
48
-
49
-
50
-
51
-
52
-
53
-
54
-
55
-
56
-
57
-
58
-
59
-
60
-
61
-
62
-
63
-
64
-
65
-
66
-
67
-
68
-
69
-
70
-
71
-
72
-
73
-
74
-
75
-
76
-
77
-
78
-
79
-
80
-
81
-
82
-
83
-
84
 |
 |

Before attempting to connect, operate or adjust this product, please
read these instructions thoroughly.
LSQT0802 A
PV-GS9
PV-GS12
PV-GS14
PV-GS15
Digital Video Camcorder
Operating Instructions
Models No.
Spanish Quick Use Guide is included.
Guía para rápida consulta en español está incluida.
For assistance, please call : 1-800-211-PANA(7262) or, contact us via the web at: http://www.panasonic.com/contactinfo
(PV-GS15 Shown)
[For PV-GS12/PV-GS14/
PV-GS15]
[For PV-GS12/PV-GS14/
PV-GS15]