Panasonic PVDV53 PVDV53 User Guide - Page 8
Using the Built-in Light, Self Demo Mode, Before you begin
 |
View all Panasonic PVDV53 manuals
Add to My Manuals
Save this manual to your list of manuals |
Page 8 highlights
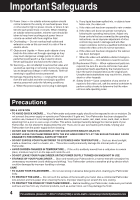
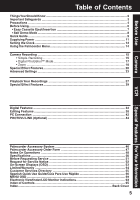
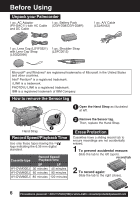
Before Using Using the Built-in Light To brighten the natural colors in a scene. Before you begin • Connect the Palmcorder to a power source. (pp. 11, 12) • Set POWER to CAMERA. 1 Hold down LIGHT for more than 0.7 second to turn ON or OFF. • " " will appear on the screen. Built-in Light Note • Using Light reduces battery time. • Provide adequate ventilation if using Light in a hot environment for a long time. • Set LIGHT to OFF when not in use. • When replacing the bulb, see page 48. 1LIGHT Caution This light becomes hot during operation. Make sure nothing covers the light during operation. Self Demo Mode If no operation takes place for approx. 10 minutes after the AC Adaptor was connected to the Palmcorder and the POWER Switch was turned to CAMERA without inserting a Cassette, the Palmcorder is automatically set to Self Demo mode for introducing its function. To turn it off, follow steps 1~4 below. [ EVF or LCD Monitor ] 3, 4 JOG KEY 2MENU 1POWER Before you begin • Connect the Palmcorder to a power source. (pp. 11, 12) 1 Set POWER to CAMERA. 2 Press MENU to display the CAMERA 3 FUNCTIONS menu screen. Rotate JOG KEY to select OTHER FUNCTIONS , and press JOG KEY to display the OTHER FUNCTIONS menu 4 screen. Rotate JOG KEY to select DEMO MODE , and press JOG KEY to select OFF. • Press MENU to exit. Note • If any button is pressed or operated (except PLAY/MULTI, ZOOM and LIGHT), the Self Demo mode is canceled. • The Self Demo mode can be started by setting DEMO MODE to ON and by exiting the menu. To turn Self Demo back on: • Set to DEMO MODE : ON in MENU screen. 8 For assistance, please call : 1-800-211-PANA(7262) or send e-mail to : [email protected]
-
 1
1 -
2
-
 3
3 -
 4
4 -
 5
5 -
 6
6 -
 7
7 -
 8
8 -
 9
9 -
 10
10 -
 11
11 -
 12
12 -
 13
13 -
14
-
15
-
16
-
17
-
18
-
19
-
20
-
21
-
22
-
23
-
24
-
25
-
26
-
27
-
28
-
29
-
30
-
31
-
32
-
33
-
34
-
35
-
36
-
37
-
38
-
39
-
40
-
41
-
42
-
43
-
44
-
45
-
46
-
47
-
48
-
49
-
50
-
51
-
52
-
53
-
54
-
55
-
56
-
57
-
58
-
59
-
60
-
61
-
62
-
63
-
64
-
65
-
66
-
67
-
68
 |
 |
