Panasonic PVGS34PKG Digital Video Camera - Page 14
USING A MEMORY CARD (OPTIONAL), Removing the Card
 |
View all Panasonic PVGS34PKG manuals
Add to My Manuals
Save this manual to your list of manuals |
Page 14 highlights
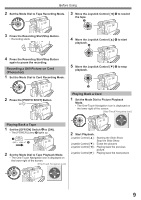
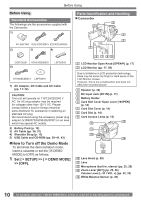
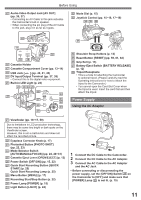
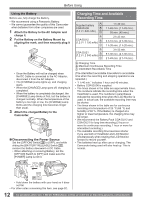
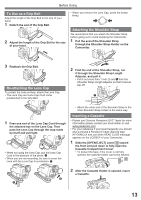
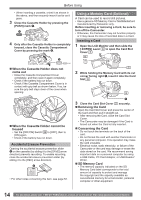
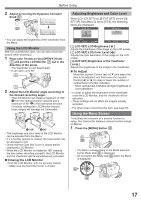
Before Using • When inserting a cassette, orient it as shown in the above, and then securely insert it as far as it goes. 3 Close the Cassette Holder by pressing the [PUSH] mark 1 . 1 4 Only after the Cassette Holder is completely housed, close the Cassette Compartment Cover by pressing the mark 2 . 2 Using a Memory Card (Optional) A Card can be used to record still pictures. • Use a genuine SD Memory Card or MultiMediaCard manufactured by Panasonic only. Before inserting or removing a Card, be sure to turn off the Camcorder. • Otherwise, the Camcorder may not function properly or it may cause the loss of recorded data in a Card. Inserting a Card 1 Open the LCD Monitor and then slide the [◄OPEN] Lever 6 to open the Card Slot Cover 7 . 6 „ When the Cassette Holder does not come out • Close the Cassette Compartment Cover completely, and then open it again completely. • Check if the battery has run down. • Check if the Cassette Compartment Cover is in contact with grip belt as shown below. If so, be sure the grip belt stays clear of the cover when opening. „ When the Cassette Holder cannot be housed • Set the [OFF/ON] Switch 26 to [OFF], then to [ON] again. • Check if the battery has run down. Accidental Erasure Prevention Opening the accidental erasure prevention slider 1 on the cassette (by sliding it to the [SAVE] arrow direction) prevents recording. To enable recording, close the accidental erasure prevention slider (by sliding it to the [REC] arrow direction). 1 • For other notes concerning this item, see page 52. 7 2 While holding the Memory Card with its cut corner facing right 1 , insert it into the Card Slot 8 . 8 1 3 Close the Card Slot Cover 7 securely. „ Removing the Card Open the Card Slot Cover and press the center of the Card and then pull it straight out. • After removing the Card, close the Card Slot Cover. • The Camcorder may be damaged if the Card is forced out when the Card is fully inserted. „ Concerning the Card • Do not touch the terminals on the back of the card. • Do not format the card with another Camcorder or any personal computer. This operation may make the card unusable. • Electrical noise, static electricity, or failure of the Camcorder or the card may damage or erase the data stored on the card. We recommend saving important data on a personal computer by using a USB Cable, PC Card Adaptor, or USB Reader/ Writer. „ SD Memory Card • The memory capacity indicated on the SD Memory Card label corresponds to the total amount of capacity to protect and manage the copyright and the capacity available as conventional memory for a Camcorder, personal computer or other equipment. 14 For assistance, please call : 1-800-211-PANA(7262) or, contact us via the web at: http://www.panasonic.com/contactinfo
-
 1
1 -
2
-
3
-
4
-
5
-
6
-
7
-
8
-
 9
9 -
 10
10 -
 11
11 -
 12
12 -
 13
13 -
 14
14 -
 15
15 -
 16
16 -
 17
17 -
 18
18 -
 19
19 -
20
-
21
-
22
-
23
-
24
-
25
-
26
-
27
-
28
-
29
-
30
-
31
-
32
-
33
-
34
-
35
-
36
-
37
-
38
-
39
-
40
-
41
-
42
-
43
-
44
-
45
-
46
-
47
-
48
-
49
-
50
-
51
-
52
-
53
-
54
-
55
-
56
-
57
-
58
-
59
-
60
-
61
-
62
-
63
-
64
-
65
-
66
-
67
-
68
-
69
-
70
-
71
-
72
 |
 |
