Panasonic PVGS34PKG Digital Video Camera - Page 36
FORMATTING A CARD, PLAYING BACK ON YOUR TV, If the image or audio from
 |
View all Panasonic PVGS34PKG manuals
Add to My Manuals
Save this manual to your list of manuals |
Page 36 highlights
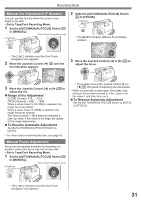
Playback Mode 3 Repeat Step 2 and press the [MENU] Button 28 when the setup is completed. • The SD Memory Card has a write protection switch. (p. 55) • For other notes concerning this item, see page 55. Formatting a Card If a Card becomes unreadable by the Camcorder, format it for reuse. Formatting erases all the data recorded on a Card. • When formatting the card all protected files (lock) are also deleted. • Set to Picture Playback Mode. • The One-Touch Navigation icon is displayed on the lower right of the screen. 1 Set [ ADVANCE] >> [ CARD FORMAT] >> [YES]. Playing Back on Your TV By connecting your Camcorder with your TV, the recorded scenes can be viewed on your TV screen. • Before connecting them, turn off the power of both the Camcorder and TV. 1 Insert a recorded tape into this Camcorder. 2 Connect the [AV OUT] Jack of the Camcorder and the Video and Audio Input Jacks of the TV. [VIDEO IN] [AUDIO IN] 33 1 28 • A confirmation message appears, select [YES] and formatting will be carried out. CARD FORMAT DELETES ALL DATA NO YES SETUP ENTER EXIT • When the formatting is completed, the screen becomes white. • It may not be possible to use a Card formatted by this Camcorder on another unit. In this case, format the Card on the unit which will use the Card. Make sure that valuable pictures are stored on your PC before proceeding. • Normally, it is not necessary to format the card. If a message appears even though you insert and remove the card several times, format it. • If the SD Memory Card is formatted on other equipment, the time spent for recording may become longer. If the SD Memory Card is formatted on a PC, it cannot be used on the Camcorder. Format the SD Memory Card on the Camcorder, in this case. • The Camcorder supports SD Memory Cards formatted in FAT12 system and FAT16 system based on SD Memory Card Specifications. A/V • Connect to the TV with the AV Cable 1 . • When plugging the pin plug of the AV cable into the [AV OUT] Jack, plug it in as far as it goes. 3 Turn on this Camcorder and set the Mode Dial 32 to the Tape Playback Mode. 4 Select the input channel on the TV. 5 Move the Joystick Control [▲] 33 to select the [ ] to start playback. • The image and audio are output on the TV. 6 Move the Joystick Control [▼] 33 to select the [ ] to stop playback. „ If the image or audio from this Camcorder is not output on the TV • Check that the plugs are inserted as far as they go. • Check the connected terminal. • Check the TV's input setting (input switch). (For more information, please read the operating instructions for the TV.) • For other notes concerning this item, see page 55. 36 For assistance, please call : 1-800-211-PANA(7262) or, contact us via the web at: http://www.panasonic.com/contactinfo
-
 1
1 -
2
-
3
-
4
-
5
-
6
-
7
-
8
-
9
-
10
-
11
-
12
-
13
-
14
-
15
-
16
-
17
-
18
-
19
-
20
-
21
-
22
-
23
-
24
-
25
-
26
-
27
-
28
-
29
-
30
-
 31
31 -
 32
32 -
 33
33 -
 34
34 -
 35
35 -
 36
36 -
 37
37 -
 38
38 -
 39
39 -
 40
40 -
 41
41 -
42
-
43
-
44
-
45
-
46
-
47
-
48
-
49
-
50
-
51
-
52
-
53
-
54
-
55
-
56
-
57
-
58
-
59
-
60
-
61
-
62
-
63
-
64
-
65
-
66
-
67
-
68
-
69
-
70
-
71
-
72
 |
 |
