Panasonic SA-XR55S SAXR55 User Guide - Page 21
RECEIVER SETTINGS - ADVANCED, Connections, Settings, Basic Operations, Before use, Operations
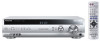 |
View all Panasonic SA-XR55S manuals
Add to My Manuals
Save this manual to your list of manuals |
Page 21 highlights
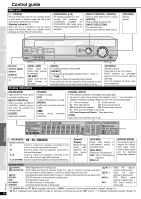
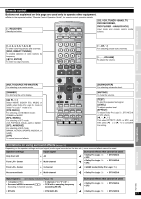
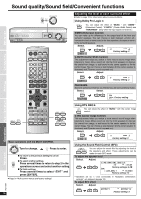
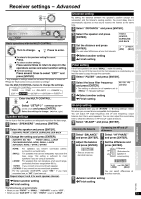
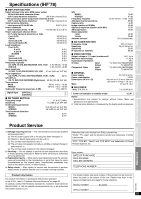
Receiver settings - Advanced MULTI CONTROL ENTER INPUT SELECTOR CANCEL POWER SPEAKERS A B DUAL AMP BI-AMP BAND PRESET TUNE VCR 2 VIDEO IN L AUDIO IN R MULTI CONTROL ENTER INPUT SELECTOR CANCEL DOWN VOLUME UP PHONES Basic operations with the MULTI CONTROL INPUT SELECTOR Turn to change. ENTER Press to enter. n To return to the previous setting/To cancel Press. n To select another settings MULTI CONTROL Press several times to return to step 2 in the CANCEL operations across and select another setting. n To finish settings Press several times to select "EXIT " and press [ENTER]. • Any changes to settings remain as set even if the power is turned off. áPage 24 "Multi control menus and factory settings". Use the MULTI CONTROL menus to change the settings. 1 MULTI Enter the MULTI CONTROL. CONTROL CANCEL INPUT SELECTOR Select "SETUP 2 " ("ADVANCE SETUP " scrolls once) and press [ENTER]. Select the settings to change. (ábelow, right) Speaker settings Set the size so that the speakers can adequately reproduce the bass range. 2 Select "SPEAKERS " and press [ENTER]. 3 Select the speaker and press [ENTER]. SUB-WFR, FRONT, CENTER, SURROUND, SUR BACK 4 Change the setting and press [ENTER]. SUB-WFR: NO, YES FRONT: SMALL, LARGE CENTER/SURROUND: NONE, SMALL, LARGE SUR BACK: NONE, 1 SPKR, 2 SPKRS NONE: For speakers you haven't connected (center, surround or surround back). SMALL: For speakers that cannot adequately reproduce the bass range. This setting is sufficient for most speakers if you are using a subwoofer. LARGE: For speakers that can reproduce a full sound range, particularly the bass range below 80 Hz. 1 SPKR: If you connect one surround back speaker. 2 SPKRS: If you connect two surround back speakers. For the subwoofer (SUB-WFR), select "YES " if you have connected one, or "NO " if you have not. Repeat steps 3 and 4 for each speaker channel. 5 Select another setting Finish setting The following are set automatically. • When you set "FRONT " to "SMALL ", "SUB-WFR " is set to "YES ". • When you set "SUB-WFR " to "NO ", "FRONT " is set to "LARGE ". Before use Connections Settings Distance setting By setting the distance between the speaker's position (except the subwoofer) and the listener's seating position, the sound delay time is automatically adjusted so that sound reaches the listener at the same time. 2 Select "DISTANCE " and press [ENTER]. 3 Select the speaker and press [ENTER]. 4 Set the distance and press [ENTER]. You can select differences at one foot intervals. 5 Select another setting Finish setting FRONT, CENTER, SURROUND, SUR BACK (MIN) (MAX) Filter setting If the Front speakers are set to "SMALL ", make this setting. Change the cut-off if the bass from the front speakers is unsatisfactory so that this bass is output through the subwoofer. 2 Select "FILTER " and press [ENTER]. 3 Select the bass filter frequency and press [ENTER]. 80, 100, 150, 200 (Hz) • This setting is effective for all speakers set to "SMALL " in "Speaker settings". 4 Select another setting Finish setting Bi-amp setting This is displayed when you set "BI-WIRE " in "Bi-wiring settings". Select this when you connect bi-wire compatible front speakers. You can adjust HF (high frequency) and LF (low frequency) output balance from the bi-wired speakers. You can also adjust the sound delay time to offset the difference in HF and LF output directions. 2 Select "BI-AMP " and press [ENTER]. Adjusting the balance Correcting the HF and LF difference 3 Select "BALANCE " 3 Select "HF PHASE " and press [ENTER]. and press [ENTER]. 4 Adjust the balance and press [ENTER]. L H • The bar shows the standard balance. 4 Set the difference and press [ENTER]. Difference HF (Side view of a LF speaker in cross section) 0.00 FEET (MIN) (MAX) You can select differences at 0.03 feet intervals. 5 Select another setting Finish setting Operations Basic Operations Reference RQT7994 21
-
 1
1 -
2
-
3
-
4
-
5
-
6
-
7
-
8
-
9
-
10
-
11
-
12
-
13
-
14
-
15
-
 16
16 -
 17
17 -
 18
18 -
 19
19 -
 20
20 -
 21
21 -
 22
22 -
 23
23 -
 24
24 -
 25
25 -
 26
26 -
27
-
28
 |
 |
