Panasonic SAHT670 SAHT670 User Guide - Page 8
Step 5 The Remote Control, Other Speaker Setup Options
 |
View all Panasonic SAHT670 manuals
Add to My Manuals
Save this manual to your list of manuals |
Page 8 highlights
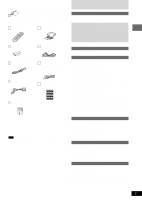
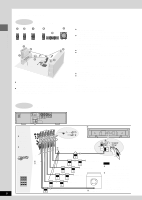
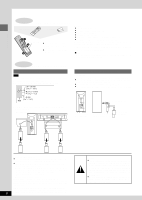
Simple setup 5 STEP The remote control Remote control Batteries 31 R6/LR6, AA, UM-3 2 ¡ Insert so the poles (+ and -) match those in the remote control. ¡ Do not use rechargeable 2 type batteries. Do not; ¡ mix old and new batteries. ¡ use different types at the same time. ¡ heat or expose to flame. ¡ take apart or short circuit. ¡ attempt to recharge alkaline or manganese batteries. ¡ use batteries if the covering has been peeled off. Mishandling of batteries can cause electrolyte leakage which can damage items the fluid contacts and may cause a fire. Remove if the remote control is not going to be used for a long period of time. Store in a cool, dark place. 7 Use Aim at the sensor, avoiding obstacles, at a maximum range of 7 m (23 feet) directly in front of the unit. Other speaker setup options Attaching to a wall Note The wall or pillar on which the speakers are to be attached should be capable of supporting 5 kg (11 Ib.) per screw. 1 Screw a screw (not included) into the wall. Fitting speaker stands (optional) Preparation Ensure the stands meet these conditions before purchasing them. ¡ Observe the diameter and length of the screws and the distance between screws as shown in the diagram. ¡ The stands must be able to support over 5 kg (11 lb.). ¡ The stands must be stable even if the speakers are in a high position. 2 Fit the speaker securely onto the screw with the hole or holes. Front/Surround speaker Center speaker 162 mm (63/8") 5 mm (13/64"), pitch 0.8 mm (1/32") Attach the stands with these holes. Plate thickness plus 7 to 10 mm (plus 9/32" to 13/32") Speaker stand (not included) RQT7534 8 Notes on speaker use ¡ You can damage your speakers and shorten their useful life if you play sound at high levels over extended periods. ¡ Reduce the volume in the following cases to avoid damage. - When playing distorted sound. - When the speakers are receiving howling from a record player, noise from FM broadcasts, or continuous signals from an oscillator, test disc, or electronic instrument. - When adjusting the sound quality. - When turning the unit on or off. If irregular coloring occurs on your television These speakers are designed to be used close to a television, but the picture may be affected with some televisions and setup combinations. If this occurs, turn the television off for about 30 minutes. The television's demagnetizing function should correct the problem. If it persists, move the speakers further away from the television. Caution ¡ Use the speakers only with the recommended system. Failure to do so may lead to damage to the amplifier and/or the speakers, and may result in the risk of fire. Consult a qualified service person if damage has occurred or if you experience a sudden change in performance. ¡ Do not attempt to attach these speakers to walls using methods other than those described in this manual.
-
 1
1 -
2
-
 3
3 -
 4
4 -
 5
5 -
 6
6 -
 7
7 -
 8
8 -
 9
9 -
 10
10 -
 11
11 -
 12
12 -
 13
13 -
14
-
15
-
16
-
17
-
18
-
19
-
20
-
21
-
22
-
23
-
24
-
25
-
26
-
27
-
28
-
29
-
30
-
31
-
32
-
33
-
34
-
35
-
36
 |
 |
