Panasonic SAHT730 Technical Guide - Page 9
Tray installation after repairs
 |
View all Panasonic SAHT730 manuals
Add to My Manuals
Save this manual to your list of manuals |
Page 9 highlights
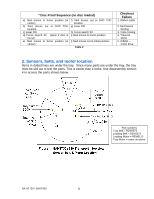
5. Tray installation (after repairs) Refer to figure 3. Positioning the main black gear and a white gear is all that is required to slide the tray back in. Procedure: 1. Main black gear - Rotate the gear so that its hole is at the 5 o'clock position and its line across the gear is horizontal as shown in figure 3. In this gear position, the laser assembly is clamped. 2. White gear - Rotate the (now free moving) left white gear so that its top molded in lines point towards the rear as shown. 3. Without crushing the tray's ribbon cable, slide the tray halfway into the mechanism. 4. Plug in the tray's ribbon cable into CN2010. The cable's contacts face rearward. 5. Push the tray all the way in. SA-HT730 / SAHT930 9
-
 1
1 -
2
-
3
-
 4
4 -
 5
5 -
 6
6 -
 7
7 -
 8
8 -
 9
9 -
 10
10 -
 11
11 -
 12
12 -
 13
13 -
 14
14 -
15
-
16
-
17
-
18
-
19
-
20
-
21
-
22
-
23
 |
 |

SA-HT730 / SAHT930
9
5. Tray installation (after repairs)
Refer to figure 3.
Positioning the main black gear and a white gear is all that is
required to slide the tray back in.
Procedure:
1. Main black gear – Rotate the gear so that its hole is at the 5 o’clock position
and its line across the gear is horizontal as shown in figure 3.
In this gear
position, the laser assembly is clamped.
2. White gear – Rotate the (now free moving) left white gear so that its top
molded in lines point towards the rear as shown.
3. Without crushing the tray’s ribbon cable, slide the tray halfway into the
mechanism.
4. Plug in the tray’s ribbon cable into CN2010.
The cable’s contacts face
rearward.
5. Push the tray all the way in.