Panasonic SC-AP01 SCAP01 User Guide - Page 8
Advanced network settings - manual
 |
View all Panasonic SC-AP01 manuals
Add to My Manuals
Save this manual to your list of manuals |
Page 8 highlights
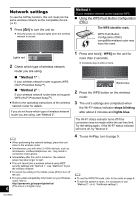
Advanced network settings ≥ The below settings are the alternative or additional settings for "Method 2". (> 7) Alternative settings Instead of steps 4 and 5: Select "Manual settings". 1 Type your home wireless network name into the "Network name (SSID)" field. 2 Select the encryption method from the "Security system" drop down list. 3 Type the password into the "Password" field and then select "NEXT". Additional settings After step 5 and before step 6: If your home wireless network has been setup to use specific IP Addresses, Subnet Mask, Default Gateway, Primary DNS, etc. Select "Advanced network settings". {. Input the required addresses into each field and select "OK". ≥ To change the settings back to DHCP, select "ON" from the "DHCP" drop down list. If you want to change the name of this unit. Select "Edit STEREO SYSTEM name". {. Only ASCII characters can be used. {. Type a new name into the "STEREO SYSTEM name" field and select "OK". ≥ Enable Java and Cookies in your browser settings. ≥ This unit can also be set using the WPS PIN code. Replace step 2 of "Method 1" with the following steps. (Before starting, refer to the wireless network router's operating instructions for details on how to enter the PIN code.) 1 While the Wi-Fi® status indicator blinks blue, press and hold [- WPS] again. {. The Wi-Fi® status indicator blinks purple. Continue to the next step. 2 Enter the PIN code "64428147" into the wireless router. 8 RQT9655
-
 1
1 -
2
-
 3
3 -
 4
4 -
 5
5 -
 6
6 -
 7
7 -
 8
8 -
 9
9 -
 10
10 -
 11
11 -
 12
12 -
 13
13 -
14
-
15
-
16
-
17
-
18
-
19
-
20
 |
 |
