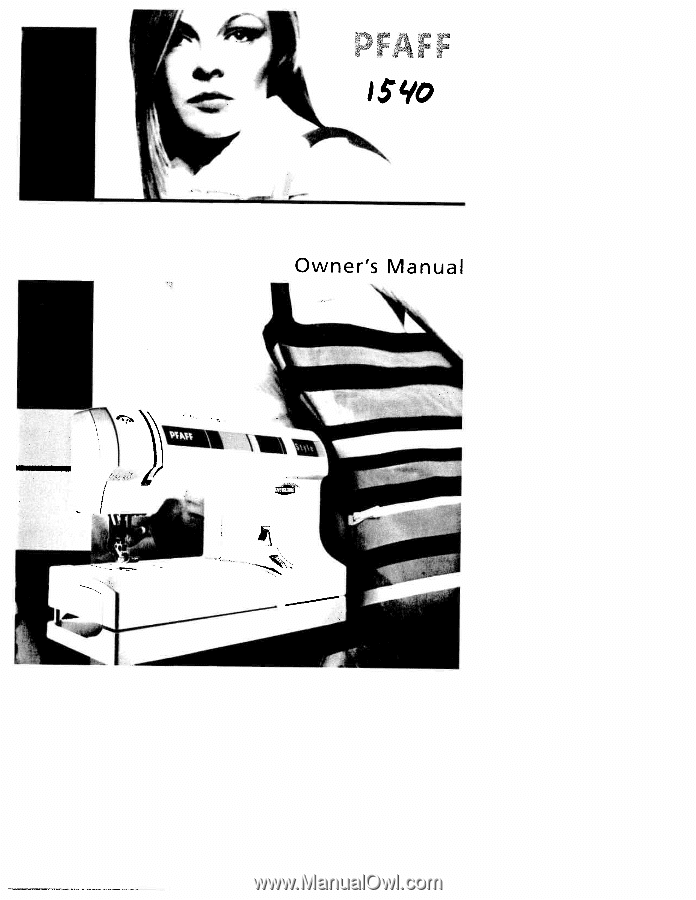
Pfaff 1540 Owner's Manual
Pfaff 1540 Manual
 |
View all Pfaff 1540 manuals
Add to My Manuals
Save this manual to your list of manuals |
Pfaff 1540 manual content summary:
- Pfaff 1540 | Owner's Manual - Page 1
0 i'D -' V.) 0) 0) - Pfaff 1540 | Owner's Manual - Page 2
machine whith unique features. Your new Pfaff can sew through almost any fabric - from thick to thin. Your InStyle has the same features as the s1 ° ele3 ct (except from the stitches marked "K", the Shelledging stitch and the Closed overlock stitch). To learn your InSt y I e, follow the instructions - Pfaff 1540 | Owner's Manual - Page 3
needle area, such as threading needle, changing needle, threading bobbin, or changing presser foot, etc. 20. Always unplug sewing machine from the electric outlet when removing covers, lubricating, or when making any other user servicing adjustments mentioned in the instruction manual. 21. Hold plug - Pfaff 1540 | Owner's Manual - Page 4
/ I 'fr - Pfaff 1540 | Owner's Manual - Page 5
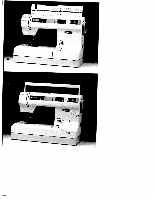
Presser foot holder with presser foot Removable accessory tray 1 5 Base plate 16 DT System / Integrated Dual Feed 17 Needle holder with fixing screw 18 Presser foot lifter 19 Button for "reverse sewing" 20 Stitch length dial 21 Carrying handle 22 Stitch selection 23 Thread guide 24 Sewing lamp - Pfaff 1540 | Owner's Manual - Page 6
-65 15,23 ii 24-25 27 26-29 2 Oiling the sewing machine Open overlock stitch Optional accessories Overlock stitches 48-5 1 52 30 59 63 Patchwork quilt Pennant stitch Placing sewing thread on spool holder Practical sewing Presser foot lifter Pullover stitch Pushbutton controls 68 28 58-66 28-29 - Pfaff 1540 | Owner's Manual - Page 7
foot Quilting Removable accessory tray Removing the presser foot Repairing tears Reverse sewing Richelieu Right needle position Ruffler 63 53, 63 3 13 38 17 52 16 61 Tapering Thread tension Thread cutter Threading the upper thread Top feed (Integrated Dual Feed) Top-stitching Trouble-shooting - Pfaff 1540 | Owner's Manual - Page 8
stitches) fl select 1540 I lEt' ( < >< S>, I 1% I I Wi WI WI WI 0 011 013 WI WI select 1530 & select 1520 I Stitch Description 1540 1530/1520 NB at 0.5 -5 iö Left needle position Straight stitch: For all sewing and top-stitching I (for straight stitch operations which require a - Pfaff 1540 | Owner's Manual - Page 9
table (stretch stitches) select 1540 0/1 WI 0/1 0/1 0 0/i 0/3 0/1 0/1 select 1530 & select 1520 Stitch Description 1540 1530/1 520 D - Decorative stitch e.g. hemstitching. Also for crazy quilting For sewing on elastic thread, overstitching terry cloth seams and for ornamental hem seams. - Pfaff 1540 | Owner's Manual - Page 10
i-7 s-7 - / -.,i .. .A '-1' r 4-1 / .--- -Z -- k-' ' \ 7/i X ". N\ select 1540 Stitch 1540 1530/1520 LC - LD - LG - LI - EK - EL - Description Dutch traditional embroidery An ornamental stitch, e.g. for bath accessories A decorative stitch, e.g. for household textiles - Pfaff 1540 | Owner's Manual - Page 11
Operate your Pfaffselect Operate your Pfaff select Electrical connection Removable accessory tray Bobbins Bobbin case Threading the needle Needle threader Pulling up the bobbin thread Presser foot lifter Thread cutter Changing the presser foot lOT System/Integrated Dual Feed Changing the needle - Pfaff 1540 | Owner's Manual - Page 12
Place the cords, foot control and instruction book in the compartment of the carryingcase I Top cover Open the folding cover (6) upwards The stitches of the sewing machine are illustrated on the inside of the top cover. Connecting the foot control F Connect the plug of the foot control to the - Pfaff 1540 | Owner's Manual - Page 13
- lHt- * _____ Qperate your Pfr1ffselect Accessory tray ç Your Pfaff select sewing machine has a removable accessory tray (15) which is also used as an eutended work support. Model 1540, has a special removable accessory organi5er. The enclosed accessories are numbered. Sort the enclosed - Pfaff 1540 | Owner's Manual - Page 14
stops the needle from moving while the machine is winding the bobbin. Placing the bobbin Switch off the main switch (2) Place the empty bobbin so that the black pin of the bobbin winder (5) snaps into the slot of the bobbin. Push the bobbin to the right Note: The bobbin can only be wound when it is - Pfaff 1540 | Owner's Manual - Page 15
Winding the bobbin from the spool holder Place the sewing thread on the spool holder (8). To guarantee free movement of the thread and to give additional hold to the thread spool, fit a spool cap corresponding to the size of the thread spool Threading Place the thread into guide A and pull - Pfaff 1540 | Owner's Manual - Page 16
corresponding spooi cap on it. Threading Place the thread into guide C and pull it through opening B to the right under hook D. Wind the thread clockwise a few times around the bobbin. Switch on the main switch Hold the end of thread firmly and press the the foot control. The winding action will - Pfaff 1540 | Owner's Manual - Page 17
left to right (9). The take-up lever must be positioned at its very top. Pass the thread to the right under the guide hook D. Then wind the thread several times around the bobbin. Press the foot control and winding the bobbin. Don't forget: Make sure to stop the needle from moving while winding the - Pfaff 1540 | Owner's Manual - Page 18
open it towards you. LAn I I Removing the bobbin case I Raise the bobbin case lever and pull out the bobbin case. Release the lever and remove the empty bobbin. a, a Thread tension To ensure perfect sewing and a durable seam, the top and bottom thread-tensions must be well adjusted to each - Pfaff 1540 | Owner's Manual - Page 19
then under the tension plate B until it rests in the opening (see arrow). A Check: When you lookat the bobbin and pull the thread, the bobbin must turn clockwise. Inserting the bobbin case D Lift lever F and slide the bobbin case onto the hook pin D as far as it will go. Opening E of the - Pfaff 1540 | Owner's Manual - Page 20
downwards again in the righthand threading slot. Finally, pass the thread from the side behind one of the two thread guides (25). To thread the needle, place the thread from front to back through the needle eye. To thread the needle using the needle threader (Model 1540>, please refer to the next - Pfaff 1540 | Owner's Manual - Page 21
Operate your Pfaffselect Needle threader (Model 1540) To make threading the needle easier and quicker, you have been provided with the PFAFF needle threader (13). Lower the presser foot. Turn the handwheel until the needle is at its highest position. Place the needle thread under hook A and hold it - Pfaff 1540 | Owner's Manual - Page 22
your Pfaff select S I Drawing up the bobbin thread Turn off the main switch Raise the presser foot. Hold the needle thread and turn the handwheel towards you until the needle is at the top again and the bobbin thread has formed a loop. Pull the needle thread to draw up the I bobbin thread - Pfaff 1540 | Owner's Manual - Page 23
the same time so that it disengages from the presser foot holder (14) Engaging the presser foot Place the presser foot under the presser foot holder (14) so that when the presser foot lifter (19) is lowered, the pins of the foot engage in the presser foot holder. Check: Please check that the presser - Pfaff 1540 | Owner's Manual - Page 24
Operate your Pfaff select The Intigrated dual teedIIDT System (Models 1530 and 1540) PFAFF offers the ideal solution for sewing difficult materials: the intigrated dual feed. This system feeds the material from the top and bottom simultaneously as is done in industrial sewing machines. The - Pfaff 1540 | Owner's Manual - Page 25
foot thread tension (10) with the help of the mark A. The normal setting for sewing is 4 to 5. P For embroidering, darning and buttonhole set the tension between 2 and 3. jJ Dropping the feed dog For certain sewing work, e.g. darning the feed dog has to be dropped. To do this, open the bobbin - Pfaff 1540 | Owner's Manual - Page 26
stitch is sewn with stitch width 0. In chapter "Utility stitches and practical sewing" (pages 21-44), you will find recommendations in the tables for the stitch width selection of individual stitches. During sewing you can also change the stitch width. N Needle position dial In the center - Pfaff 1540 | Owner's Manual - Page 27
_______ ___ Operate your Pfaff select Reverse sewing The machine sews in reverse only as long as the reverse sewing button (20) is pressed. Fii j f7 mA Bri C 0 IfllV I Stitch length adjustment dial With the stitch length adjustment dial (21) you can adjust the stitch - Pfaff 1540 | Owner's Manual - Page 28
selection, push button controls - select 1540 LI . Utility stitches Each stitch has been given a letter that you can find on the push button controls. By pressing the correct button, the stitch is selected and the machine is ready to sew either be in the normal sewing range or in the stretch - Pfaff 1540 | Owner's Manual - Page 29
Operate your Pfcffselect Stitch selection, stitch dial - select 1530, 1520 select Utility stitches Each stitch is identified by a letter. The stitches and their corresponding letters are shown on the inside of the lid, a chart is also - Pfaff 1540 | Owner's Manual - Page 30
- Pfaff 1540 | Owner's Manual - Page 31
Utility stitches and practical sewing Utility stitches and practical sewing Sewing chart General sewing aids Non-elastic stitches Elastic stitches Overlock stitches Covering stitches Buttonhole Button sewing Hemming with the twin needle Smocldng Gathering Darning Sewing on zippers Stabilizing edges - Pfaff 1540 | Owner's Manual - Page 32
sewing the selected stitches. The choice of the sewing foot, the S setting of the needle thread tension and whether the sewing is carried out with S the top feed switched on or off. Always use the "center" needle position if not otherwise specificed in the instructions. S 5 ; ; H-x 1540 - Pfaff 1540 | Owner's Manual - Page 33
described on page 15 and the bobbin thread tension on page 8. Perfect tension Too high tension Too low tension Topstitching Straight stitch G (1540)IE (1530, 1520) can be sewn using any of 15 various needle positions in such a way that you can always guide the sewing foot along the fabric edge for - Pfaff 1540 | Owner's Manual - Page 34
For overcasting difficult materials, blind I stitch foot No. 3 is very useful. When sewing, the thread lies over pin C, thus I preventing curling of the fabric edge. In this way you can sew beautiful smooth F seams. F The raw edge must be guided along edge guide B. You can adjust this edge - Pfaff 1540 | Owner's Manual - Page 35
the hem again so that the hem edge protrudes by about 1 cm • Place the fabric under the sewing foot so that the crease line runs along edge guide B. • Using the needle positioning knob 28, c. select the needle position to the right • When the needle enters the crease line, it must only pick up - Pfaff 1540 | Owner's Manual - Page 36
U:ility stitches and practical sewing )I( - )I( - 1540 G 0 Stretch • 3-5 oil 1540 G 3-51.4 Stretch • 3-5 0/1 1 530 E 0 Stretch • 3-5 0/1 1530 E 3-51. Stretch • 0/1 1520 E 0 Stretch 3-5 0/1 1520 E 3-51.1 Stretch 3-5 0/1 Stretch triple straight stitch Stretch triple zigzag stitch F - Pfaff 1540 | Owner's Manual - Page 37
in quarters. Pin elastic to fabric at quarter . markings. Place fabric and elastic under sewing • foot. • Stretch elastic to fit the fabric. Begin • sewing. 1540 M 1 530 F 1 520 F • 5-Id Stretch 5- Stretch • 5-l Stretch 3-5 0/1 3-5 °fl 3-5 0/1 Honeycomb stitch The honeycomb stitch is an - Pfaff 1540 | Owner's Manual - Page 38
durable and quickly sewn. Tip: We recommend using blind stitch foot No. 3 when sewing overlock seams. It guides particularly well and prevents the seam from puckering even on wide seams. 1540 K 53O I I 5- itretch • 5- itretch • 5- itretch 3-5 0/3 3-5 0/3 3-5 0/3 Open overlook stitch With this - Pfaff 1540 | Owner's Manual - Page 39
! When overlocking, if you select a needle position other than center, and stitch width other than 5 , make sure the needle does not strike the bar of sewing foot 3. I 1540 H 1530 - 12O - 5-' Stretch • - - - - 3-5 0/1 - - - - Pullover stitch (Model 1540) This stitch is suitable - Pfaff 1540 | Owner's Manual - Page 40
seams. a The covering stitches are only available on select 1540. S L\j\j $ S S S • 1540 L 5-bi Stretch 3-5 0/1 S 1530 - - - 1520 - - - - - I - - Feather stitch (Model 1540) S With the feather stitch you can sew highly elastic materials with an effect similar to S that - Pfaff 1540 | Owner's Manual - Page 41
sewing S. > N iHx 1540 L 5- 1-2 • 3-5 0/1 1530 - - - - - 1540 IG 5- Stretch • 1530 - - 1520 - - - 3-5 0/1 - - - - I Fancy elastic stitch (Model 1540) Pennant stitch (Model 1540 edge with fancy elastic stitch. • Sew the band onto the part with an overlock stitch (see pgs 28 - Pfaff 1540 | Owner's Manual - Page 42
of the buttonhole. 1540 CBA 5- C 0/1 1530 - - 1520 - - 1540 - Standard buttonhole • Insert the buttonhole foot and slide the foot forward as far as it will go. • Select stitch 1 (C) and sew the right side of the buttonhole to the required length. Clip the top thread after a few stitches - Pfaff 1540 | Owner's Manual - Page 43
sewing 1540 - - - 1530 ABC 5- 0/1 i o ABC 5- 0/1 1520/1 530- Standard buttonhole • Insert the buttonhole foot and slide the foot forward as far as it will go. • Select stitch A. Sew the left side of the buttonhole to the required length. Clip the top thread after a few stitches. • Select - Pfaff 1540 | Owner's Manual - Page 44
Insert the sewing foot • Place a match between the holes of the button and sew it on as described to the left. • Remove the match and pull the fabric and the button apart. • Wrap the shank you have just created with sewing thread and knot it. (See illustrations below) Securing • Select straight - Pfaff 1540 | Owner's Manual - Page 45
must make sure that you select the center needle position • bobbin thread tension, the more intense the gathering effect. • Sew a test seam to determine the level of gather. • Mark the first line on the right side of the fabric and sew along it. • Each additional seam can be sewn at a presser foot - Pfaff 1540 | Owner's Manual - Page 46
ends are knotted to amount you pull the threads. secure the gather. • The gather can also be altered after sewing by pulling the ends of the elastic threads. Tip: The cording foot (special accessory) is particularly suitable for gathering. Due to its guide grooves the elastic is fed • Finally - Pfaff 1540 | Owner's Manual - Page 47
snaps the presser foot lifter into a notch (B) on the back side of the sewing machine into the darning position. • Place the darning work in the darning hoop. • Dropthefeeddog. • Pull up the bobbin thread and hold the threads when you start sewing. • Darn the damaged area by guiding the fabric back - Pfaff 1540 | Owner's Manual - Page 48
Utility stitches and practical sewing I; Hx • 1540 M 5-i- 02-1,5 3-5 011 • 1530 F 5- 02-1,5 3-5 0/1 1520 F 5-i- 0,2-1,5 3-5 0/1 Darning with the elastic stitch Darning with the elastic stitch is especially suitable for repairing damaged areas. • Sew over the damaged area in rows until it - Pfaff 1540 | Owner's Manual - Page 49
plastic zipper. It is important for all types of zippers to sew very close to the edge of the teeth of the zipper. This is why it is possible to insert the zipper foot either on the right or the left of the presser foot holder. Additionally, you can set the needle so that - Pfaff 1540 | Owner's Manual - Page 50
the needle in the fabric. Raise the presser foot. • Stitch in halt of the zipper, leave the foot and open the zipper. • Now you can finish sewing the seam, w needle in the fabric, raise the presser foot and close the zipper. • Now you can continue sewing the seam up to the end ot the zipper - Pfaff 1540 | Owner's Manual - Page 51
foot on the right side and move the needle to the right needle position . • Stitch along the edge of the zipper. • Just before the end of the seam, open the zipper and hnish sewing the seam. • Close the zipper and baste the overlap evenly to the other half of the zipper. • Then sew through - Pfaff 1540 | Owner's Manual - Page 52
(approx. 2 mm> • Lay the folded fabric edge underneath the hemmer and sew a few stitches. • Leave the needle in the fabric, raise the presser foot and insert the fabric into the hemmer foot scroll. • Lower the presser foot and guide the fabric evenly into the hemmer. Take care to ensure that the - Pfaff 1540 | Owner's Manual - Page 53
stitches and practical sewing : 1540 G 1530 E 1 520 E 0 2,5 • 3-5 0/1 • 0 2,5 3-5 0/1 0 2,5 3-5 0/1 Inserting lace You can achieve a beautiful effect by inserting lace, e.g. on babywear and children's clothing. • First the lace is basted onto the right side of the fabric. • Sew on both sides - Pfaff 1540 | Owner's Manual - Page 54
It is often used as an edging on lingerie. Tip: By sewing a colored woollen thread into the seam you strengthen the shell- edge while also creating color can also be used instead of The higher the needle thread tension, the a woollen thread. I deeper the shell edge feed. • Serge the fabric - Pfaff 1540 | Owner's Manual - Page 55
Decorative sewing and embroidery techniques rative sewing and embroidery techniques Sewing table for decorative sewing Decorative stitches Monograms Embroidering with the .e zigzag stitch/Tapering ppliqu' elieu elet embroidery 'work quilt ng 49-51 51 52 52 53 54 4c - Pfaff 1540 | Owner's Manual - Page 56
, you can produce decorations by selecting different stitches, using different thread! E fabric colors or vary length and width of the stitches. For decorative stitches we recommend using special embroidery threads which F are available from your Pfaff dealer. Use stabilizer under the - Pfaff 1540 | Owner's Manual - Page 57
(only on select 1540) An additional effect can be produced with different colored thread. Multi-colored thread was used for the middle border in this example. You can purchase it in a great variety of shades from your PFAFF dealer. • Place appropriate stabilizer under the fabric. • Mark the middle - Pfaff 1540 | Owner's Manual - Page 58
sketched F foot and bring it into darning position (see page 37). using the zigzag stitch. F • Place stabilizer under the fabric. • Hoop the fabric in an embroidery hoop I and embroider using the zigzag stitch. I • Tie off the threads and remove the stabilizer. F Tip: By sewing quickly - Pfaff 1540 | Owner's Manual - Page 59
Tapering is easy with your select sewing machine. By adjusting the width of this dense zigzag stitch you can create Interesting embroidery. Even embroidering • Place stabilizer under the fabric. • Set needle thread tension to "buttonhole", select zigzag stitch G (1540), E (1530/1520), set stitch - Pfaff 1540 | Owner's Manual - Page 60
Set needle thread tension to "buttonhole", select zigzag stitch G • Select right needle position and embroider a straight line. F (1540), E ( Turn the material 180 degrees and embroider the other half of the leaf and sew one stitch. Continue in this manner until the initial width is achieved. - Pfaff 1540 | Owner's Manual - Page 61
with the appliqué foot (special accessories), because it has a special cutout on the underside for the buttonhole seam. Use a fusible backing fabric to iron the appliqué onto the material, making it easier for you to appliqué. • Insert the appliqué foot in the sewing machine. • Transfer your drafted - Pfaff 1540 | Owner's Manual - Page 62
sew with your sewing machine. Using a magic marker, draw your motif Traditional eyelet embroidery which previously had to be made laboriously by hand can now be made quite easily with the help of an eyelet plate (special accessory zigzag stitch. • Draw up the bobbin thread and hold it • Finally, - Pfaff 1540 | Owner's Manual - Page 63
model to sew all layers together. Work from the inside of the quilt out. Use a straight stitch for long seams. Use stitches such as FG or L stretch (select 1540) to add a decorative touch. Experiment with other stitches on a scrap of fabric. Contact your Pfaff dealer, library, or bookstore for - Pfaff 1540 | Owner's Manual - Page 64
seam as an I edge. Use the decorative stitch foot 1. a - 4 %• 4 - ., , - Hem edge sewn with hemstitch seam • Iron the hem over twice and pull one or F more threads out from above the hem. F • Using the stretch zigzag, stitch width 2- 3 mm, sew the hem from the face side. The needle must - Pfaff 1540 | Owner's Manual - Page 65
Accessories and needles "andneE I accessories) [accessories table jfdot tape blnder etable - Pfaff 1540 | Owner's Manual - Page 66
and needles F Presser feet (normal accessories) 0 Standard presser foot Part No198-694 816-00 (pictured) (select 1540 and 1530) F Part No196-694-847-00 (select 1520) 1 Fancy-stitch foot (for top feed) Part No198-694 814-00 (select 1540) F F * 1 Clear view foot I (Fancy-stitch toot not - Pfaff 1540 | Owner's Manual - Page 67
Accessories and needles 5 Buttonhole foot Part No. 93-036 990-91 6 Darning foot Part No. 93-035 960-91 (select 1540) 7 7 Hemmer Part No. 98-694 818-00) (select 1540) 8 Edge guide Part No. 98-802 422-00 1O S ft 1-3 Spool cap Part No. 93-036 048 44 2. Part No. 93-035 050-44 3. Part No. 93-036 049. - Pfaff 1540 | Owner's Manual - Page 68
at an extra charge from your dealer Accessory Appliqué foot Part No. Sewing work 93-042 941-91 For appliqué work Open appliqué foot 93-036 931081 Bias tape binder 98-054 484-9 1 For binding edges with I (remove foot holder) bias tape Cording foot, 5 grooves 93-042 950-9 1 For cording - Pfaff 1540 | Owner's Manual - Page 69
technique. You can make these seams particularly decorative by using a sewing thread of a contrasting color. The felling foot is available in two different widths. • Attach the felling foot to the presser foot holder. Shirring foot Beautiful gathering effects can be achieved quickly and easily with - Pfaff 1540 | Owner's Manual - Page 70
center front of the needle plate. • Replace the needle plate. The notch between the needle plate and the sewing machine provides space for the gimp thread while sewing. Feed the gimp thread under the work support so that it does not become knotted during sewing. • Gently pull the fabric taut while - Pfaff 1540 | Owner's Manual - Page 71
Accessories and needles m4oGo25'j5aas 1320 E 0 2,5 nd:r 3-5 I L --X 1540 G 0 3 0 3-5 Ruffler 1530 E 0 3 The bias tape will enclose the raw edge automatically during sewing. Tip: You can obtain an additional decorative effect by PFAFF dealer, full operating instructions are included. - Pfaff 1540 | Owner's Manual - Page 72
C '533 C 2 0,35-1 C) 2 0.35-1 C 3 Cording 1540 G foot 3 1530 E 2 0,35-1 0 2 0,35-1 0 2-3 Appliqu foot 2-3 C 2 0.35-1 3 ..* E 2 0.35-1 2-3 E Cording foot Appliqué foot Cording is a technique in which pearl Appliqués are easily sewn and always thread or a fine cord is overstitched to - Pfaff 1540 | Owner's Manual - Page 73
• Attach the fringe foot. • Embroider the motif row by row. For circles you must work from the outside in. • When using heavier threads, you should select a slightly longer stitch length. Always sew a test seam first. • When you have finished, pull the work carefully from the machine by holding the - Pfaff 1540 | Owner's Manual - Page 74
Accessories 100 Medium ball point Stretch-fabric needle developed especially for Pfaff. Particularly suitable for delicate stretch and knitted fabrics F 130 seams with buttonhole silk or No. 30/3 synthetic thread, metallic thread 70-110 130/705 H-WING Needle size: Hemstitching point - Pfaff 1540 | Owner's Manual - Page 75
Accessories and needles Classification Stitch [1 length 1301705 H-ZWI 2,5 mm fi size: 80 2,5 mm the handwheel. In this way, needle breakage is avoided as much as possible. Zigzag sewing jpj Classification Stitch length Stitch width Needle Suitable for spacing 1301705 H-ZWI size: 80 size - Pfaff 1540 | Owner's Manual - Page 76
Wi VT VT 'V - Pfaff 1540 | Owner's Manual - Page 77
Maintenance and tmuble shooting I - Maintenance and trouble-shooting Changing the needle plate 68 Cleaning and oiling 68 Replacing the sewing lamp 69 Trouble-shooting 70 - Pfaff 1540 | Owner's Manual - Page 78
It is very important to clean and oil your sewing machine, because it will rewardyou with a longer service life. The more often you use the machine, the more care it needs. Removal: F • Raise the sewing foot and remove the removable accessory tray. F • Push the point of a small screwdriver - Pfaff 1540 | Owner's Manual - Page 79
and troubleshooting Changing the sewing lamp Switch off the main switch Disconnect the mains plug and the foot control plug from the machine. • Take off the removable accessory tray (15). The sewing lamp is located inside the left side of the sewing machine Removal: Hold the sewing machine tightly - Pfaff 1540 | Owner's Manual - Page 80
Check top and bottom tensions. Only use perfect threads F Do not wind thread free-hand, but run it on through the winding tension. Thread up correctly. Check needle and bobbin thread tensions Machine does not feed or feeds irregularly Sewing lint has collected between the feed dog teeth rows - Pfaff 1540 | Owner's Manual - Page 81
- Pfaff 1540 | Owner's Manual - Page 82
< C C c>c cc n -c C m z • - • • • ft \ e ei t ed , pdpe
-
 1
1 -
 2
2 -
 3
3 -
 4
4 -
 5
5 -
 6
6 -
 7
7 -
8
-
9
-
10
-
11
-
12
-
13
-
14
-
15
-
16
-
17
-
18
-
19
-
20
-
21
-
22
-
23
-
24
-
25
-
26
-
27
-
28
-
29
-
30
-
31
-
32
-
33
-
34
-
35
-
36
-
37
-
38
-
39
-
40
-
41
-
42
-
43
-
44
-
45
-
46
-
47
-
48
-
49
-
50
-
51
-
52
-
53
-
54
-
55
-
56
-
57
-
58
-
59
-
60
-
61
-
62
-
63
-
64
-
65
-
66
-
67
-
68
-
69
-
70
-
71
-
72
-
73
-
74
-
75
-
76
-
77
-
78
-
79
-
80
-
81
-
82
 |
 |
0
i’D
-‘
V.)
0)
0)