Pfaff expression 2014 Owner's Manual - Page 63
right-hand
 |
View all Pfaff expression 2014 manuals
Add to My Manuals
Save this manual to your list of manuals |
Page 63 highlights
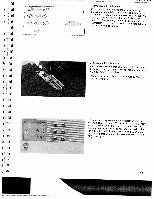
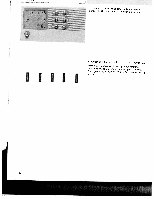
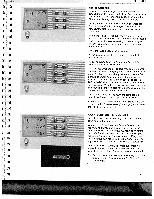
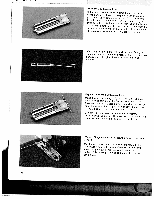
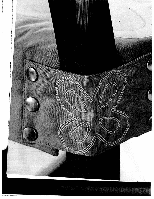
*_'..A'.i.I ii iJIcO 62 Buttonhole with gimp thread otpttgdBhhhfuiuermurltlreehtapbtaaueobdudptnltphethotiroronovaeentlneasosherstddsoitetthlchrwateehhpeiflafoplrootmiornvgootaoe.tehx.rtrttBeai.PmsaluPstanrtabelstdeatwaosetcrncllneteyhhehf.oxwtetthlhtUgieeetteuhhnsNiecrdsdgeeaoieipann.mmsdegt9aepeoerfrcnrltncaoohodncmtfrhloseoaentarttuohodlcanweenslsndacgmoeabtetrrrhehpneeattshoeameserfrtwee,ogwtfgnrhobiueim.eoanltcapgfkraronondft btAhafrrteetaarcdcko.umnCtpiulltethtoiefnfgltohtoehpegoibmfutpthtortnehahredoaleids,shpjiuudlsldtethbneehbeeinnloddwsthotehf etfhinbeaulgttiomnphole bartack. Keyhole buttonhole with gimp thread aGPbPnaaludarsicdseleeextfhttttehhengeeduthcgiindreiemgenastpdferorotnehmonrftedhtaashedeluceannlcalegdomntenhtrpgetroaht,fhtefgetrihfomofenooptotbtotaafhacntrtkdheteahopdefubltouslhivteduteoperpn. rithnheotesolseemthfroeeftooatrlo.igt.ht Sew the right-hand seam of the buttonhole. After the machine sews the gimp thread down first few stitches of the curved from the clamp with a straight end pin. pull the Warning: surface. The presser foot must not be raised from the fabric Pull the gimp thread on the left towards the rear until the loop is just in front of the needle. Carefully sew the curve. After sewing the curve, hold the gimp thread a little more taut and finish gimp thread. sewing the buttonhole. Cut off the excess
-
 1
1 -
2
-
3
-
4
-
5
-
6
-
7
-
8
-
9
-
10
-
11
-
12
-
13
-
14
-
15
-
16
-
17
-
18
-
19
-
20
-
21
-
22
-
23
-
24
-
25
-
26
-
27
-
28
-
29
-
30
-
31
-
32
-
33
-
34
-
35
-
36
-
37
-
38
-
39
-
40
-
41
-
42
-
43
-
44
-
45
-
46
-
47
-
48
-
49
-
50
-
51
-
52
-
53
-
54
-
55
-
56
-
57
-
 58
58 -
 59
59 -
 60
60 -
 61
61 -
 62
62 -
 63
63 -
 64
64 -
 65
65 -
 66
66 -
 67
67 -
 68
68 -
69
-
70
-
71
-
72
-
73
-
74
-
75
-
76
-
77
-
78
-
79
-
80
-
81
-
82
-
83
-
84
-
85
-
86
-
87
-
88
-
89
-
90
-
91
-
92
-
93
-
94
-
95
-
96
-
97
-
98
-
99
-
100
-
101
-
102
-
103
-
104
-
105
 |
 |
