Pfaff expression 2014 Owner's Manual - Page 81
foot/Stitch-in-the-ditch
 |
View all Pfaff expression 2014 manuals
Add to My Manuals
Save this manual to your list of manuals |
Page 81 highlights
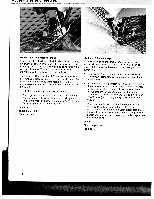
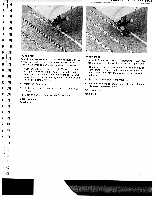
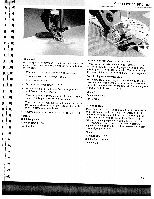
Accessories and nee . TI ./ Fringe foot With this special foot fantastic effects in no on terry cloth. for fringe embroidery you can produce time. This foot is particularly effective Mark your desired pattern with a fabric marking pen. Place a piece of stabilizer under the fabric. • Attach the fringe foot. • Set the upper thread tension to 2 - 3. Embroider the motif row by row. work from the outside inwards. For circles you must • When longer using stitch heavier threads, you should select a length. Always sew a test seam first. slightly • ymWoauhcehwniilnlyeopuublylhtahhvoeeldefinningdistlhhoeeodp,lsapsfutllallto/tothipgesh.wt.Iof rykoucapreufllultloyofrqoumicktlhye, • Knot the beginning and end threads on the reverse side. Stitch: 3 Stitch length: 0.5 - 1 Stitch width: 1.5 - 2.5 Tension: 2 - 3 Narrow edge foot/Stitch-in-the-ditch foot taTehtxhetcaisecclhelpeinrnntegetslrysleaosrcfuetfihotteeoodtfamotoofaitenkadiescgshtesen-djtaoorfirankobiewnreig-cpesedtedhgpegeaettr.woaTpotehsfteiaftabcmbrhrieicintcsaglpseiegeapucsaieidresear,t.iein.Idet ..is Topstitching with a narrow edge tapFhlroleoerwsdnsesaesrrfirorofreowdpot-elereadffgetgcaehtianttnsootdppsstphttiioettccsfihhatiibnosrpngicapacenliadndcggete.o.tphMsetiotcvceehn.tthTeerhegnuecieeddnelteeorfingtthuoeide Stitch: 1 Stitch length: 25 Tension: 3-5 Sewing on lace oetsuocPhftdfeniletygnadtchoceftheeaeueriobrnrcttfrghghzeit.ceiuehngsCietfdzfeohpoaerforolgaodtagbopenaurrseidisdiegcdr/hlpdetzyath.reingeesssBdisziedrfosapieteetgnhhaddieru.ssfaphetalit.aedbtecTcdrgdheihece.eaNdAaollgcofnod.eedywjnu3oioltsnuaefatgrcrnytefhdofgaoeuusbsrhrirewdmiowlceiaudoctltwrocdeheailtttbalhpocnekerhdteeihplnceeelligpfaestcnertioeghgfdtehhtthe Stitch: 3 Stitch length: 1 - 3.0 Stitch width: 1.5 - 3.5 Tension: 3-5 79
-
 1
1 -
2
-
3
-
4
-
5
-
6
-
7
-
8
-
9
-
10
-
11
-
12
-
13
-
14
-
15
-
16
-
17
-
18
-
19
-
20
-
21
-
22
-
23
-
24
-
25
-
26
-
27
-
28
-
29
-
30
-
31
-
32
-
33
-
34
-
35
-
36
-
37
-
38
-
39
-
40
-
41
-
42
-
43
-
44
-
45
-
46
-
47
-
48
-
49
-
50
-
51
-
52
-
53
-
54
-
55
-
56
-
57
-
58
-
59
-
60
-
61
-
62
-
63
-
64
-
65
-
66
-
67
-
68
-
69
-
70
-
71
-
72
-
73
-
74
-
75
-
 76
76 -
 77
77 -
 78
78 -
 79
79 -
 80
80 -
 81
81 -
 82
82 -
 83
83 -
 84
84 -
 85
85 -
 86
86 -
87
-
88
-
89
-
90
-
91
-
92
-
93
-
94
-
95
-
96
-
97
-
98
-
99
-
100
-
101
-
102
-
103
-
104
-
105
 |
 |
