Pfaff select 150 Owner's Manual - Page 23
Reverse sewing, Stitch length adjustment
 |
View all Pfaff select 150 manuals
Add to My Manuals
Save this manual to your list of manuals |
Page 23 highlights
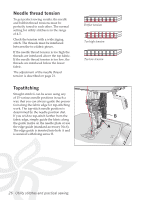
20 19 A 19 Reverse sewing The machine sews in reverse only as long as the reverse sewing button (20) is pressed. Stitch length adjustment dial Adjust stitch length With the stitch length adjustment dial (19) you can adjust the stitch length between 0 and 6 mm by turning the point marking on the button to the required length. Buttonhole Between the numbers 0 and 1 you will Ànd the "buttonhole" symbol (A). This area is the optimum stitch density for sewing buttonholes and embroidering. The further you turn the dial to 0, the higher the density of the stitch. Stretch stitches To sew stretch stitches (dark background), you must turn the stitch length adjustment dial (19) as far as it will go in the grey area. Operate your sewing machine 23
-
 1
1 -
2
-
3
-
4
-
5
-
6
-
7
-
8
-
9
-
10
-
11
-
12
-
13
-
14
-
15
-
16
-
17
-
 18
18 -
 19
19 -
 20
20 -
 21
21 -
 22
22 -
 23
23 -
 24
24 -
 25
25 -
 26
26 -
 27
27 -
 28
28 -
29
-
30
-
31
-
32
-
33
-
34
-
35
-
36
-
37
-
38
-
39
-
40
-
41
-
42
-
43
-
44
 |
 |

23
20
19
A
19
Operate your sewing machine
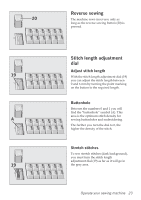
Reverse sewing
The machine sews in reverse only as
long as the reverse sewing button (20) is
pressed.
Stitch length adjustment
dial
Adjust stitch length
With the stitch length adjustment dial (19)
you can adjust the stitch length between
0 and 6 mm by turning the point marking
on the button to the required length.
Buttonhole
Between the numbers 0 and 1 you will
À
nd the “buttonhole” symbol (A). This
area is the optimum stitch density for
sewing buttonholes and embroidering.
The further you turn the dial to 0, the
higher the density of the stitch.
Stretch stitches
To sew stretch stitches (dark background),
you must turn the stitch length
adjustment dial (19) as far as it will go in
the grey area.