Pfaff smart 350p Owner's Manual - Page 9
Start Embellishing - felting embellisher
 |
View all Pfaff smart 350p manuals
Add to My Manuals
Save this manual to your list of manuals |
Page 9 highlights
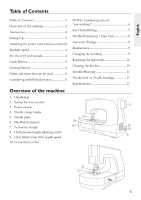
English Start Embellishing Layer the project fabric with the material that will be felted together to create the embellishment. Make sure that the smaller piece to be felted is on the correct side of the project (right or wrong side). The embellishing fabric can be put on either the right or the wrong side of the project. Experiment first on scraps to see which look you like best for your project. Place the layers to be felted together under the clear fabric cover with needle guard. Adjust the height if you need to at this time so the project can move freely under the clear fabric cover with needle guard (see page 3). Move the fabric in any direction so the needles can mesh the layers together. When you have finished embellishing the needle stop position will automatically be up and out of the project. Because the needles always stop in the highest up position, your projects are very easy to place into the felting area and very easy to remove. You will never break needles placing or removing your project. 7
-
 1
1 -
2
-
3
-
 4
4 -
 5
5 -
 6
6 -
 7
7 -
 8
8 -
 9
9 -
 10
10 -
 11
11 -
 12
12 -
 13
13 -
 14
14 -
15
-
16
-
17
-
18
-
19
-
20
-
21
-
22
-
23
-
24
-
25
-
26
-
27
-
28
-
29
-
30
-
31
-
32
-
33
-
34
-
35
-
36
-
37
-
38
-
39
-
40
-
41
-
42
-
43
-
44
-
45
-
46
-
47
-
48
-
49
-
50
-
51
-
52
-
53
-
54
-
55
-
56
 |
 |
